
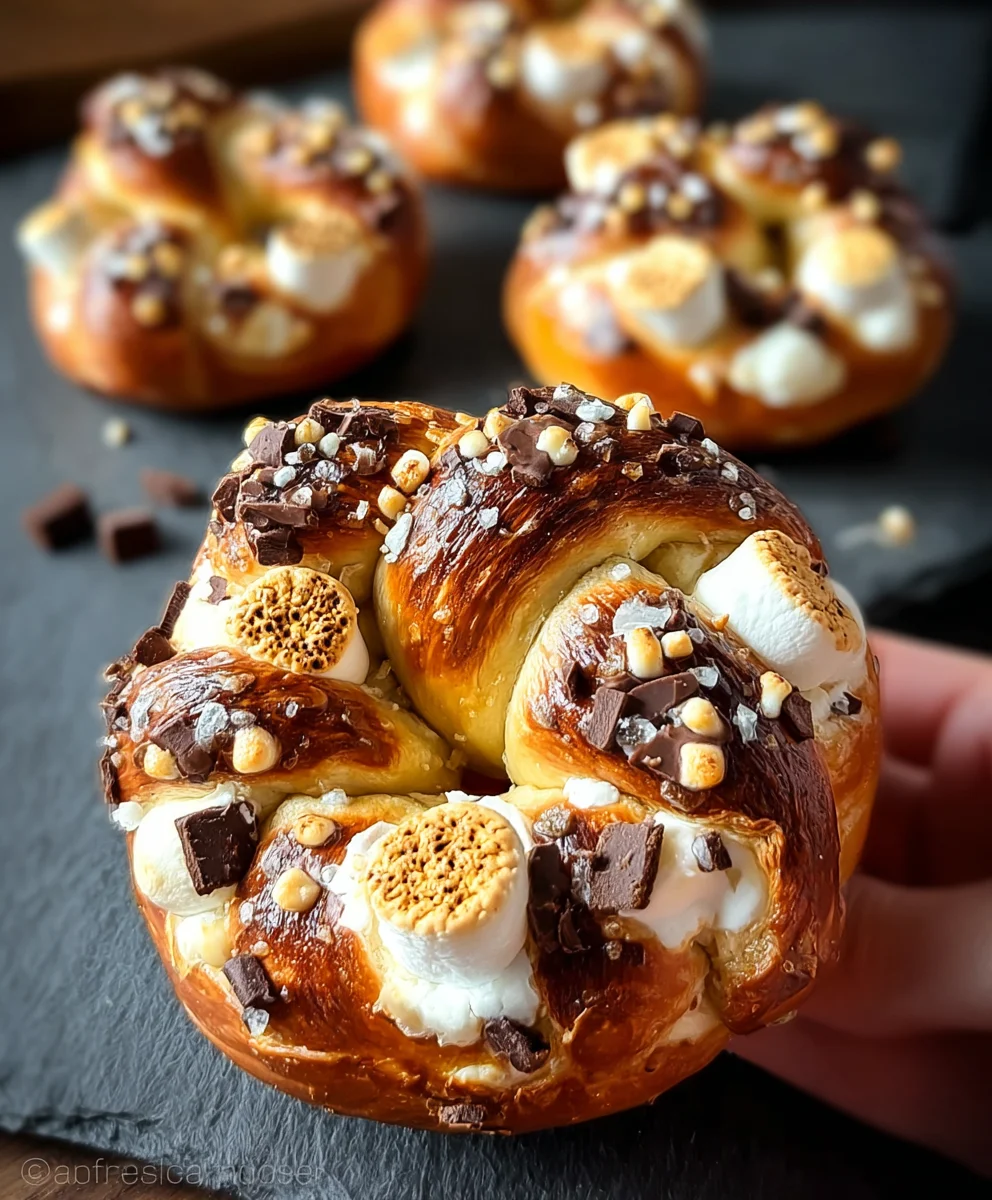
Smores Stuffed Pretzels represent the ultimate fusion of classic campfire nostalgia and a beloved salty snack, creating a treat so irresistibly unique, it’s destined to become your new favorite. I remember the pure joy of crafting a perfect s’more by the fire, that gooey marshmallow, melted chocolate, and crisp graham cracker creating a symphony of textures and flavors. Now, imagine taking that quintessential outdoor experience and elevating it with the delightful crunch and savory notes of a pretzel. It’s an ingenious twist that marries the familiar with the exciting.
The history of s’mores is deeply rooted in American camping culture, a simple yet profoundly satisfying dessert that has brought smiles to generations. Pretzels, on the other hand, boast a rich European heritage, evolving into a beloved snack around the world. What I find truly fascinating about this recipe is how it bridges these two distinct culinary worlds, transforming them into something entirely novel. It’s not just a snack; it’s a creative reinterpretation that respects its origins while pushing boundaries.
People absolutely adore this dish because it delivers an unparalleled sensory experience. Each bite of these Smores Stuffed Pretzels offers a harmonious blend of sweet, salty, gooey, and crunchy – a dynamic contrast that keeps you reaching for more. The molten marshmallow and chocolate provide that luxurious melt, perfectly balanced by the pretzel’s hearty crunch and subtle saltiness. It’s wonderfully convenient to prepare, making it an ideal treat for gatherings, movie nights, or simply when you crave a little moment of bliss. I truly believe you’ll find this innovative take on s’mores an unforgettable delight!
Ingredients:
- For the Pretzel Dough:
- 1 ½ cups warm water (about 105-115°F / 40-46°C) – The ideal temperature is crucial for activating the yeast. Too hot, and you kill it; too cold, and it won’t activate properly.
- 1 tablespoon active dry yeast – Ensure your yeast is fresh! An old batch can ruin your dough’s rise.
- 1 teaspoon granulated sugar – This is the yeast’s first meal, helping it spring to life.
- 4 ½ cups (about 540g) all-purpose flour, plus more for dusting – I always recommend having a little extra on hand for kneading.
- 2 teaspoons fine sea salt – Don’t skimp on the salt; it’s essential for flavor and regulating yeast activity.
- ¼ cup unsalted butter, melted and cooled slightly – Adds richness and tenderness to our “Smores Stuffed Pretzels”.
- For the S’mores Filling:
- 1 ½ cups mini marshmallows – Regular size works too, but mini marshmallows melt more evenly and distribute better inside our pretzels.
- 1 cup milk chocolate chips or chopped milk chocolate bar – High-quality chocolate makes all the difference here. Consider a bar meant for eating rather than just baking chips for a superior melt.
- ¾ cup graham cracker crumbs – You can buy these pre-crushed or easily make them yourself by crushing whole graham crackers.
- For the Baking Soda Bath:
- 10 cups water – For our boiling bath.
- ½ cup baking soda – This alkaline bath is what gives pretzels their signature dark crust and chewy texture.
- For the Topping and Finish:
- 1 large egg, beaten – This egg wash gives our “Smores Stuffed Pretzels” that beautiful golden sheen.
- 2 tablespoons coarse pretzel salt or flaky sea salt – For that classic pretzel finish.
- Optional: Extra graham cracker crumbs for sprinkling on top.
Preparing the Pretzel Dough: The Foundation of Our Smores Stuffed Pretzels
- Activate the Yeast: In a large mixing bowl (or the bowl of your stand mixer), combine the warm water and granulated sugar. Sprinkle the active dry yeast over the top. Give it a gentle stir and then let it sit undisturbed for about 5-10 minutes. You’re looking for a foamy, bubbly layer to form on the surface – this indicates your yeast is alive and ready to work its magic. If you don’t see any foam, your yeast might be old, or your water wasn’t the right temperature, and it’s best to start again with fresh yeast. A vigorous foam is your green light!
- Combine Dry Ingredients: While the yeast is activating, in a separate medium bowl, whisk together the all-purpose flour and fine sea salt. This ensures the salt is evenly distributed throughout the dough.
- Mix Wet and Dry: Once your yeast is nice and foamy, pour in the melted and slightly cooled unsalted butter into the yeast mixture. Then, gradually add the flour mixture to the wet ingredients, a cup at a time, mixing on low speed with a dough hook attachment (if using a stand mixer) or with a sturdy wooden spoon until a shaggy dough forms.
-
Knead the Dough:
- Stand Mixer Method: Increase the mixer speed to medium-low and knead for about 8-10 minutes. The dough should gather around the hook and pull cleanly away from the sides of the bowl. It will become smooth, elastic, and springy.
- Hand Kneading Method: Turn the shaggy dough out onto a lightly floured surface. Knead by hand for 10-15 minutes. Use the heel of your hand to push the dough away from you, fold it back, rotate it a quarter turn, and repeat. Continue until the dough is smooth, elastic, and has a good bounce-back when you gently poke it. This vigorous kneading is critical for developing the gluten structure, which gives pretzels their characteristic chew. Don’t skip this step – it’s crucial for the texture of your Smores Stuffed Pretzels.
- First Rise: Lightly grease a clean large bowl with a little oil or cooking spray. Place the kneaded dough into the bowl, turning it once to coat the entire surface with oil. Cover the bowl tightly with plastic wrap or a clean kitchen towel. Let the dough rise in a warm, draft-free place for 1 to 1 ½ hours, or until it has roughly doubled in size. The warmth helps the yeast to ferment efficiently, creating those lovely air pockets.
Preparing the S’mores Filling: The Heart of Our “Smores Stuffed Pretzels”
- Prepare Graham Cracker Crumbs: If you’re not using pre-crushed crumbs, place whole graham crackers in a resealable plastic bag and crush them using a rolling pin until fine crumbs are formed. Alternatively, pulse them in a food processor. You want a consistent, fine crumb texture.
- Mix the Filling: In a medium bowl, gently combine the mini marshmallows, milk chocolate chips (or chopped chocolate), and graham cracker crumbs. This ensures an even distribution of all the wonderful s’mores elements when you stuff your pretzels. Set aside, ready for assembly.
Assembling and Shaping the Smores Stuffed Pretzels
- Punch Down the Dough: Once the dough has doubled in size, gently punch it down to release the air. Turn the dough out onto a lightly floured surface.
- Divide the Dough: Divide the dough into 12 equal pieces. For accuracy, you can weigh the entire dough ball and then divide that weight by 12 to get the precise weight for each piece. This helps ensure all your “Smores Stuffed Pretzels” bake evenly.
-
Shape and Fill Each Pretzel:
- Take one piece of dough and, on a lightly floured surface, roll it out into an oval or rectangle, roughly 5-6 inches long and 3-4 inches wide. You want the dough to be about ¼-inch thick.
- Spoon a generous tablespoon (or slightly more) of the S’mores filling mixture onto the center of the rolled-out dough. Try to keep the filling somewhat contained in a log shape in the middle, leaving a border around the edges. Be careful not to overfill, as this can lead to leaks during baking.
- Gently fold one long edge of the dough over the filling, bringing it to meet the opposite long edge. Press the edges together firmly to seal the filling inside, creating a log or calzone-like shape. Take your time with this step, ensuring a very tight seal. Any gaps will allow the marshmallow and chocolate to escape.
- Once sealed, gently pinch and roll the ends to fully enclose the filling and create a neat, somewhat rounded “Smores Stuffed Pretzel” log. You can even give it a slight curve if you like, reminiscent of a traditional pretzel shape, but the log or bun shape is usually easier for stuffing.
- Repeat this process with the remaining dough pieces and filling. As you finish shaping each one, place it on a parchment-lined baking sheet, leaving a little space between them.
The Caustic Bath: The Signature Pretzel Treatment
- Prepare the Bath: Preheat your oven to 450°F (230°C). Line two large baking sheets with parchment paper or silicone baking mats. In a large, wide pot (like a Dutch oven), bring 10 cups of water to a rolling boil. Once boiling, carefully and slowly add the ½ cup of baking soda. Be cautious, as the mixture will foam up significantly! Reduce the heat to a simmer once it settles.
- Dip the Pretzels: Using a large slotted spoon or spider strainer, carefully lower one or two of your “Smores Stuffed Pretzels” at a time into the simmering baking soda bath. Let them simmer for about 20-30 seconds per side, so a total of 40-60 seconds. This short bath is what gives pretzels their distinct dark brown crust and chewy texture. Do not overcrowd the pot.
- Drain and Transfer: Carefully remove the pretzels from the bath, allowing excess liquid to drain off. This is a vital step as too much liquid can prevent proper browning. Transfer the dipped pretzels to your prepared baking sheets, ensuring they are spaced apart.
Baking the Smores Stuffed Pretzels
- Egg Wash and Season: In a small bowl, lightly beat the large egg. Using a pastry brush, generously brush the tops and sides of each “Smores Stuffed Pretzel” with the egg wash. This will give them a beautiful shine and help the coarse salt adhere. Immediately sprinkle the tops with the coarse pretzel salt. If you’re feeling extra indulgent, now is the time to sprinkle a few more graham cracker crumbs on top for added texture and a visual cue of the deliciousness within.
- Bake to Golden Perfection: Place the baking sheets in the preheated oven. Bake for 12-18 minutes, rotating the trays halfway through, until the “Smores Stuffed Pretzels” are deep golden brown and look absolutely irresistible. The exact baking time may vary depending on your oven, so keep a close eye on them, especially after the 12-minute mark. You want a robust golden color, not just a light tan, to achieve that authentic pretzel character. Don’t be alarmed if a little chocolate or marshmallow peeks out; it just adds to the rustic charm!
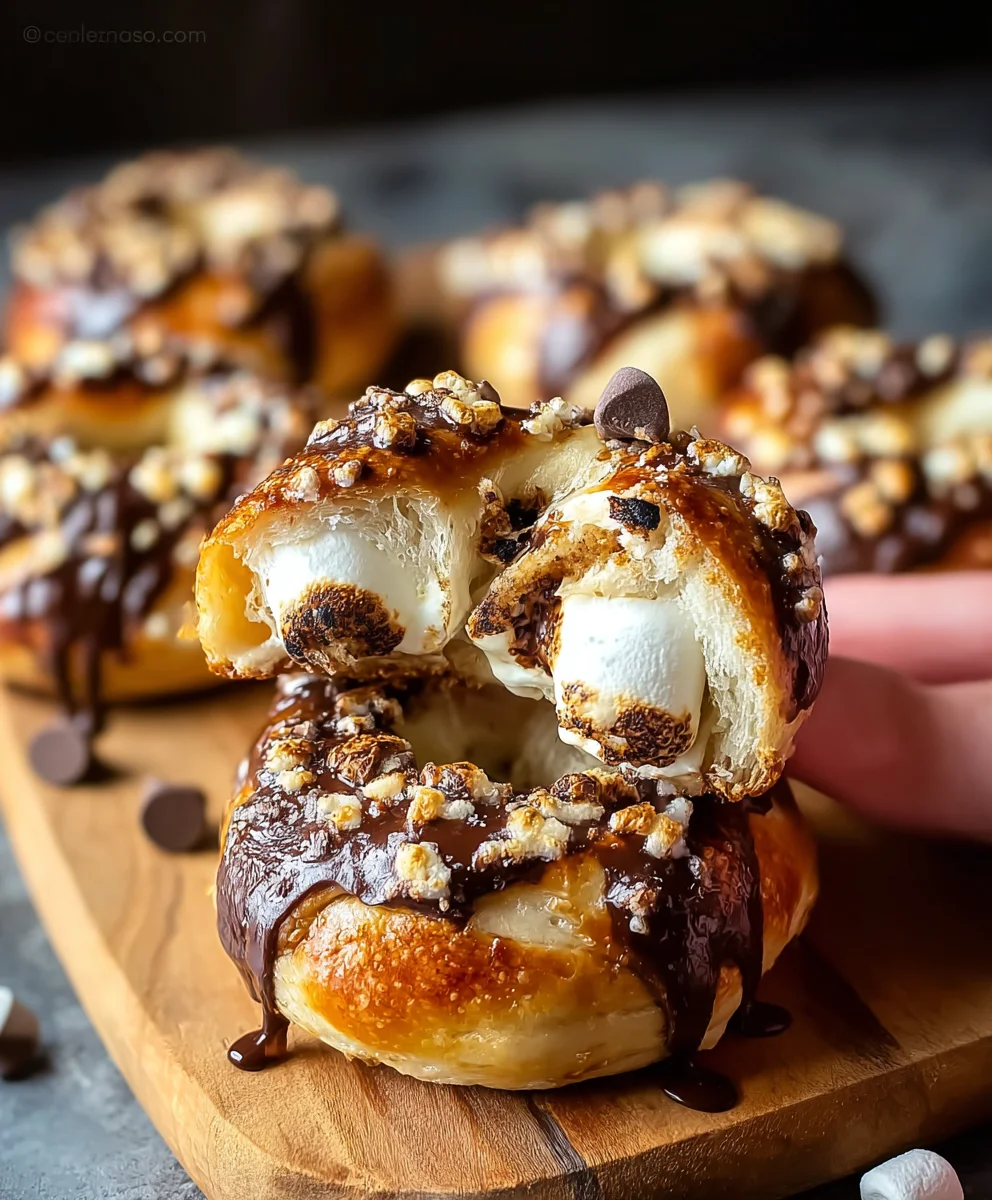
- Cooling: Once baked, carefully transfer the “Smores Stuffed Pretzels” to a wire cooling rack. Allow them to cool for at least 15-20 minutes before serving. While it’s tempting to dig in immediately, the filling will be molten hot, and cooling allows the flavors to meld and the internal structure to set a bit, making them easier and safer to eat.
- Serving Suggestions: Serve these warm, melty, and utterly delightful “Smores Stuffed Pretzels” as a unique dessert or a special treat. They are fantastic on their own, but if you’re feeling adventurous, a light dusting of powdered sugar or a small drizzle of chocolate sauce could elevate them even further. They are best enjoyed the day they are made, savoring that perfect contrast of chewy pretzel exterior and gooey s’mores interior.
Conclusion:
Well, my friends, we’ve reached the sweet, salty, and utterly satisfying end of our journey through this incredible recipe. If there’s one thing I want you to take away from our time together, it’s that life is too short for boring snacks. And with this recipe, boring is simply not an option. We’re talking about a culinary creation that expertly marries the classic campfire delight with the beloved crunchy, salty pretzel, resulting in something truly extraordinary. These are not just treats; they’re an experience, a moment of pure, unadulterated joy that you can create right in your own kitchen.
I genuinely believe that the Smores Stuffed Pretzels are an absolute game-changer. Why are they a must-try? Let me count the ways! First, the sheer simplicity of the process is a huge win. You don’t need to be a pastry chef to achieve perfection here; just a little enthusiasm and a few basic ingredients are all it takes. Second, the flavor profile is out of this world. That golden-brown, lightly salted pretzel exterior, giving way to a warm, gooey center of melted chocolate and toasted marshmallow – it’s a symphony for your taste buds. The unexpected combination of textures and temperatures is what makes these so captivating and utterly addictive. They hit every note: sweet, salty, crunchy, chewy, and irresistibly gooey. It’s a unique fusion that will surprise and delight anyone who takes a bite, making them an instant crowd-pleaser for any gathering.
Now, let’s talk about how and when to enjoy these magnificent creations. While they are undeniably perfect straight out of the oven, still warm and yielding, they also hold up beautifully at room temperature, making them ideal for so many occasions. Imagine serving these as a delightful addition to your dessert spread at your next potluck or family gathering. They make fantastic party favors, individually wrapped and tied with a cute ribbon, or a thoughtful homemade gift for friends and neighbors. I love to pair them with a robust cup of coffee for an indulgent morning treat, or alongside a steaming mug of hot cocoa on a chilly evening. For an extra special touch, try them as a topping for a scoop of vanilla bean ice cream – the warm, gooey pretzel melting slightly into the cold ice cream is pure bliss!
Endless Possibilities for Customization!
But the fun doesn’t stop there! One of the things I adore most about this recipe is its incredible versatility. You can truly make it your own with just a few simple tweaks. Let’s explore some delicious variations:
- Chocolate Choices: Don’t feel limited to milk chocolate! Experiment with dark chocolate for a more intense, sophisticated flavor, or try white chocolate for a creamier, sweeter profile. Peanut butter chips, caramel bits, or even a mix of different chocolates can also create exciting new dimensions.
- Marshmallow Magic: While classic mini marshmallows are wonderful, consider flavored marshmallows (like strawberry or chocolate) for a twist. If you’re feeling ambitious, use larger marshmallows cut into smaller pieces and give them an extra torching for that authentic campfire char.
- Added Fillings: Before adding the marshmallow, try a tiny dollop of peanut butter inside for a S’mores-Reese’s mashup, or a touch of a fruit preserve for a sweet and tangy surprise. A thin sliver of a different candy bar could also be a fun experiment!
- Drizzle & Dip: After baking, you can drizzle extra melted chocolate (white, dark, or milk) over the cooled pretzels, or even a zigzag of caramel sauce. A sprinkle of flaky sea salt on top of the fresh chocolate drizzle really elevates the flavor.
- Topping Extravaganza: Before the chocolate sets, roll the edges in crushed graham cracker crumbs for a full S’mores effect, colorful sprinkles for a festive look, finely chopped nuts for extra crunch, or even shredded coconut for a tropical vibe.
Don’t Just Dream About Them – Make Them!
Seriously, I cannot stress this enough: please, please, please give this recipe a try! I promise you won’t regret it. It’s a wonderful way to bring a little bit of magic into your day, to treat yourself, or to show someone you care with a homemade delight. The process is incredibly rewarding, and the results are utterly delicious. And once you’ve whipped up your batch of these amazing treats, I would absolutely love to hear about your experience!
Did you try a fun variation? What did your family and friends think? Did they disappear faster than you could say “S’mores Stuffed Pretzels”? Share your stories, your tips, and especially your photos! Tag me on social media or leave a comment below. Your culinary adventures inspire me, and I can’t wait to see all the deliciousness you create. Happy baking, and enjoy every last sweet and salty bite!
Baked S’mores Stuffed Pretzels: Ultimate Dessert Mashup!
S’mores Stuffed Pretzels are the ultimate fusion of classic campfire nostalgia and a beloved salty snack, creating an irresistibly unique treat. This recipe bridges two distinct culinary worlds, offering a harmonious blend of sweet, salty, gooey, and crunchy in every bite. Perfect for gatherings, movie nights, or a blissful moment.
Ingredients
-
1 ½ cups warm water
-
1 tbsp active dry yeast
-
1 tsp granulated sugar
-
4 ½ cups all-purpose flour
-
2 tsp fine sea salt
-
¼ cup unsalted butter, melted
-
1 ½ cups mini marshmallows
-
1 cup milk chocolate chips
-
¾ cup graham cracker crumbs
-
8 cups water (for bath)
-
½ cup baking soda
-
1 large egg, beaten
-
2 tbsp coarse pretzel salt
-
Optional: Extra graham cracker crumbs
Instructions
-
Step 1
In a large bowl, combine warm water, granulated sugar, and yeast. Let sit 5-10 minutes until foamy. -
Step 2
Whisk flour and fine sea salt in a separate bowl. Add melted butter to yeast mixture, then gradually add flour mixture, mixing until a shaggy dough forms. Knead dough (8-10 min with stand mixer or 10-15 min by hand) until smooth and elastic. -
Step 3
Lightly grease a bowl, place dough, cover, and let rise in a warm, draft-free place for 1 to 1 ½ hours, or until doubled in size. -
Step 4
If needed, crush graham crackers into fine crumbs. In a medium bowl, gently combine mini marshmallows, milk chocolate chips, and graham cracker crumbs. Set aside. -
Step 5
Punch down dough and divide into 12 equal pieces. Roll each piece into a 5-6 inch long, 3-4 inch wide oval/rectangle (¼-inch thick). Spoon about 1 tablespoon of S’mores filling onto the center. Fold one long edge over the filling to meet the opposite edge, pressing firmly to seal. Pinch and roll the ends to fully enclose the filling, forming a log or bun shape. Place on parchment-lined baking sheets. -
Step 6
Preheat oven to 450°F (230°C). Line two large baking sheets with parchment paper. In a large pot, bring 8 cups of water to a rolling boil. Carefully add ½ cup baking soda (it will foam). Reduce heat to a simmer. -
Step 7
Carefully lower 1-2 pretzels into the simmering baking soda bath. Boil each pretzel for 30 seconds on each side. Remove, allowing excess liquid to drain, then transfer to prepared baking sheets. -
Step 8
Brush the tops and sides of each pretzel with beaten egg. Immediately sprinkle with coarse pretzel salt and optional extra graham cracker crumbs. -
Step 9
Bake for 12-18 minutes at 450°F (230°C), rotating trays halfway through, until deep golden brown. -
Step 10
Transfer baked pretzels to a wire cooling rack. Allow to cool for at least 15-20 minutes before serving. Best enjoyed warm on the day they are made.
Important Information
Nutrition Facts (Per Serving)
It is important to consider this information as approximate and not to use it as definitive health advice.
Allergy Information
Please check ingredients for potential allergens and consult a health professional if in doubt.
Leave a Comment