
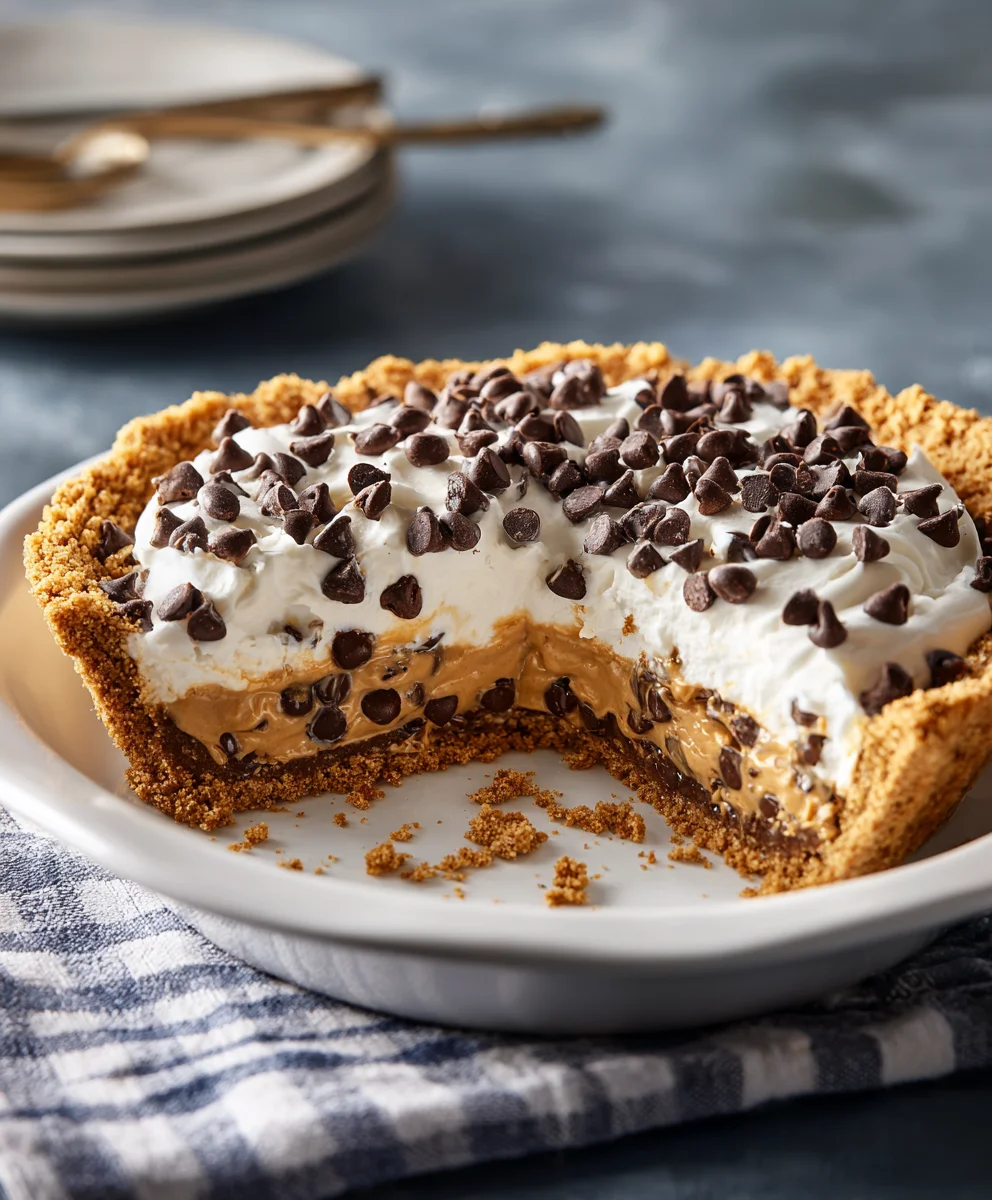
Chocolate Chip Peanut Butter Pie – just hearing those words evokes a symphony of indulgence, doesn’t it? I’ve always believed that some food combinations are simply destined for greatness, and few rival the timeless pairing of rich chocolate and creamy peanut butter. This isn’t just a dessert; it’s a celebration of two beloved American staples coming together in perfect harmony, a testament to the fact that some flavors are simply meant to be. The comforting allure of peanut butter combined with the luxurious richness of chocolate has captivated taste buds for generations, creating a nostalgic foundation for this spectacular dessert.
Imagine a velvety smooth, melt-in-your-mouth peanut butter filling, generously studded with decadent chocolate chips, all nestled within a crisp, buttery crust. It’s a masterpiece of contrasting yet complementary flavors and textures that dance on your palate. For me, there’s an almost nostalgic comfort in every bite. It brings back cherished memories of childhood treats, yet it’s sophisticated enough for any special occasion or elegant dinner party. That’s precisely why the Chocolate Chip Peanut Butter Pie has earned a cherished spot in countless hearts and at countless dessert tables – its irresistible taste, satisfying texture, and sheer convenience make it a crowd-pleaser every single time.
Whether you’re a lifelong devotee of peanut butter cups or simply seeking a dessert that promises pure, unadulterated bliss, prepare to fall head over heels. I’m thrilled to guide you through crafting this irresistible treat, ensuring every slice is a moment of pure joy.
Ingredients:
- For the Chocolate Cookie Crust:
- 1 ½ cups (about 18-20 cookies) chocolate sandwich cookies (like Oreos, crushed finely)
- ¼ cup (4 tablespoons) unsalted butter, melted
- For the Irresistible Peanut Butter Filling:
- 1 cup (2 sticks) unsalted butter, softened to room temperature
- 1 cup creamy peanut butter (I always go for the classic Jif or Skippy for this recipe; avoid natural, oily peanut butter as it can affect texture)
- 2 ½ cups powdered sugar, sifted
- ½ cup whole milk
- 1 teaspoon pure vanilla extract
- 1 (8 ounce) package cream cheese, softened to room temperature (full-fat works best for richness and stability)
- 1 (8 ounce) container frozen whipped topping (like Cool Whip), thawed in the refrigerator
- ½ cup mini chocolate chips (for mixing into the filling)
- For the Silky Chocolate Ganache Topping:
- 1 cup semi-sweet chocolate chips (good quality ones make a difference!)
- ½ cup heavy cream (also known as whipping cream)
- For Garnish (Optional but Highly Recommended!):
- Additional mini chocolate chips or chocolate shavings
- A few dollops of reserved whipped topping or freshly made whipped cream
- Chopped roasted peanuts
Prepare the Chocolate Cookie Crust
Oh, this crust is where the magic truly begins! It’s the perfect crunchy foundation for our dreamy Chocolate Chip Peanut Butter Pie. It’s incredibly simple to make, but a few key steps will ensure it’s absolutely perfect.
- First things first, let’s get those chocolate sandwich cookies crushed. You want them to be very fine, almost like sand. I find the easiest way to do this is in a food processor. Just toss in the whole cookies – no need to scrape out the cream filling, it adds to the richness! Pulse them until they’re a consistent, fine crumb. If you don’t have a food processor, no worries! Place the cookies in a large zip-top bag, seal it, and use a rolling pin or the bottom of a heavy pan to crush them. Make sure to really pound and roll until there are no large chunks left.
- Once your cookie crumbs are ready, transfer them to a medium-sized mixing bowl.
- Now, melt your ¼ cup of unsalted butter. You can do this in a microwave-safe bowl in 15-second intervals, stirring in between, or in a small saucepan over low heat. Just make sure it’s completely melted and smooth.
- Pour the melted butter over the chocolate cookie crumbs. Using a fork or your clean hands, mix the butter and crumbs together until they are thoroughly combined. The mixture should resemble wet sand and hold together when you press it. This melted butter acts as the binder, holding all those delicious crumbs together, so don’t skimp on mixing!
- Pressing the Crust: Transfer the crumb mixture into a 9-inch pie plate. Now comes the important part: pressing it down firmly and evenly. Start by pressing the mixture into the bottom of the pie plate, using the flat bottom of a measuring cup or your knuckles. Then, work your way up the sides of the pie plate, creating a nice, uniform crust edge. The goal here is an even thickness all around, which prevents some parts from being too dense or too crumbly. This firmness is crucial for a crust that won’t fall apart when you slice into your magnificent pie.
- Bake or Chill: For an extra sturdy crust, I love to bake it for a short period. Pop the pie plate with the crust into a preheated oven at 350°F (175°C) for about 8-10 minutes. This helps to set the butter and makes the crust wonderfully crisp. Alternatively, if you prefer a no-bake route, you can place the pie plate in the freezer for at least 15-20 minutes to firm up. I personally find the short bake makes a superior crust.
- Once baked (if you chose that route), let the crust cool completely on a wire rack before moving on. A warm crust will melt our next delicious layer, and we definitely don’t want that!
Whip Up the Irresistible Peanut Butter Filling
Ah, the heart of our Chocolate Chip Peanut Butter Pie! This filling is outrageously creamy, lusciously rich, and has that perfect balance of sweet and salty. Getting the right texture is key here, so pay close attention to the mixing steps!
- In a large mixing bowl, using an electric mixer (either a stand mixer with a paddle attachment or a hand mixer), combine your softened unsalted butter and creamy peanut butter. It’s absolutely essential that both the butter and the peanut butter are at room temperature. Cold butter won’t cream properly, and cold peanut butter will be stiff and difficult to incorporate smoothly. Beat them together on medium speed until the mixture is incredibly light and fluffy, almost cloud-like, ensuring all ingredients are fully incorporated and the color has lightened significantly. This aeration is key to a truly decadent filling, so don’t rush this step; it usually takes about 3-5 minutes.
- Next, add the softened cream cheese to the butter and peanut butter mixture. Continue beating on medium speed until everything is perfectly smooth and no lumps of cream cheese remain. This addition provides a delightful tang and helps to stabilize our rich filling, preventing it from being overly sweet or too greasy. Scrape down the sides of the bowl as needed to ensure everything is evenly mixed.
- Gradually add the sifted powdered sugar to the mixture, one cup at a time, beating well after each addition. Start on low speed to avoid a “sugar cloud” in your kitchen, then increase to medium. Sifting the powdered sugar beforehand is a small but mighty step that prevents any lumps from forming, ensuring a silky-smooth filling.
- Pour in the whole milk and vanilla extract. Continue beating on medium speed until the mixture is fully combined and looks beautifully smooth and creamy. It should be thick, but still very spreadable.
- Now, for the secret to that ethereal lightness: gently fold in the thawed whipped topping. This step needs to be done by hand with a rubber spatula, not your electric mixer. Mixing the whipped topping too vigorously will deflate it, and we want to preserve as much of that lovely airiness as possible. Fold it in until just combined, being careful not to overmix. You’ll see the filling transform into an even lighter, fluffier consistency.
- Finally, stir in your ½ cup of mini chocolate chips. These little pockets of chocolate will be distributed throughout every bite of the creamy peanut butter filling, adding texture and reinforcing the “Chocolate Chip” part of our pie’s name. Give it a gentle stir until they are evenly dispersed.
Craft the Silky Chocolate Ganache Layer
No Chocolate Chip Peanut Butter Pie would be complete without a luscious layer of chocolate, and a homemade ganache is the absolute pinnacle. It’s rich, glossy, and provides the perfect counterpoint to the sweet and salty peanut butter. It might sound fancy, but it’s surprisingly simple to make!
- In a medium, microwave-safe bowl, combine your semi-sweet chocolate chips and heavy cream. Using good quality chocolate chips here really makes a difference in the flavor and smoothness of your ganache.
- Heat the mixture in the microwave in 30-second intervals, stirring thoroughly after each interval. It’s crucial to stir well even if it doesn’t look like much is happening at first. The residual heat will continue to melt the chocolate. Continue until the chocolate chips are almost entirely melted and the mixture is very warm. Alternatively, you can heat the heavy cream in a small saucepan until it just begins to simmer around the edges (don’t boil it!), then pour it over the chocolate chips in a heat-proof bowl. Let it sit for 5 minutes without stirring.
- Regardless of your heating method, after the initial heating, let the mixture sit for 2-3 minutes to allow the chocolate to fully soften in the warm cream.
- Now, begin to stir the mixture gently with a spoon or a small whisk, starting from the center and working your way outwards. You’ll witness a magical transformation as the chocolate and cream emulsify into a gloriously smooth, shiny, and utterly irresistible ganache. Keep stirring until there are absolutely no lumps and the ganache is completely uniform and glossy.
- Cooling is Key: It’s important to let the ganache cool slightly before pouring it over the peanut butter filling. If it’s too hot, it could melt the filling below, creating a messy situation. Let it sit at room temperature for about 10-15 minutes, stirring occasionally, until it’s still pourable but has thickened slightly and isn’t steaming hot. It should be warm to the touch, but not hot. This will ensure a beautiful, even layer that sets perfectly.
Assemble and Chill Your Divine Chocolate Chip Peanut Butter Pie
We’re in the home stretch! The assembly is quick, but the chilling is paramount. Patience here will be rewarded with perfectly set slices of pure indulgence.
- Retrieve your cooled chocolate cookie crust from the oven or freezer. Ensure it’s completely cool before proceeding.
- Carefully spoon the entire peanut butter filling mixture into the cooled pie crust. Use an offset spatula or the back of a spoon to gently spread the filling evenly across the bottom and up to the edges of the crust. Take your time to make it smooth and level, creating a beautiful base for our ganache.
- Now, gently pour the slightly cooled chocolate ganache over the peanut butter filling. You can gently tilt the pie plate to help the ganache spread evenly over the entire surface, creating a beautiful, glossy layer. Resist the urge to spread it with a spatula, as this can disturb the peanut butter layer underneath. The ganache will settle beautifully on its own.
- The Crucial Chill: This is arguably the most important step for a pie that holds its shape. Place the pie in the refrigerator to chill for at least 4-6 hours, but ideally overnight. This extended chilling time allows the peanut butter filling to firm up completely and the ganache to set into a sliceable, yet still soft, layer. Trying to cut it too soon will result in a glorious, but messy, puddle. I often make this pie the day before I plan to serve it.
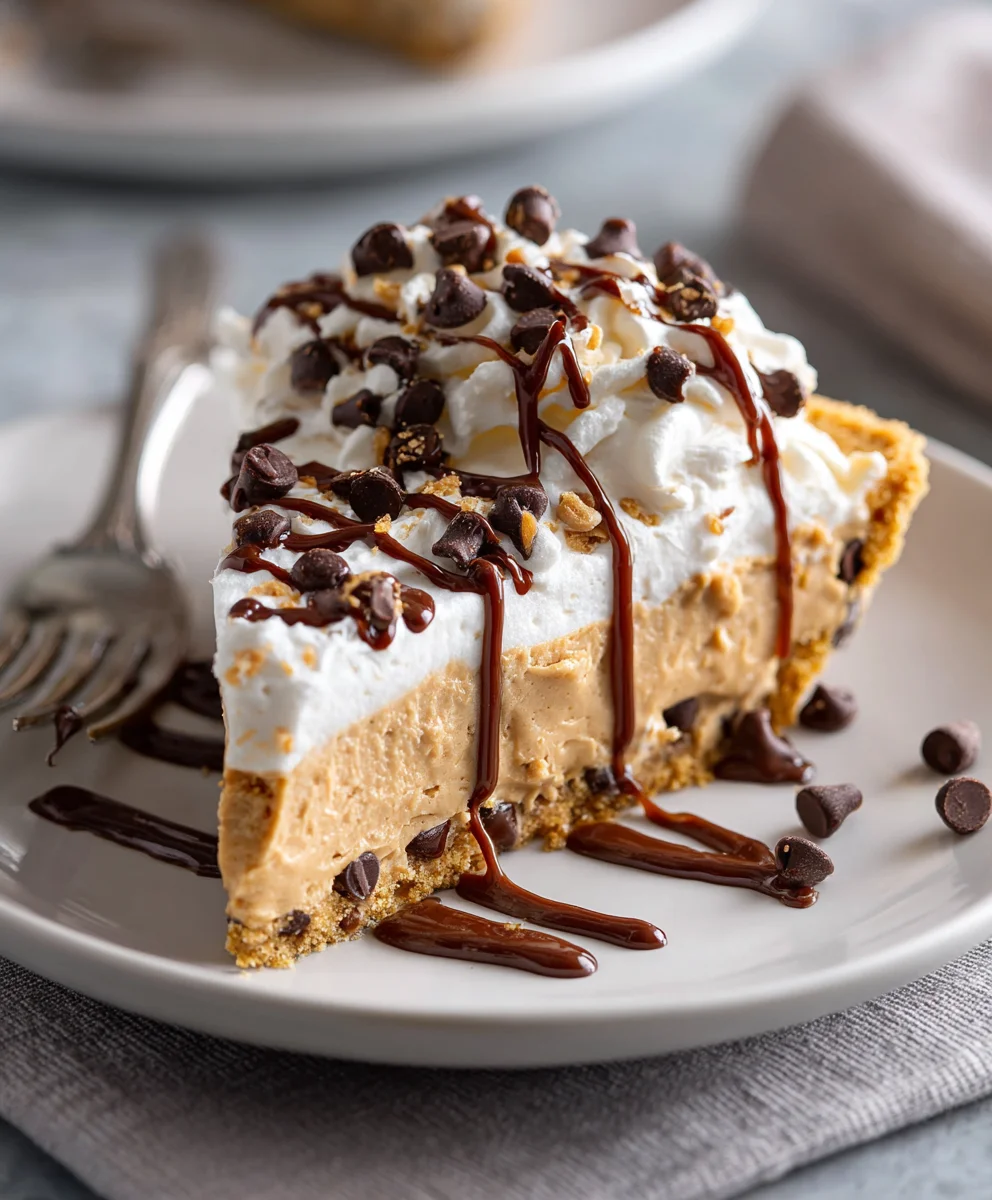
- Garnish Time (Optional, but Fun!): Once the pie is fully chilled and set, it’s time to add those delightful finishing touches. Before serving, you can sprinkle additional mini chocolate chips, curl some chocolate shavings, or dollop on some extra whipped cream around the edges. A sprinkle of chopped roasted peanuts can also add a lovely texture and intensify the peanut flavor. This is your chance to make it look as irresistible as it tastes!
Serving Suggestions and Storage Tips
After all that meticulous effort, you’re just moments away from enjoying a slice of pure bliss! Here are a few tips to ensure your Chocolate Chip Peanut Butter Pie experience is absolutely perfect, from the first slice to the last.
- Slicing for Perfection: When you’re ready to serve, take the pie out of the refrigerator and let it sit at room temperature for about 10-15 minutes. This allows the ganache and filling to soften just slightly, making for easier, cleaner cuts. For the cleanest slices, use a sharp, thin-bladed knife. I recommend dipping your knife in hot water and wiping it clean between each slice. This simple trick prevents the ganache from sticking and dragging, giving you those picture-perfect pieces everyone will admire.
- Ideal Temperature: While the pie needs to be well-chilled to set, serving it slightly less cold can enhance its flavors. The subtle warmth allows the chocolate and peanut butter notes to truly shine through, providing a richer, more nuanced taste experience.
- Pairing Suggestions: This pie is incredibly rich and satisfying on its own, but it pairs wonderfully with a simple cup of coffee or a cold glass of milk. For an extra special treat, consider serving it with a scoop of vanilla bean ice cream or a dollop of fresh whipped cream that isn’t already part of the pie. The contrast in temperatures and textures is divine!
- Storing Leftovers: If (and that’s a big “if”!) you have any leftovers, cover the pie tightly with plastic wrap or aluminum foil. You want to prevent any air from getting to it, as this can dry out the filling and affect the texture of the ganache. Store the pie in the refrigerator for up to 3-4 days. While it might last a bit longer, the texture and freshness are truly at their peak within this timeframe.
- Freezing for Later: For longer storage, this pie freezes surprisingly well! Once the pie is fully chilled and set, you can wrap individual slices or the entire pie (if you plan to eat it all at once later) in several layers of plastic wrap, followed by a layer of aluminum foil. Freeze for up to 1 month. When you’re ready to enjoy, thaw the pie in the refrigerator overnight or individual slices for a few hours. The texture might be slightly softer after freezing and thawing, but the flavor will still be fantastic.
There you have it – your complete guide to crafting an unforgettable Chocolate Chip Peanut Butter Pie. This dessert is truly a showstopper, boasting layers of rich flavor and delightful textures that are sure to impress anyone lucky enough to get a slice. Enjoy every decadent bite!
Conclusion:
So, there you have it – my cherished recipe for what I truly believe is one of life’s greatest dessert pleasures. This isn’t just any pie; it’s a symphony of textures and flavors that dance on your palate. Imagine the rich, velvety smoothness of peanut butter filling, so lusciously creamy it practically melts in your mouth, perfectly contrasted by the delightful crunch of a homemade, buttery crust. And then, the star studded throughout: those gooey, slightly melty chocolate chips, offering pockets of intense cocoa bliss in every single bite. What makes this recipe an absolute must-try, in my humble opinion, is its uncanny ability to satisfy nearly every dessert craving simultaneously. It’s sweet but not cloyingly so, rich without being overly heavy, and utterly comforting from the first forkful to the last. It’s also surprisingly straightforward to put together, defying its decadent appearance. You don’t need to be a pastry chef to achieve perfection here; just a love for incredible flavors and a willingness to create something truly special. I’ve tweaked and perfected this particular rendition over many years, ensuring that each step contributes to a flawless, irresistible treat that will undoubtedly become a staple in your dessert repertoire. The combination of classic flavors, elevated by thoughtful preparation, truly sets this Chocolate Chip Peanut Butter Pie apart from any other dessert you might have tried.
Now that you’re armed with the knowledge to create this masterpiece, let’s talk about how to truly elevate the experience. While this pie is undeniably magnificent on its own, a scoop of vanilla bean ice cream melting gently alongside a slice adds another layer of creamy indulgence that is simply divine. Or, for those who prefer a lighter touch, a generous dollop of freshly whipped cream, perhaps infused with a hint of vanilla or a touch of cocoa powder, provides a beautiful counterpoint to the pie’s richness. Don’t shy away from a dusting of finely grated dark chocolate or a drizzle of warm fudge sauce for an extra touch of decadence. Thinking about variations? Oh, the possibilities are endless! For a playful twist, consider pressing a layer of crushed pretzels into the bottom of the crust before adding the filling – the salty crunch is an unexpected, yet incredibly welcome, addition. Or, swap out some of the semi-sweet chocolate chips for white chocolate chips, dark chocolate chunks, or even mini peanut butter cups for an explosion of different chocolatey textures and flavors. If you’re hosting a gathering, consider making individual mini pies in ramekins or muffin tins; they’re incredibly cute and make for easy serving. For a seasonal touch, during the cooler months, a sprinkle of ground cinnamon or a tiny pinch of nutmeg in the crust can add a warm, inviting depth. And for a truly adult version, a very subtle splash of coffee liqueur mixed into the filling before chilling can create a sophisticated undertone that will have your guests asking for your secret. This pie is a chameleon, adapting beautifully to your personal preferences and the occasion.
I genuinely hope that you’re feeling inspired and excited to roll up your sleeves and bring this incredible dessert to life in your own kitchen. There’s something profoundly satisfying about creating something so delicious from scratch, and I promise you, the aroma alone as it chills will be enough to get your taste buds tingling with anticipation. Don’t hesitate, don’t overthink it – just gather your ingredients, follow the steps, and prepare to be amazed. This recipe is designed to be accessible and rewarding, whether you’re a seasoned baker or just dipping your toes into the world of homemade desserts. I truly believe that once you try this Chocolate Chip Peanut Butter Pie, it will earn a permanent spot in your recipe collection. And once you do, I would absolutely love to hear about your experience! Did you stick to the original, or did you venture into some of the variations I suggested? Did it become the star of your dinner party, or a comforting treat on a quiet evening? Please, come back and share your thoughts, your successes, and even your questions in the comments below. Snap a picture of your beautiful creation and share it with the world! Your feedback not only makes my day but also helps inspire other aspiring bakers in our community. Happy baking, my friends, and prepare for a dessert experience that’s truly unforgettable!
Chocolate Chip Peanut Butter Pie
A rich and creamy Chocolate Chip Peanut Butter Pie featuring a velvety smooth peanut butter filling studded with chocolate chips, nestled in a chocolate cookie crust, and topped with a silky chocolate ganache.
Ingredients
-
1 ½ cups chocolate sandwich cookies, crushed
-
¼ cup unsalted butter, melted
-
1 cup unsalted butter, softened
-
1 cup creamy peanut butter
-
2 ½ cups powdered sugar, sifted
-
½ cup whole milk
-
1 teaspoon pure vanilla extract
-
1 (8 ounce) package cream cheese, softened
-
1 (8 ounce) container frozen whipped topping, thawed
-
½ cup mini chocolate chips (for filling)
-
1 cup semi-sweet chocolate chips (for ganache)
-
½ cup heavy cream
Instructions
-
Step 1
Crush 1 ½ cups chocolate sandwich cookies finely. Mix with ¼ cup melted unsalted butter until combined. Press mixture firmly and evenly into a 9-inch pie plate. Bake at 350°F (175°C) for 8-10 minutes, or freeze for 15-20 minutes to set. Let cool completely. -
Step 2
In a large bowl, beat 1 cup softened unsalted butter and 1 cup creamy peanut butter with an electric mixer until light and fluffy (3-5 minutes). Add 8 oz softened cream cheese and beat until smooth. Gradually add 2 ½ cups sifted powdered sugar, beating after each addition. Stir in ½ cup whole milk and 1 teaspoon pure vanilla extract until smooth. Gently fold in 8 oz thawed whipped topping by hand. Stir in ½ cup mini chocolate chips. -
Step 3
Combine 1 cup semi-sweet chocolate chips and ½ cup heavy cream in a microwave-safe bowl. Heat in 30-second intervals, stirring thoroughly after each, until smooth and glossy. Alternatively, heat cream until it simmers, pour over chips, let sit 5 minutes, then stir until smooth. Let ganache cool for 10-15 minutes, stirring occasionally, until warm but not hot. -
Step 4
Spoon the peanut butter filling into the cooled pie crust; spread evenly. Gently pour the slightly cooled ganache over the filling, tilting the pie plate to spread. Refrigerate for at least 4-6 hours, or ideally overnight, until fully set. -
Step 5
Garnish with additional mini chocolate chips, chocolate shavings, or chopped roasted peanuts if desired. For clean slices, let the pie sit at room temperature for 10-15 minutes, then use a sharp knife dipped in hot water and wiped clean between each slice. Store leftovers covered in the refrigerator for 3-4 days, or freeze for up to 1 month.
Important Information
Nutrition Facts (Per Serving)
It is important to consider this information as approximate and not to use it as definitive health advice.
Allergy Information
Please check ingredients for potential allergens and consult a health professional if in doubt.

Leave a Comment