
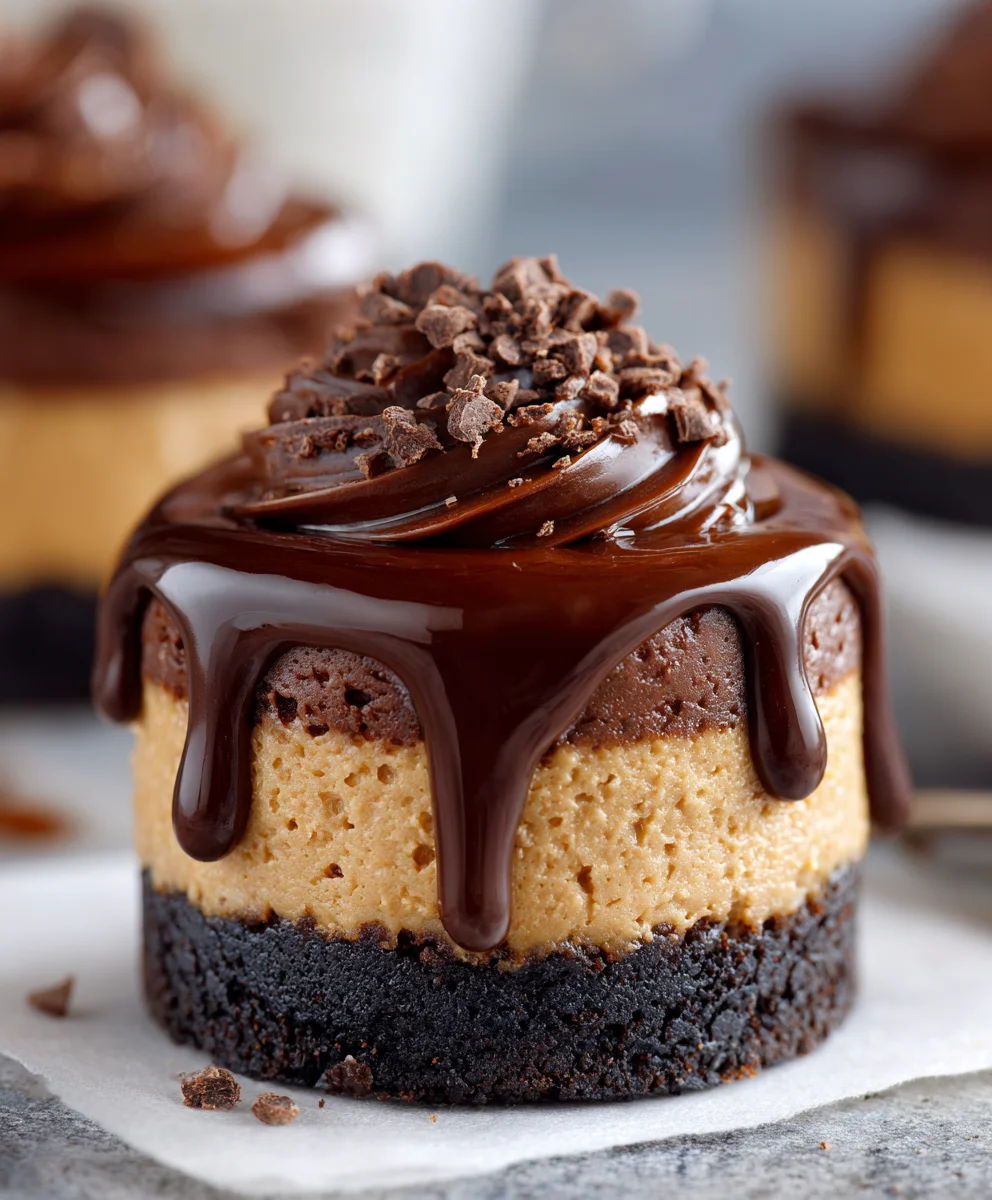
Chocolate Peanut Butter Mini Cheesecakes are truly a revelation, bringing together two of the world’s most beloved flavors into one perfectly portioned, incredibly decadent dessert. If you’ve ever found yourself torn between a rich chocolate delight and a creamy peanut butter treat, then this recipe is your dream come true. I’ve always been captivated by the magical combination of chocolate and peanut butter, a duo that has charmed taste buds for generations, evolving from simple candies to sophisticated desserts. This particular rendition elevates the classic cheesecake experience by transforming it into an individual serving of pure bliss.
People adore these mini cheesecakes not just for their undeniable flavor – the harmonious blend of sweet chocolate, savory peanut butter, and the signature tangy cream cheese – but also for their delightful texture. Each bite offers a velvety smooth filling atop a crunchy crust, a textural symphony that’s simply irresistible. Furthermore, their convenient, individual size makes them an ideal choice for entertaining, offering guests a personal dessert without the fuss of slicing. Truly, these Chocolate Peanut Butter Mini Cheesecakes are the ultimate crowd-pleaser, delivering all the luxury of a full-sized cheesecake in a charming, bite-sized package.
Ingredients:
-
For the Chocolate Cookie Crust:
- 1 ½ cups (about 180g) chocolate sandwich cookies, finely crushed (approximately 16-18 cookies, such as Oreos, with filling)
- ¼ cup (56g) unsalted butter, melted
-
For the Rich Chocolate Peanut Butter Cheesecake Filling:
- 24 ounces (680g) full-fat cream cheese, softened to room temperature
- 1 cup (200g) granulated sugar
- 2 large eggs, at room temperature
- 1 teaspoon pure vanilla extract
- 4 ounces (113g) good quality semi-sweet chocolate, melted and slightly cooled
- ½ cup (120g) creamy peanut butter, softened slightly
- 2 tablespoons powdered sugar (for peanut butter swirl)
- 1-2 tablespoons milk or cream (for peanut butter swirl)
-
For the Velvety Chocolate Ganache Topping:
- 4 ounces (113g) good quality semi-sweet chocolate chips or finely chopped chocolate
- ½ cup (120ml) heavy cream
-
For Garnish (Optional):
- Mini peanut butter cups, halved or chopped
- Additional chocolate drizzles
- Finely chopped roasted peanuts
- A sprinkle of sea salt
Preparing the Perfect Chocolate Cookie Crust
- Preheat and Prepare: First things first, let’s get our oven ready to welcome these delightful Chocolate Peanut Butter Mini Cheesecakes. Preheat your oven to a cozy 350°F (175°C). While the oven warms up, line a 12-cup standard muffin tin with paper liners. I find that using paper liners makes removing the finished cheesecakes a breeze, and they also look so charming when served.
- Crush the Cookies: Now for the fun part! Take your chocolate sandwich cookies and crush them until they resemble fine crumbs. You can do this in a few ways: either place them in a zip-top bag and smash them with a rolling pin (a great stress reliever!), or for a quicker, more uniform result, pulse them in a food processor. We’re aiming for a texture similar to fine sand, ensuring no large chunks remain so our crust is perfectly smooth.
- Combine and Press: In a medium bowl, combine your finely crushed chocolate cookie crumbs with the ¼ cup of melted unsalted butter. Stir these two ingredients together thoroughly until all the crumbs are moistened and resemble wet sand. This butter is our binding agent, ensuring our crust holds together beautifully. Once combined, spoon about one tablespoon of the mixture into the bottom of each prepared muffin liner. Using the back of a spoon, or even your fingertips, firmly press the mixture down to create an even, compact layer. A tamper designed for pie crusts works wonderfully here if you have one!
- A Quick Bake: Place the muffin tin with the pressed crusts into your preheated oven and bake for 5-7 minutes. This short bake time helps to set the crust and prevent it from becoming soggy later. You’ll notice a delightful chocolatey aroma filling your kitchen.
- Cool Down: Once baked, remove the muffin tin from the oven and set it aside on a wire rack to cool completely. It’s crucial that the crusts are cool before we add our cheesecake filling; otherwise, the heat could cause our delicate filling to become runny or crack prematurely. This also prevents the crust from becoming too soft once the filling is added, maintaining that lovely texture for our Chocolate Peanut Butter Mini Cheesecakes.
Crafting the Irresistible Cheesecake Filling
- Soften the Cream Cheese: For the silkiest, most lump-free cheesecake filling, ensure your full-fat cream cheese is at room temperature. I can’t stress this enough! If it’s too cold, you’ll end up with lumps, and no one wants lumpy cheesecake. You can let it sit out on the counter for at least an hour, or if you’re in a hurry, you can gently warm it in the microwave in short 10-15 second bursts until it’s pliable.
- Cream the Cream Cheese and Sugar: In a large mixing bowl, using an electric mixer (either a stand mixer with the paddle attachment or a hand mixer), beat the softened cream cheese on medium speed until it’s incredibly smooth and creamy, with no lumps visible. This usually takes about 2-3 minutes. Gradually add the granulated sugar, continuing to beat on medium speed for another 2-3 minutes until the mixture is light, fluffy, and the sugar is fully incorporated. Scrape down the sides of the bowl often to ensure everything is evenly mixed. This step is key to creating a truly luscious texture for your Chocolate Peanut Butter Mini Cheesecakes.
- Introduce the Eggs and Vanilla: Reduce the mixer speed to low. Add the eggs one at a time, mixing just until each egg is incorporated before adding the next. Overmixing eggs can incorporate too much air, which can lead to cracks in your cheesecakes. Follow with the vanilla extract, mixing just until combined. We’re aiming for a smooth, homogenous batter, but gentle mixing is our friend here.
- Melt the Chocolate: In a separate small, microwave-safe bowl, melt the semi-sweet chocolate. You can do this in the microwave in 20-second intervals, stirring well after each, until smooth and fully melted. Alternatively, use a double boiler on the stovetop. Let the melted chocolate cool slightly for a few minutes. We don’t want it too hot when it meets our cream cheese mixture.
- Create the Chocolate Cheesecake Base: Gently fold the slightly cooled melted chocolate into the cream cheese mixture until just combined. Be careful not to overmix. This creates our rich, decadent chocolate cheesecake base that will pair perfectly with the peanut butter.
- Prepare the Peanut Butter Swirl Mixture: In another small bowl, combine the softened creamy peanut butter with the powdered sugar and 1-2 tablespoons of milk or cream. Stir until smooth and a pourable consistency. If it’s too thick, add a tiny bit more milk or cream; if too thin, a touch more powdered sugar. This will be the distinct peanut butter ribbon in our Chocolate Peanut Butter Mini Cheesecakes.
Assembling and Baking the Divine Mini Cheesecakes
- Fill the Crusts: Now that our crusts are cool and our filling is ready, it’s time to assemble! Spoon about 2-3 tablespoons of the chocolate cheesecake filling into each prepared crust, filling each liner about two-thirds full. Try to distribute the chocolate filling as evenly as possible among all 12 cups.
- Add the Peanut Butter Swirl: Take your prepared peanut butter mixture and dollop about ½ to 1 teaspoon onto the center of each chocolate cheesecake-filled cup. You can use a small spoon or even a piping bag with the tip snipped off for more control.
- Swirl to Perfection: Using a skewer or a toothpick, gently swirl the peanut butter into the chocolate cheesecake filling. Make a few passes through the mixtures to create a beautiful marbled effect. Be careful not to overmix, or the peanut butter will completely blend in. We want distinct swirls for that visual appeal and burst of peanut butter flavor in every bite of our Chocolate Peanut Butter Mini Cheesecakes.
- Bake Gently: Carefully place the muffin tin back into your preheated oven. Bake for 18-22 minutes, or until the edges of the cheesecakes are just set, but the centers still have a slight jiggle when you gently shake the pan. This slight jiggle indicates that they are perfectly cooked and will firm up during cooling. Overbaking can lead to dry cheesecakes and cracks.
- Cooling Down, Slowly: Once baked, turn off the oven but leave the cheesecakes inside with the oven door propped open a few inches for about 15-20 minutes. This slow cooling prevents drastic temperature changes that can cause cracking. Then, remove the muffin tin from the oven and place it on a wire rack to cool completely to room temperature. This can take anywhere from 1 to 2 hours. Patience is key for smooth, crack-free cheesecakes!
- Chilling for Firmness: Once completely cool, transfer the muffin tin to the refrigerator and chill the cheesecakes for at least 4 hours, or preferably overnight. Chilling is absolutely essential for cheesecakes to fully set and develop their rich, dense texture. It also makes them much easier to handle and top. Do not skip this step; it’s what makes these Chocolate Peanut Butter Mini Cheesecakes truly irresistible!
Making the Velvety Chocolate Ganache Topping
- Prepare for Ganache: Once your mini cheesecakes are thoroughly chilled, it’s time to prepare our glorious chocolate ganache topping. This luscious layer will add another dimension of chocolatey goodness and an elegant finish.
- Heat the Cream: Place your chocolate chips or finely chopped semi-sweet chocolate in a medium heat-proof bowl. In a small saucepan, heat the heavy cream over medium heat until it just begins to simmer around the edges, but do not let it boil vigorously. You’ll see tiny bubbles forming.
- Pour and Rest: Immediately pour the hot cream over the chocolate in the bowl. Let it sit undisturbed for 5 minutes. This allows the heat from the cream to gently melt the chocolate, ensuring a smooth ganache. Resist the urge to stir during this time!
- Stir to Silky Smoothness: After 5 minutes, use a small whisk or a spoon to gently stir the mixture from the center outwards until it is completely smooth, shiny, and fully emulsified. If there are a few stubborn lumps, you can gently microwave it for 10-15 seconds and stir again.
- Cool Slightly: Allow the ganache to cool for about 10-15 minutes at room temperature, stirring occasionally, until it thickens slightly to a pourable but not runny consistency. It should be thick enough to coat the back of a spoon. This cooling period is important so it doesn’t just run off the cheesecakes.
Finishing Touches and Serving Your Masterpiece
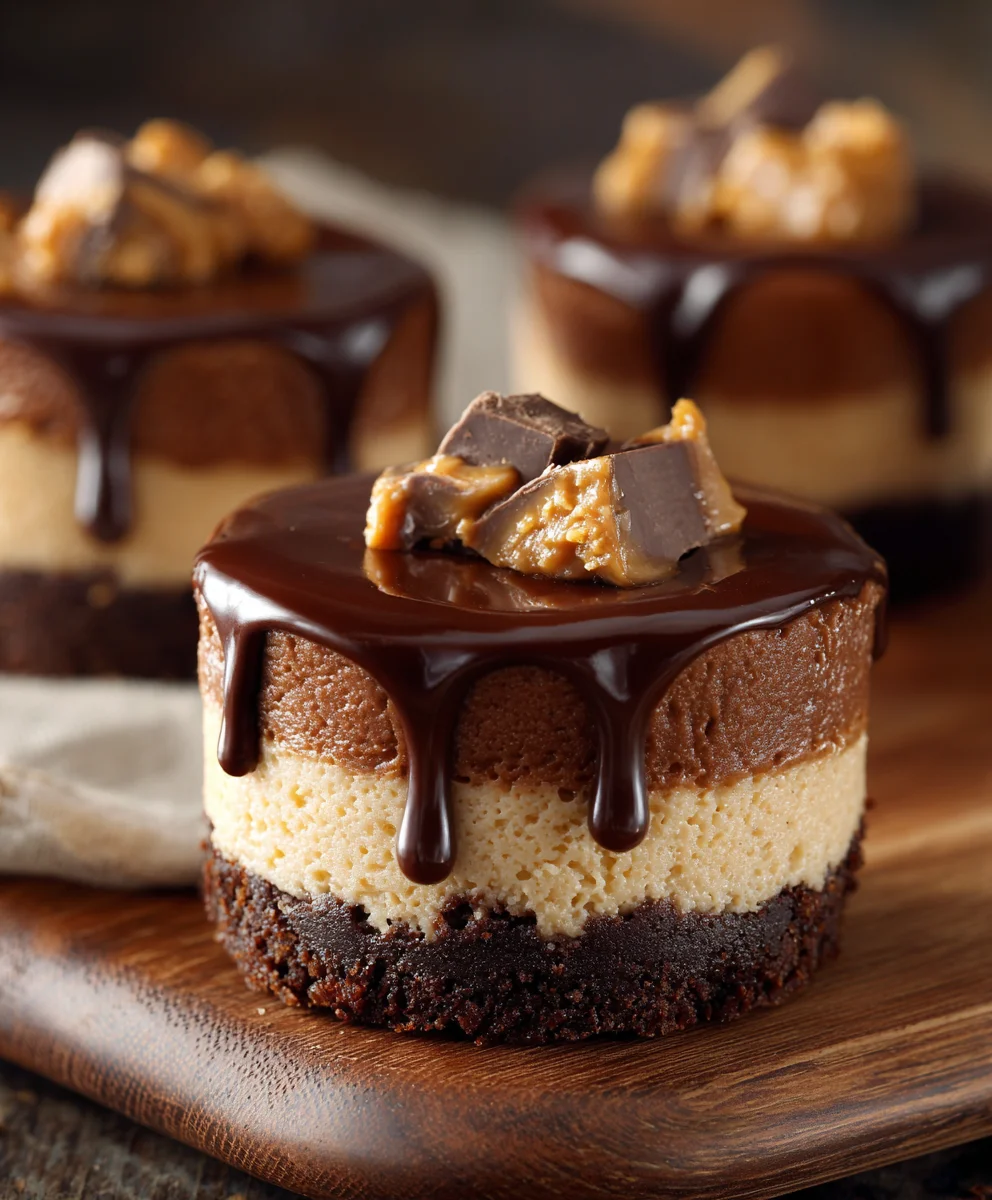
- Top with Ganache: Carefully remove the chilled mini cheesecakes from their paper liners (if desired, or leave them in for easy serving). Spoon about a tablespoon of the slightly cooled ganache over the top of each cheesecake, allowing it to naturally spread and drip slightly down the sides. The contrast of the dark ganache against the lighter cheesecake is truly beautiful.
- Garnish and Glamorize: This is where you can truly make these Chocolate Peanut Butter Mini Cheesecakes your own! Immediately after topping with ganache, add your desired garnishes. I love to press a halved mini peanut butter cup into the center, or sprinkle some finely chopped roasted peanuts for extra crunch, perhaps even a delicate drizzle of extra melted peanut butter. A tiny pinch of flaky sea salt can also beautifully enhance the chocolate and peanut butter flavors.
- A Final Chill: For the ganache to fully set and for the flavors to meld perfectly, return the decorated cheesecakes to the refrigerator for another 30 minutes to an hour. This ensures everything is firm and ready for serving.
- Serve and Enjoy: Once fully chilled and set, your exquisite Chocolate Peanut Butter Mini Cheesecakes are ready to be devoured! Arrange them on a pretty platter and watch them disappear. They are best served chilled and can be stored in an airtight container in the refrigerator for up to 3-4 days. Each bite offers a harmonious blend of rich chocolate, creamy peanut butter, and a satisfying cookie crunch, making them an absolute showstopper for any gathering or a delightful treat just for you. Enjoy the fruits of your labor!
Conclusion:
Well, my fellow dessert enthusiasts, we’ve reached the sweet crescendo of our baking journey. I truly hope you’re as excited as I am about the prospect of creating these utterly irresistible treats. What makes these particular cheesecakes a non-negotiable addition to your baking repertoire, you ask? It’s simple: they perfectly marry the universally adored combination of rich, decadent chocolate with the creamy, salty allure of peanut butter. This isn’t just any dessert; it’s a symphony of flavors and textures in a perfectly portioned bite. Imagine sinking your teeth into a velvety smooth, melt-in-your-mouth cheesecake that delivers both the intense cocoa notes and the unmistakable comforting taste of roasted peanuts. Each individual serving means no fighting over slices, no mess, and an elegant presentation that belies the simple joy of their preparation. They are incredibly easy to make, yet they taste like something you’d order from a high-end patisserie. These are the perfect solution for satisfying a serious sweet craving without overindulging, or for impressing guests with minimal fuss. Trust me, once you’ve experienced the sheer delight of these, you’ll wonder how you ever lived without them. They are, without a doubt, a true crowd-pleaser, guaranteed to bring smiles and satisfied sighs.
Now, while these Chocolate Peanut Butter Mini Cheesecakes are absolutely divine just as they are, one of the most exciting aspects of baking is the opportunity to customize and make a recipe truly your own. For an extra touch of indulgence, consider a dollop of freshly whipped cream on top, perhaps dusted with a sprinkle of cocoa powder or a few delicate chocolate shavings. A drizzle of extra melted peanut butter or a swirl of chocolate fudge sauce can elevate them further, creating beautiful visual appeal and an additional layer of flavor. Don’t shy away from adding a pinch of flaky sea salt right before serving to really make those chocolate and peanut butter notes sing – it’s a game-changer!
Feeling adventurous? For a textural twist, sprinkle some finely chopped roasted peanuts or mini chocolate chips over the top. If you’re hosting a party, arranging them on a tiered dessert stand creates an absolutely stunning display. For those who love a fruity counterpoint, a single fresh raspberry or a few sliced strawberries on each cheesecake can add a burst of color and a refreshing tartness that beautifully complements the richness. You could even experiment with different crusts; while a chocolate cookie crumb is classic, a crushed graham cracker or even shortbread cookie crust could offer a delightful variation. For a truly unique take, try folding a tiny amount of espresso powder into the chocolate cheesecake layer for a deeper, more sophisticated cocoa flavor, or even a tiny pinch of cayenne pepper for a subtle, intriguing warmth that lingers on the palate.
These mini cheesecakes are also incredibly versatile for various occasions. They are the ideal individual dessert for a dinner party, a fantastic contribution to a potluck, or simply a delightful treat to have on hand for a cozy evening in. Imagine bringing a platter of these to a family gathering – they disappear almost instantly! Their individual nature makes them perfect for portion control and easy serving, eliminating the need for cutting and ensuring every guest gets a picture-perfect dessert.
So, what are you waiting for? I wholeheartedly encourage you to roll up your sleeves, gather your ingredients, and embark on this incredibly rewarding baking adventure. I promise you, the effort is minimal, and the reward is immense. There’s something truly special about creating something delicious from scratch, especially when it results in such a universally loved dessert. Once you’ve taken that first glorious bite, I would absolutely love to hear all about your experience! Did you stick to the recipe, or did you put your own creative spin on it with a unique topping or a surprising variation? Please don’t hesitate to share your thoughts, your successes, and perhaps even your beautifully plated creations. Your feedback and your stories are what truly make this culinary journey so enjoyable for all of us. Get baking, enjoy every moment, and prepare to fall head over heels for these exquisite little masterpieces. I just know they’ll become a cherished favorite in your home, just as they have in mine. Happy baking!
Best Chocolate Peanut Butter Mini Cheesecakes – Quick Treat
Chocolate Peanut Butter Mini Cheesecakes are truly a revelation, bringing together two of the world’s most beloved flavors into one perfectly portioned, incredibly decadent dessert. If you’ve ever found yourself torn between a rich chocolate delight and a creamy peanut butter treat, then this recipe is your dream come true.
Ingredients
-
1 ½ cups (180g) chocolate sandwich cookies, crushed
-
¼ cup (56g) unsalted butter, melted
-
24 ounces (680g) full-fat cream cheese, softened
-
1 cup (200g) granulated sugar
-
2 large eggs
-
1 teaspoon pure vanilla extract
-
4 ounces (113g) semi-sweet chocolate, melted
-
½ cup (120g) creamy peanut butter
-
2 tablespoons powdered sugar (for swirl)
-
1-2 tablespoons milk or cream (for swirl)
-
4 ounces (113g) semi-sweet chocolate chips or chopped chocolate
-
½ cup (120ml) heavy cream
-
Mini peanut butter cups, halved or chopped (optional)
-
Additional chocolate drizzles (optional)
-
Finely chopped roasted peanuts (optional)
-
A sprinkle of sea salt (optional)
Instructions
-
Step 1
Preheat oven to 350°F (175°C). Line a 12-cup muffin tin or 12 mini baking cups with paper liners. Combine crushed chocolate cookies and melted butter. Press 1 tablespoon of mixture into each liner to form a compact crust. -
Step 2
Bake crusts for 5-7 minutes. Remove from oven and cool completely on a wire rack. -
Step 3
In a large mixing bowl, beat softened full-fat cream cheese on medium speed until smooth (2-3 minutes). Gradually add granulated sugar, beating until light and fluffy (2-3 minutes). -
Step 4
Reduce mixer speed to low. Add eggs one at a time, mixing just until incorporated. Mix in vanilla extract until just combined. -
Step 5
Gently fold slightly cooled melted semi-sweet chocolate into the cream cheese mixture until just combined. Do not overmix. -
Step 6
In a small bowl, combine softened creamy peanut butter with powdered sugar and 1-2 tablespoons of milk or cream. Stir until smooth and pourable. -
Step 7
Spoon 2-3 tablespoons of the chocolate cheesecake filling into each cooled crust, filling liners about two-thirds full. Dollop about ½ to 1 teaspoon of the peanut butter mixture onto the center of each cup. Gently swirl the peanut butter into the chocolate filling using a skewer or toothpick to create a marbled effect. -
Step 8
Carefully place the muffin tin back into the preheated oven. Bake for 18-22 minutes, or until the edges are just set and the centers have a slight jiggle. -
Step 9
Turn off the oven but leave cheesecakes inside with the door propped open for 15-20 minutes. Remove and cool completely on a wire rack (1-2 hours). Transfer to the refrigerator and chill for at least 4 hours, or preferably overnight, until fully set. -
Step 10
Place chocolate chips in a medium heat-proof bowl. Heat heavy cream in a small saucepan until it just begins to simmer. Pour hot cream over chocolate and let sit undisturbed for 5 minutes. Stir gently from the center outwards until smooth and shiny. -
Step 11
Allow the ganache to cool for 10-15 minutes at room temperature, stirring occasionally, until it thickens slightly to a pourable but not runny consistency. -
Step 12
Carefully remove chilled mini cheesecakes from their paper liners. Spoon about 1 tablespoon of the slightly cooled ganache over the top of each cheesecake. Immediately add desired garnishes such as halved mini peanut butter cups, chocolate drizzles, chopped roasted peanuts, or a sprinkle of sea salt. -
Step 13
Return decorated cheesecakes to the refrigerator for another 30 minutes to an hour for the ganache to fully set. Serve chilled. Store in an airtight container in the refrigerator for up to 3-4 days. They can also be frozen for up to 1 month.
Important Information
Nutrition Facts (Per Serving)
It is important to consider this information as approximate and not to use it as definitive health advice.
Allergy Information
Please check ingredients for potential allergens and consult a health professional if in doubt.
Leave a Comment