
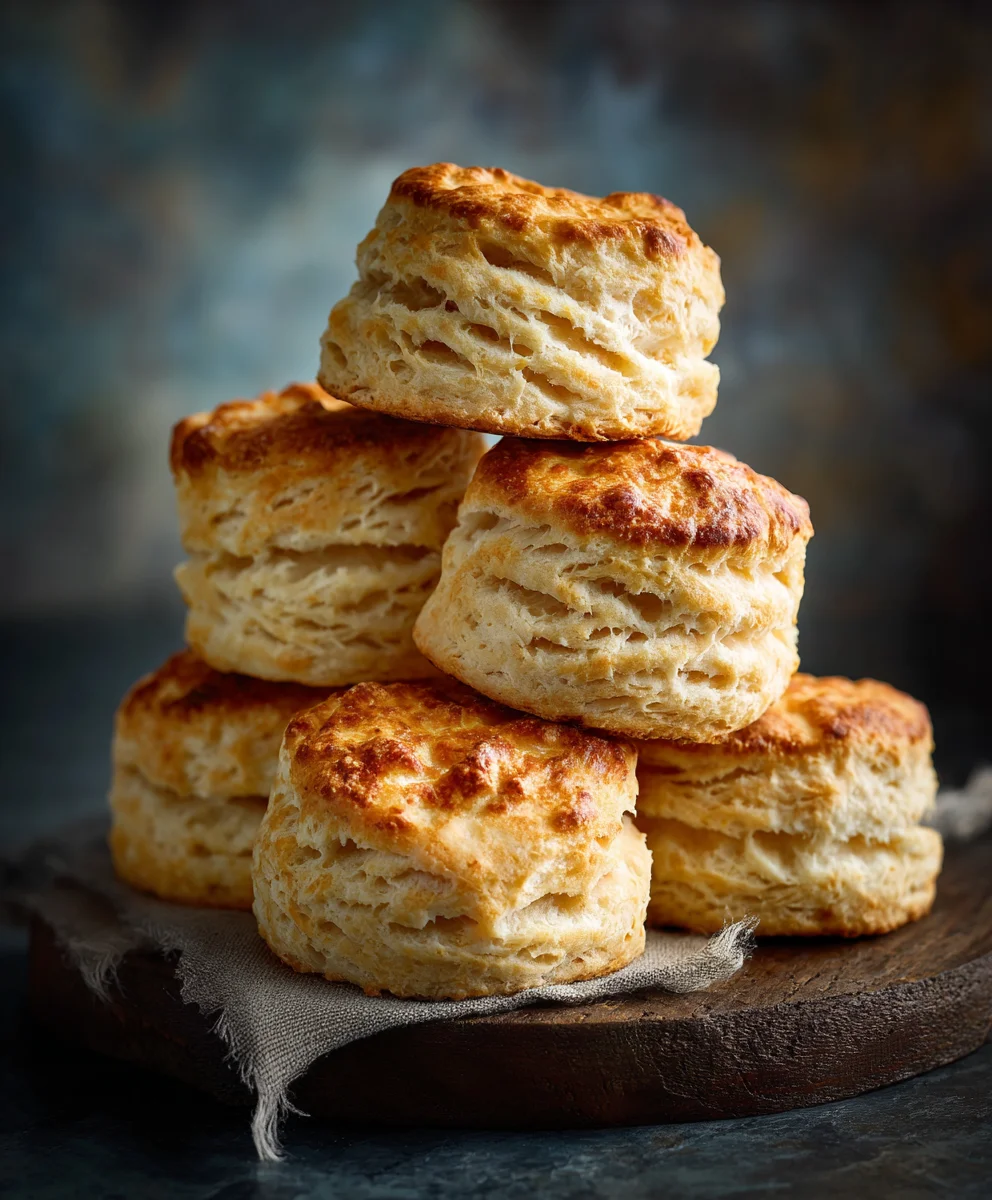
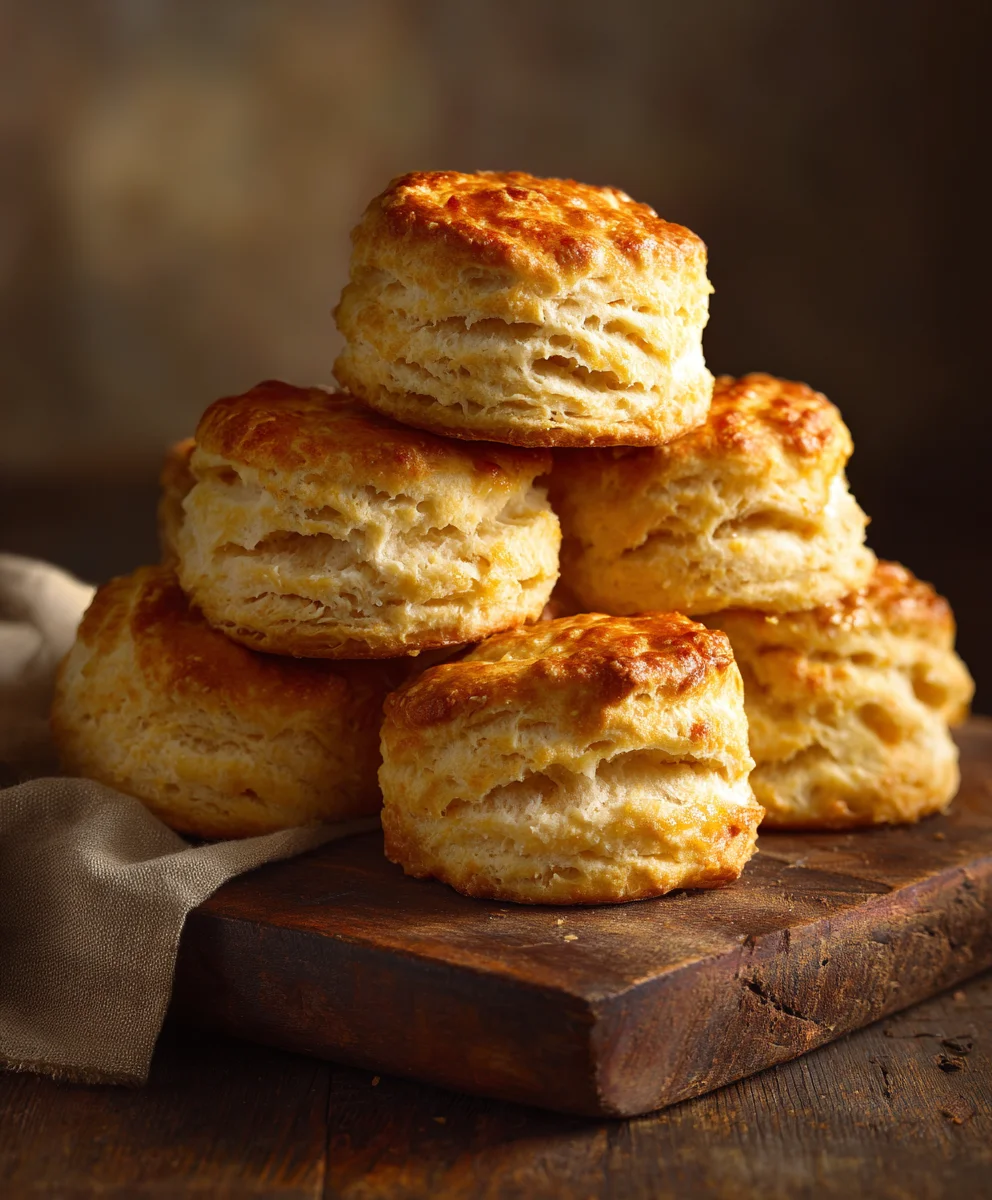
Bojangles Biscuits are more than just a simple breakfast item; they are a cornerstone of Southern comfort, a warm, buttery hug on a plate. I’ve always been captivated by the magic behind these golden, flaky wonders that accompany so many beloved meals. For generations, biscuits have held a special place in the culinary heart of the South, embodying hospitality and a sense of home. Bojangles, a beloved institution, has truly perfected this art, creating biscuits that are consistently light, airy, and bursting with a rich, buttery flavor.
The Enduring Appeal of Southern Biscuits
People adore them not only for their incredible texture – those distinct, tender layers that practically melt in your mouth – but also for their remarkable versatility, pairing perfectly with anything from savory fried chicken to sweet fruit jams. There’s a profound sense of nostalgia and satisfaction in a perfectly made biscuit. I am absolutely thrilled to share my insights into mastering the art of perfect, homemade Bojangles Biscuits, bringing that iconic taste of Southern charm right into your kitchen. Get ready to embark on a delicious culinary journey that promises warmth, comfort, and an unforgettable experience.
Ingredients:
To embark on this delightful journey of crafting your very own Bojangles-style biscuits, gather these essential components. Precision in measurement, especially with the leavening agents and butter, is key to achieving that signature flaky texture and towering rise. I always recommend using a kitchen scale for the dry ingredients if you have one, but precise cup measurements will certainly get you there too!
- All-Purpose Flour: 4 cups (about 480g) – I find that unbleached all-purpose flour works wonderfully, providing a tender crumb without being too delicate.
- Baking Powder: 1 tablespoon + 1 teaspoon (approximately 16g) – This is your primary leavening agent, crucial for that impressive biscuit rise. Make sure it’s fresh!
- Baking Soda: 1 teaspoon (approximately 5g) – Works in tandem with the acidity of the buttermilk to give an extra lift and contribute to the biscuit’s tender interior.
- Granulated Sugar: 2 tablespoons (approximately 25g) – While optional for some biscuit recipes, a touch of sugar balances the savory notes and enhances browning, giving our homemade Bojangles Biscuits a hint of sweetness.
- Fine Sea Salt: 1 teaspoon (approximately 6g) – Don’t skip the salt; it brings out all the flavors!
- Unsalted Butter, very cold: 1 ½ sticks (12 tablespoons or 170g) – This is the heart of your biscuit’s flakiness. I recommend cutting it into small cubes and placing it back in the freezer for at least 15-20 minutes before you start. Seriously, the colder, the better!
- Buttermilk, very cold: 1 ½ cups (360ml) – The tangy acidity of buttermilk reacts with the baking soda, creating those lovely air pockets. Just like the butter, keep it chilled until the very last moment. If you don’t have buttermilk, you can make a substitute by adding 1 ½ tablespoons of lemon juice or white vinegar to regular milk and letting it sit for 5-10 minutes until it slightly curdles.
- Melted Unsalted Butter: 2-3 tablespoons, for brushing the tops after baking – This step adds a beautiful sheen, extra flavor, and keeps the crust tender.
Prepping Your Workspace and Ingredients
- Preheat Your Oven to Perfection: First things first, I always get my oven ready. Preheat your oven to a blazing 450°F (230°C). Biscuits love a hot oven; it helps them rise quickly and achieve that signature crispy exterior while staying soft and tender inside. Ensure your oven rack is in the middle position for even baking.
- Prepare Your Baking Sheet: While the oven heats up, line a large baking sheet with parchment paper. This prevents sticking and makes cleanup a breeze. If you don’t have parchment paper, a light dusting of flour on an ungreased baking sheet will work, but I personally prefer the non-stick reliability of parchment.
- Gather and Measure Dry Ingredients with Precision: In a very large bowl, I like to whisk together all my dry ingredients: the all-purpose flour, baking powder, baking soda, granulated sugar, and fine sea salt. Whisk them thoroughly for at least 30 seconds to ensure the leavening agents and salt are evenly distributed throughout the flour. This step is crucial for consistent rise and flavor in every biscuit.
- Ensure Butter and Buttermilk are Ice Cold: Remember those cold ingredients I emphasized? Now’s the time they really shine. Take your cubed, very cold butter out of the freezer. Likewise, grab your buttermilk straight from the fridge. Keeping these ingredients super chilled is the secret weapon against tough biscuits. When cold fat hits the hot oven, it creates steam, which in turn pushes apart the layers of dough, resulting in that glorious flakiness we crave in Bojangles Biscuits.
- Prepare Your Work Surface: Have a clean, lightly floured surface ready for when you turn out the dough. I usually sprinkle about ¼ cup of flour on my countertop, spreading it out evenly.
Making the Biscuit Dough
- Incorporate the Cold Butter into Dry Ingredients: This is arguably the most critical step for flaky biscuits. Add your ice-cold butter cubes directly into the bowl of dry ingredients. Using a pastry blender, two knives, or even your fingertips, quickly work the butter into the flour mixture. My preferred method is using my fingertips; I gently rub the butter into the flour until the mixture resembles coarse meal with some pea-sized pieces of butter still visible. Do not overmix at this stage! The goal is to keep those distinct pieces of butter intact. It’s these tiny pockets of butter that melt during baking, creating steam and separating the layers, leading to those beautiful, flaky textures in our homemade Bojangles Biscuits.
- Add the Buttermilk: Once your butter is nicely incorporated, make a well in the center of the flour and butter mixture. Pour in the very cold buttermilk. Using a fork or a rubber spatula, gently stir the mixture until it just barely comes together. I cannot stress this enough: mix only until combined! Overmixing develops the gluten in the flour, which leads to tough, chewy biscuits instead of light, tender ones. You might still see some dry flour streaks – that’s perfectly fine, even desired. The dough should be shaggy and a bit sticky.
- Turn Out the Dough: Carefully scrape the shaggy dough out onto your lightly floured work surface. You’ll notice it’s not a perfectly smooth ball, and that’s exactly what we want at this stage.
Shaping and Cutting Your Bojangles Biscuits
- Gentle Folding for Layers (Lamination): This technique is my personal touch for ensuring extra flakiness, reminiscent of those perfect Bojangles Biscuits. Sprinkle a little flour on top of the dough. Gently pat the dough into a rough rectangle. Now, perform a series of folds:
- Fold one side of the rectangle over by about two-thirds.
- Then, fold the other side over that, like folding a letter.
- Rotate the dough 90 degrees.
- Repeat this folding process 2-3 more times. Each fold creates more layers, which translates directly to more flakiness in your final biscuits. Remember to handle the dough as little as possible and keep your movements light and quick to prevent the butter from warming up.
- Pat or Roll the Dough to Thickness: After the folds, gently pat the dough out into a uniform thickness of about ¾ to 1 inch (approximately 2-2.5 cm). I often just use my hands for this, as it reduces handling and keeps the dough tender. If you prefer a rolling pin, use it very lightly and with minimal pressure. Uniform thickness is important for even baking.
- Cut Out Your Biscuits: Now for the fun part! Take a 2.5 to 3-inch (6-7.5 cm) round biscuit cutter. Dip the cutter in a little flour to prevent sticking, then press it straight down into the dough. Do NOT twist the cutter! Twisting seals the edges of the biscuit, preventing it from rising properly and creating those beautiful, flaky layers. Just press straight down and lift straight up.
- Arrange on the Baking Sheet: Carefully transfer the cut biscuits to your prepared baking sheet. For soft-sided biscuits (my preference, and what you often find with Bojangles Biscuits), arrange them so they are just barely touching each other. This proximity helps them rise taller and stay moist. If you prefer crispier sides, space them about 1 inch apart.
- Handle Scraps Thoughtfully: Gather the dough scraps together. Gently press them into a new, smaller mass, fold it once or twice, and then pat it out again to the same ¾ to 1-inch thickness. Cut out any remaining biscuits. Be aware that biscuits made from re-rolled scraps might be slightly tougher than the first batch, as the gluten has been worked a bit more, but they’ll still be delicious!
Baking the Perfect Bojangles Biscuits
- Bake in the Hot Oven: Place your baking sheet with the cut biscuits into the preheated 450°F (230°C) oven. The initial burst of high heat is exactly what these biscuits need to achieve maximum lift and develop a lovely golden crust.
- Bake Until Golden Brown: Bake for 12-18 minutes. The exact time will depend on your oven and the thickness of your biscuits. I always start checking around the 12-minute mark. Look for a beautiful golden-brown color on top and bottom. The sides should also be lightly browned, and the biscuits should feel firm to the touch. A perfectly baked biscuit will have risen significantly and developed gorgeous, flaky layers.
- The Secret Butter Brush: As soon as you pull those glorious, hot Bojangles Biscuits out of the oven, immediately brush the tops with 2-3 tablespoons of melted unsalted butter. This step is pure magic. It adds an extra layer of rich flavor, a beautiful sheen, and helps to keep the crust tender, preventing it from drying out.
- Cool Briefly and Serve Warm: Allow the biscuits to cool on the baking sheet for just a few minutes before serving. This brief cooling period helps them set up and makes them easier to handle.
Serving Suggestions and Tips
You’ve done it! You’ve successfully made a batch of incredible Bojangles Biscuits from scratch. Now, let’s talk about enjoying them to their fullest and some handy tips for future biscuit-making endeavors.
- Serve Warm for Optimal Enjoyment: There’s truly nothing better than a warm, fresh-baked biscuit. I love to split them open right out of the oven, letting the steam escape, ready to receive whatever delicious toppings I have on hand.
- Pairings Galore:
- Classic Southern Style: These biscuits are absolutely divine with a generous ladle of homemade sausage gravy. The rich, savory gravy soaking into the flaky layers is pure comfort food.
- Sweet Sensations: For a sweeter take, slather them with your favorite fruit jam or preserves, a drizzle of local honey, or even some apple butter. The slight sweetness in the biscuit complements these beautifully.
- The Full Bojangles Experience: Of course, pair them with crispy, perfectly seasoned fried chicken for that authentic, full-on Bojangles-inspired meal! They also make fantastic breakfast sandwiches with eggs, cheese, and your favorite breakfast meat.
- Storage Tips: If, by some miracle, you have any leftover Bojangles Biscuits (it rarely happens in my house!), store them in an airtight container at room temperature for up to 2-3 days. While they are best eaten fresh, they will still be delicious.
- Reheating for Freshness: To revive day-old biscuits, I recommend wrapping them loosely in foil and heating them in a preheated 300°F (150°C) oven for about 8-10 minutes, or until warmed through. You can also pop them in a toaster oven for a few minutes. Avoid the microwave if possible, as it can make them tough.
- Troubleshooting Common Biscuit Woes:
- Tough Biscuits: Almost always a sign of overmixing the dough. Remember to handle it as little as possible!
- Flat Biscuits: Could be old leavening agents (baking powder/soda), butter that wasn’t cold enough (melted into the dough before baking), or twisting the biscuit cutter.
- Dry Biscuits: Not enough fat, overbaking, or too much flour added during the kneading/rolling stage. Ensure your measurements are accurate and don’t add too much extra flour to your surface.
- Make-Ahead Option: You can cut the biscuits and place them on a parchment-lined baking sheet, then freeze them solid. Once frozen, transfer them to a freezer-safe bag. When you’re ready to bake, place the frozen biscuits on a baking sheet and bake at the same temperature, adding an extra 5-10 minutes to the baking time. This is a fantastic hack for fresh Bojangles Biscuits any time you crave them!
Conclusion:
Well, my friends, we’ve reached the delicious culmination of our culinary journey! I truly hope you’re as excited as I am about the prospect of bringing these incredible, cloud-like morsels into your own kitchen. This isn’t just another biscuit recipe; it’s a gateway to unparalleled comfort, a testament to the magic that happens when simple ingredients are treated with a little love and the right technique. I honestly believe that once you experience the sheer joy of biting into one of these tender, flaky creations, you’ll understand exactly why I call them a must-try. They possess that perfect golden-brown crust, a delightfully airy interior, and a buttery richness that absolutely melts in your mouth. There’s an undeniable satisfaction that comes from pulling a fresh batch of these beauties from the oven, filling your home with an aroma that’s pure bliss.
What makes this particular recipe stand out, beyond its exquisite taste and texture, is its surprising accessibility. You don’t need to be a seasoned baker to achieve spectacular results. With my guidance, every step is designed to be straightforward, ensuring that even novice cooks can achieve a biscuit that rivals the very best. Imagine the look on your family’s faces when you present them with a basket of these warm, homemade delights. It’s more than just food; it’s an experience, a moment of shared happiness, a taste of home. And let me tell you, if you’ve ever dreamt of recreating that perfect, golden-brown crust and impossibly tender crumb found in iconic offerings like Bojangles Biscuits, then prepare to have your dreams deliciously realized with this recipe. It truly stands its ground, offering a homemade alternative that is simply unparalleled.
Now, let’s talk about how to truly savor these delectable biscuits. The possibilities are virtually endless, and that’s part of their charm! For a classic breakfast, I love them split open and slathered with homemade strawberry jam or a rich honey butter. They are, of course, the quintessential companion to a hearty sausage gravy, creating a dish that defines comfort food for me. But don’t stop there! Think outside the breakfast box. These biscuits make an incredible base for mini chicken pot pies, with a creamy, savory filling baked right inside. For lunch or a light dinner, try turning them into delightful slider sandwiches. Fill them with thinly sliced ham and cheddar, or even leftover pulled pork. A dollop of cranberry sauce and some turkey makes for a fantastic holiday-inspired bite. And for those with a sweet tooth, why not experiment with a cinnamon-sugar topping before baking? Or drizzle them with a simple glaze made from powdered sugar and a touch of vanilla extract for a dessert that’s surprisingly elegant and utterly satisfying. You can also experiment by adding savory elements to the dough itself – a handful of shredded cheddar cheese and chives, or some crumbled bacon, can transform them into a whole new experience perfect for pairing with a bowl of chili or a hearty stew.
I truly can’t wait for you to embark on this baking adventure. There’s something incredibly therapeutic about the process of bringing these ingredients together, watching them transform, and finally, savoring the fruits of your labor. So please, don’t just admire these biscuits from afar; get into your kitchen this week and give this recipe a try! I promise you won’t regret it. Once you’ve pulled that glorious tray from the oven and taken that first unforgettable bite, I would absolutely love to hear all about your experience. Did you stick to the classic preparation? Or did you get creative with a unique serving suggestion or a fantastic variation? Perhaps you discovered a new favorite topping or filling! Share your triumphs, your tips, and even your funny kitchen anecdotes with me. Tag me on social media, leave a comment below, or send me a message – I live for your culinary stories and photos! Happy baking, my friends, and prepare to fall head over heels for your new favorite homemade biscuits!
Bojangles Biscuits Recipe
Master the art of perfect, homemade Bojangles Biscuits. This recipe guides you to creating light, airy, and buttery biscuits with distinct, tender layers, embodying Southern comfort right in your kitchen.
Ingredients
-
All-Purpose Flour: 4 cups (480g)
-
Baking Powder: 1 tablespoon + 1 teaspoon (16g)
-
Baking Soda: 1 teaspoon (5g)
-
Granulated Sugar: 2 tablespoons (25g)
-
Fine Sea Salt: 1 teaspoon (6g)
-
Unsalted Butter, very cold, cubed: 1 ½ sticks (12 tablespoons or 170g)
-
Buttermilk, very cold: 1 ½ cups (360ml)
-
Melted Unsalted Butter: 2-3 tablespoons, for brushing
Instructions
-
Step 1
Preheat your oven to 450°F (230°C). Line a large baking sheet with parchment paper. -
Step 2
In a large bowl, whisk together the all-purpose flour, baking powder, baking soda, granulated sugar, and fine sea salt for at least 30 seconds to ensure even distribution. -
Step 3
Add the ice-cold butter cubes to the dry ingredients. Using a pastry blender or your fingertips, quickly work the butter into the flour mixture until it resembles coarse meal with some pea-sized pieces of butter still visible. Do not overmix. -
Step 4
Make a well in the center of the mixture. Pour in the very cold buttermilk. Using a fork or rubber spatula, gently stir the mixture until it just barely comes together and is shaggy. Do not overmix. -
Step 5
Carefully scrape the dough onto a lightly floured work surface. Gently pat the dough into a rough rectangle. Perform 2-3 series of folds: fold one side of the rectangle over by about two-thirds, then fold the other side over that, like folding a letter. Rotate the dough 90 degrees and repeat. -
Step 6
Gently pat the dough out to a uniform thickness of about ¾ to 1 inch (2-2.5 cm). Dip a 2.5 to 3-inch (6-7.5 cm) round biscuit cutter in flour. Press it straight down into the dough; do NOT twist the cutter. Lift straight up. -
Step 7
Carefully transfer the cut biscuits to your prepared baking sheet, arranging them so they are just barely touching each other. Bake in the preheated oven for 12-18 minutes, until they are beautifully golden brown on top and bottom and feel firm. -
Step 8
Immediately upon removing the biscuits from the oven, brush the tops with 2-3 tablespoons of melted unsalted butter. Allow them to cool on the baking sheet for just a few minutes before serving warm for optimal enjoyment.
Important Information
Nutrition Facts (Per Serving)
It is important to consider this information as approximate and not to use it as definitive health advice.
Allergy Information
Please check ingredients for potential allergens and consult a health professional if in doubt.

Leave a Comment