
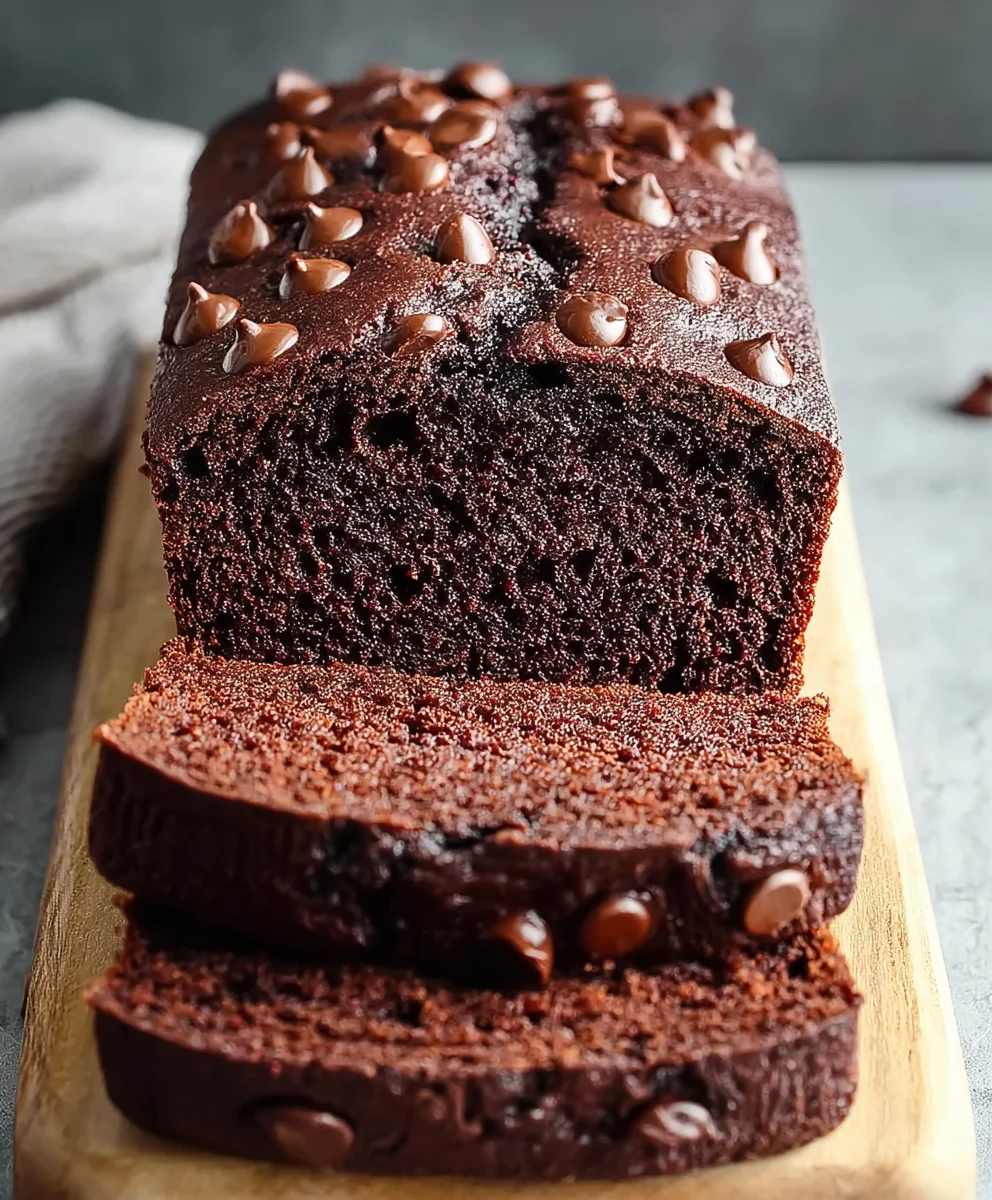
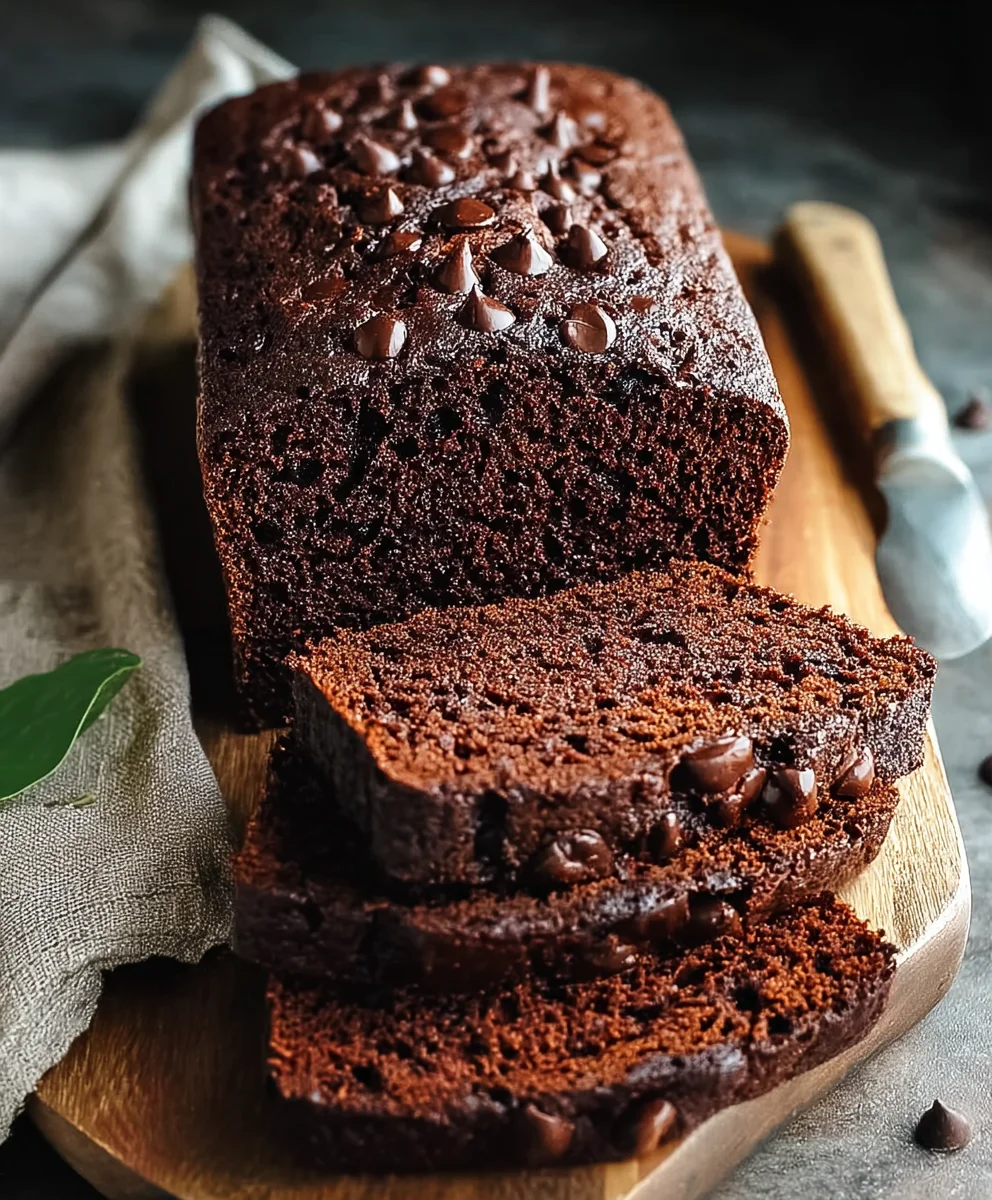
Chocolate Banana Bread is more than just a simple quick bread; it’s a heartwarming revelation that transforms humble, overripe bananas into an irresistible masterpiece. There’s a unique joy in taking what might otherwise be discarded and turning it into something so utterly delicious and comforting. I find that this particular variation elevates the beloved classic to new heights, offering a delightful interplay of textures and flavors that captivates from the very first bite.
The history of banana bread itself speaks to a spirit of ingenuity, gaining widespread popularity during the Great Depression as resourceful home cooks sought to utilize every ingredient to its fullest. Over time, this practical solution blossomed into a culinary staple, cherished for its moistness and simple goodness. The introduction of chocolate, whether as chips or chunks, was a stroke of genius, transforming a wholesome loaf into an indulgent treat.
People absolutely adore Chocolate Banana Bread for its extraordinary moistness, the rich pockets of melted chocolate that surprise your palate, and the sweet, comforting aroma that permeates the entire house as it bakes. It’s a perfect candidate for a cozy breakfast, a satisfying afternoon snack, or even a casual dessert. This recipe promises not just a delightful dish, but a moment of comforting indulgence that is surprisingly simple to achieve.
Ingredients:
- For the Wet Ingredients:
- 3-4 medium very ripe bananas (about 1 ½ cups mashed), the browner, the better for that intense, natural sweetness and deep banana flavor!
- ½ cup (113g) unsalted butter, melted and slightly cooled – I always opt for unsalted so I can control the salt content precisely.
- ¾ cup (150g) granulated sugar – for that perfect touch of sweetness to balance the chocolate and banana.
- 1 large egg, at room temperature and lightly beaten – room temperature eggs emulsify better with other ingredients, creating a smoother batter.
- 1 teaspoon vanilla extract, pure vanilla is always worth it for the depth of flavor it adds!
- For the Dry Ingredients:
- 1 ½ cups (180g) all-purpose flour, spooned and leveled – this method ensures you don’t pack too much flour, which can lead to a dense loaf.
- ½ cup (45g) unsweetened cocoa powder, a good quality Dutch-processed cocoa powder will give you the best depth of chocolate flavor and a beautiful dark color for your Chocolate Banana Bread.
- 1 teaspoon baking soda – our leavening agent that reacts with the acidic bananas and cocoa to create a light, fluffy texture.
- ¼ teaspoon salt – essential for balancing sweetness and enhancing all the other flavors.
- For the Chocolate Goodness:
- 1 cup (170g) semi-sweet chocolate chips or chunks, feel free to use dark chocolate for a less sweet, more intense flavor profile in your Chocolate Banana Bread.
- Optional: ¼ cup extra chocolate chips for sprinkling on top before baking, creating a truly irresistible presentation.
Preparation is Key: Getting Ready to Bake
- Preheat your oven and prepare your pan: My first step, and a crucial one for any successful bake, is to preheat your oven to 350°F (175°C). While the oven is warming up, take a standard 9×5-inch (23×13 cm) loaf pan. I like to either grease it thoroughly with butter or non-stick cooking spray, and then lightly flour it, tapping out any excess. For an extra easy removal and cleanup, I often line the bottom and two long sides with parchment paper, leaving an overhang on the sides. This creates convenient “handles” to lift the loaf out once it’s baked and cooled slightly. Don’t skip this pan prep step; it makes a huge difference in preventing sticking and ensuring a beautiful, intact loaf of Chocolate Banana Bread. A well-prepped pan sets the stage for success!
- Mash the bananas: In a medium-sized bowl, use a sturdy fork or a potato masher to mash your very ripe bananas. You’re looking for a consistency that’s mostly smooth but still has a few small lumps, which I find add lovely texture and bursts of banana flavor to the finished bread. The riper your bananas, the sweeter and more intensely banana-flavored your bread will be, so don’t be afraid to use bananas that are almost completely brown with plenty of speckles – those are truly the best for baking, as their starches have converted to sugars, enhancing the natural sweetness. Set this aside for a moment, letting those sweet aromas develop.
Crafting the Chocolate Banana Bread Batter
- Combine wet ingredients: In a large mixing bowl, I start by combining the melted and slightly cooled unsalted butter with the granulated sugar. Whisk these together vigorously for about 1-2 minutes until they’re well incorporated and look light and fluffy. This aeration helps create a tender crumb. Then, I crack in the large, room-temperature egg and add the pure vanilla extract, whisking again until everything is smoothly blended and looks cohesive. It’s important for the butter to be slightly cooled (not hot) so it doesn’t accidentally cook the egg when they meet. After this, gently fold in your mashed bananas, ensuring they are evenly distributed throughout the wet mixture. The goal here is a harmonious blend of flavors and textures, not over-mixing, which can lead to a tough final product.
- Whisk dry ingredients: In a separate, medium-sized bowl, I combine the all-purpose flour, unsweetened cocoa powder (remember, a good quality one makes a difference in your Chocolate Banana Bread!), baking soda, and salt. Use a whisk to thoroughly combine these dry ingredients. This step is absolutely crucial because it ensures that the leavening agents (baking soda) and salt are evenly distributed throughout the flour mixture. This prevents pockets of baking soda (which can taste unpleasant) and guarantees an even rise, creating a uniform, delightful crumb structure. Don’t rush this whisking! A well-mixed dry component is fundamental for a consistent bake.
- Combine wet and dry mixtures: Now comes the moment to bring it all together! Add the dry ingredients mixture to the large bowl containing your wet ingredients. With a rubber spatula or a sturdy wooden spoon, gently fold them together until they are just combined. The key here is to avoid over-mixing at all costs. Over-mixing develops gluten in the flour, which can lead to a tough, dry, and chewy banana bread, rather than the moist, tender loaf we’re aiming for. A few streaks of flour are perfectly fine – they’ll disappear during baking and you won’t even notice them in the finished Chocolate Banana Bread. I always remind myself: less is more when mixing bread batters, especially for quick breads like this!
- Fold in the chocolate chips: Once your batter is just combined and there are no visible large pockets of dry flour, it’s time for the star of the show! Gently fold in 1 cup of semi-sweet chocolate chips (or dark chocolate chips, if you prefer a richer, less sweet profile that complements the banana beautifully). Distribute them evenly throughout the batter with a few gentle folds. If you like, reserve an extra ¼ cup of chocolate chips to sprinkle generously over the top of the batter once it’s in the loaf pan; this creates a beautiful, inviting crust with lovely melted chocolate pockets that truly elevate the visual appeal of your Chocolate Banana Bread. A generous amount of chocolate ensures every single slice is a pure, indulgent treat!
Baking Your Banana Bread to Perfection
- Transfer to the loaf pan: Pour or spoon the luscious chocolate banana bread batter into your prepared 9×5-inch loaf pan. Use your spatula to spread it evenly from corner to corner, ensuring an even bake. If you reserved some chocolate chips, now is the perfect time to sprinkle them generously over the top of the batter. This not only looks fantastic but also provides little pockets of melted chocolate right on the surface, adding another layer of texture and decadence to your finished bread.
-
Bake: Carefully place the loaf pan into your preheated oven, ideally on the middle rack. Bake for approximately 55-70 minutes. Baking times can vary significantly depending on your specific oven and even the humidity in your kitchen, so it’s always best to keep an eye on it rather than relying solely on the clock.
Tips for Knowing When Your Chocolate Banana Bread is Done:
- The Skewer Test: Around the 55-minute mark, insert a wooden skewer or a long toothpick into the very center of the loaf. If it comes out clean or with just a few moist crumbs attached (not wet batter), your Chocolate Banana Bread is likely done. If it comes out with wet batter, continue baking for another 5-10 minutes and test again. Remember, chocolate chips can melt onto the skewer, so try to test a spot where you don’t feel a chip to get an accurate reading on the batter’s doneness.
- Visual Cues: The top should be a deep, rich brown, slightly firm to the touch when gently pressed, and the edges will start to pull away slightly from the sides of the pan. Sometimes, a beautiful crack will form down the center, which is completely normal and a sign of a good, healthy rise, indicating a tender crumb inside.
- The Aroma Test: Your entire kitchen will be filled with an absolutely irresistible aroma of warm chocolate and sweet banana – a sure sign that deliciousness is nearing completion! Trust your nose; it’s a powerful baking tool.
It’s generally better to slightly underbake than overbake banana bread, as overbaking can lead to a dry, crumbly loaf. However, underbaking too much can result in a collapsed center or a gummy texture. Finding that sweet spot of perfect doneness is key to a truly exceptional Chocolate Banana Bread.
Cooling and Serving Your Masterpiece
- Initial Cooling in the Pan: Once baked, carefully remove the loaf pan from the oven and immediately place it on a wire rack. Let the Chocolate Banana Bread cool in the pan for about 10-15 minutes. This brief cooling period in the pan is important because it allows the bread to firm up slightly and continue setting from the residual heat, making it much easier to remove without breaking or sticking. It’s a small but significant step that contributes to the structural integrity of your loaf.
-
Full Cooling on a Wire Rack: After the initial cooling period, carefully run a thin knife around the edges of the bread (if you didn’t use parchment paper) to loosen it. Using the parchment paper “handles,” or by gently inverting the pan, lift or turn the loaf out onto the wire rack to cool completely. Allowing the bread to cool completely on a wire rack is absolutely essential for the best texture and slicing experience. Slicing it while it’s still warm might be incredibly tempting, but it can cause the bread to be gummy, crumbly, and the chocolate chips will still be molten and potentially messy, not to mention difficult to get clean slices. A full cool-down allows the internal structure to set, the moisture to redistribute, and makes for perfectly neat, clean slices of your magnificent Chocolate Banana Bread.
Why Complete Cooling Matters for Perfect Slices:
- Structure: The internal structure of the bread continues to set and solidify as it cools, resulting in a firm, yet wonderfully moist and tender texture that holds its shape beautifully.
- Slicing: A fully cooled loaf slices much more cleanly and easily with a sharp knife, preventing crumbling, tearing, and ensuring beautiful presentation of each individual slice.
- Flavor: Believe it or not, the complex flavors of banana, chocolate, and vanilla often deepen and meld better as the bread cools, enhancing the overall taste experience and making every bite more enjoyable.
- Slice and Enjoy: Once your delicious Chocolate Banana Bread is completely cool (or at least mostly cool!), slice it with a serrated knife for the cleanest cuts. Serve it plain to truly savor its rich flavors, or if you’re feeling indulgent, spread a little cream cheese, softened butter, or even a dollop of whipped cream on top. This bread is incredibly versatile and makes for a wonderful, comforting breakfast, a delightful afternoon snack with your coffee or tea, or a satisfying dessert.
- Storage: To keep your homemade Chocolate Banana Bread fresh, store any leftover slices or the whole loaf at room temperature in an airtight container or wrapped tightly in plastic wrap. It will stay moist and delicious for up to 3-4 days. For longer storage, you can wrap individual slices or the whole loaf tightly in plastic wrap, then an additional layer of aluminum foil, and freeze for up to 3 months. Thaw frozen bread at room temperature, or gently warm individual slices in the microwave or oven for a quick, comforting treat that tastes freshly baked. This delightful bread also makes a fantastic, thoughtful gift for friends, family, or neighbors!
Conclusion:
If you’ve made it this far, reading through my beloved recipe, then you are just moments away from experiencing a truly transformative baking journey. I can confidently say that this
Chocolate Banana Bread
isn’t just another recipe; it’s a testament to how simple ingredients can come together to create something profoundly comforting and undeniably delicious.
Why is it a must-try?
It’s more than just moist; it’s incredibly tender, almost melting in your mouth with every bite. The natural sweetness of perfectly ripe bananas perfectly complements the rich, deep notes of chocolate, creating a symphony of flavors that is both familiar and exciting. This recipe is a fantastic way to utilize those forgotten, overripe bananas on your counter, turning what might seem like waste into a golden-brown treasure. The aroma alone, as it bakes, is enough to warm any home and bring a smile to anyone who walks through the door. I find myself constantly drawn back to this recipe because it’s so reliable, yielding a consistently perfect loaf every single time, whether I’m making it for a special occasion or just a cozy Sunday morning.
But the magic doesn’t stop once it’s out of the oven. While a warm slice of this bread, fresh from cooling, is absolutely heavenly on its own, I’ve got a few serving suggestions and variations that will elevate your experience even further. For a truly indulgent treat, try serving a warm slice with a generous scoop of vanilla bean ice cream that slowly melts into the tender crumb, creating a delightful contrast of temperatures and textures. A dollop of freshly whipped cream, perhaps with a touch of cinnamon or a drizzle of chocolate ganache, also makes for an exquisite dessert. If you’re enjoying it for breakfast or an afternoon snack, a simple pat of salted butter or a smear of almond butter enhances the flavors beautifully.
And if you’re feeling adventurous, don’t hesitate to put your own spin on this classic. Consider adding a handful of chopped walnuts or pecans to the batter for an extra layer of crunch and nutty flavor – a combination I adore. You could also experiment with different types of chocolate; dark chocolate chunks will offer a more intense, sophisticated bitterness, while milk chocolate chips will lean into a sweeter, creamier profile. White chocolate chips or even a swirl of Nutella before baking could also create fascinating new dimensions. For a subtle hint of spice, a pinch of cinnamon or nutmeg can really round out the flavors, especially during the cooler months. If you prefer smaller, individual portions, this batter works wonderfully as muffins; just adjust your baking time accordingly, typically 20-25 minutes, until a toothpick inserted comes out clean. I even love making mini loaves to share with friends and neighbors – they make perfect edible gifts that always bring joy.
Now, it’s your turn!
I’ve shared my secrets, my tips, and my passion for this incredible bake. I truly believe that once you try this recipe, it will become a cherished staple in your kitchen, just as it has in mine. There’s an unparalleled satisfaction that comes from creating something so delicious from scratch, and I want you to experience that joy. So, gather your ingredients, preheat your oven, and prepare to fill your home with the most wonderful aroma. When your beautiful loaf of Chocolate Banana Bread emerges, golden-brown and fragrant, I sincerely hope you’ll savor every single bite. After you’ve baked it, please come back and share your experience with me! I absolutely love hearing from you and seeing your creations. Did you add any variations? What did you serve it with? Leave a comment below, or better yet, share a photo on your favorite social media and tag me! I can’t wait to see your masterpieces and hear about how much you loved this truly special recipe. Happy baking!
Frequently Asked Questions (FAQs)
Can I use under-ripe bananas for this recipe?
While you technically can use slightly green bananas, I strongly recommend waiting until your bananas are very ripe, ideally with plenty of brown spots on the peel. The riper the banana, the sweeter and more flavorful it will be, and it will also contribute significantly to the moistness of the bread. Under-ripe bananas will result in a less sweet and potentially drier loaf. If you’re in a hurry, you can ripen bananas quickly by baking them on a baking sheet at 300°F (150°C) for 15-30 minutes, until their skins are black and shiny.
Can I freeze Chocolate Banana Bread?
Absolutely! This bread freezes beautifully. Once it’s completely cooled, you can wrap the entire loaf tightly in plastic wrap, then again in aluminum foil, and place it in a freezer-safe bag. It will last for up to 3-4 months in the freezer. For individual servings, slice the bread first, then wrap each slice separately before freezing. Thaw at room temperature, or gently warm slices in a toaster oven for a fresh-baked taste.
What kind of chocolate works best?
For this Chocolate Banana Bread, I typically use semi-sweet chocolate chips or chopped semi-sweet baking chocolate. They offer a perfect balance of sweetness and rich chocolate flavor that complements the banana beautifully. However, feel free to experiment! Dark chocolate chunks (60-70% cocoa) will give you a more intense chocolate flavor, while milk chocolate chips will make it sweeter and creamier. Mini chocolate chips are also a great option for more even distribution throughout the loaf.
Why did my banana bread sink in the middle?
There are a few common reasons why banana bread might sink. It could be due to overmixing the batter, which develops the gluten too much and makes the bread tough and prone to sinking. Always mix until just combined. Another reason could be opening the oven door too early during baking, causing a sudden drop in temperature. Make sure your oven temperature is accurate and avoid peeking until at least two-thirds of the baking time has passed. Over-leavening (too much baking soda/powder) or using too many mashed bananas without adjusting other ingredients can also contribute to a sunken middle.
How long does homemade banana bread last and how should I store it?
When stored properly, homemade banana bread will stay fresh for about 3-4 days at room temperature. To keep it moist, wrap the cooled loaf tightly in plastic wrap or aluminum foil, or store it in an airtight container. If your kitchen is particularly warm or humid, or if you plan to keep it longer, I recommend storing it in the refrigerator, where it can last up to a week. Just be aware that refrigeration can sometimes alter the texture slightly, making it a bit firmer.
Chocolate Banana Bread Recipe: Super Moist & Flavorful
Chocolate Banana Bread is more than just a simple quick bread; it’s a heartwarming revelation that transforms humble, overripe bananas into an irresistible masterpiece. There’s a unique joy in taking what might otherwise be discarded and turning it into something so utterly delicious and comforting. I find that this particular variation elevates the beloved classic to new heights, offering a delightful interplay of textures and flavors that captivates from the very first bite.
Ingredients
-
3-4 medium very ripe bananas (1 ½ cups mashed)
-
½ cup (113g) unsalted butter, melted
-
¾ cup (150g) granulated sugar
-
1 large egg, room temperature
-
1 tsp vanilla extract
-
1 ½ cups (180g) all-purpose flour
-
½ cup (45g) unsweetened cocoa powder
-
1 tsp baking soda
-
¼ tsp salt
-
1 cup (170g) semi-sweet chocolate chips or chunks
-
Optional: ¼ cup extra chocolate chips for sprinkling
Instructions
-
Step 1
Preheat oven to 350°F (175°C). Grease and flour a 9×5-inch loaf pan, or line with parchment paper for easy removal. -
Step 2
In a medium bowl, mash ripe bananas (about 1 ½ cups). In a large mixing bowl, whisk melted butter, granulated sugar, large egg, and vanilla extract until well combined and fluffy. Gently fold in the mashed bananas. -
Step 3
In a separate medium bowl, whisk together all-purpose flour, unsweetened cocoa powder, baking soda, and salt until thoroughly combined. -
Step 4
Add the dry ingredients to the wet ingredients. With a rubber spatula, gently fold until just combined. Avoid over-mixing; a few streaks of flour are acceptable. -
Step 5
Gently fold in 1 cup of semi-sweet chocolate chips or chunks. Reserve an optional ¼ cup of chocolate chips if you wish to sprinkle them on top before baking. -
Step 6
Pour the batter into the prepared loaf pan and spread evenly. Sprinkle any reserved chocolate chips over the top. Bake for 55-70 minutes, or until a wooden skewer inserted into the center comes out clean or with moist crumbs (no wet batter). -
Step 7
Remove the loaf from the oven and let it cool in the pan for 10-15 minutes on a wire rack. Then, carefully remove the bread from the pan and transfer it to the wire rack to cool completely. Slice with a serrated knife and enjoy. -
Step 8
Store leftover Chocolate Banana Bread in an airtight container at room temperature for 3-4 days. For longer storage, wrap tightly and freeze for up to 3 months. Thaw at room temperature or gently warm.
Important Information
Nutrition Facts (Per Serving)
It is important to consider this information as approximate and not to use it as definitive health advice.
Allergy Information
Please check ingredients for potential allergens and consult a health professional if in doubt.


Leave a Comment