
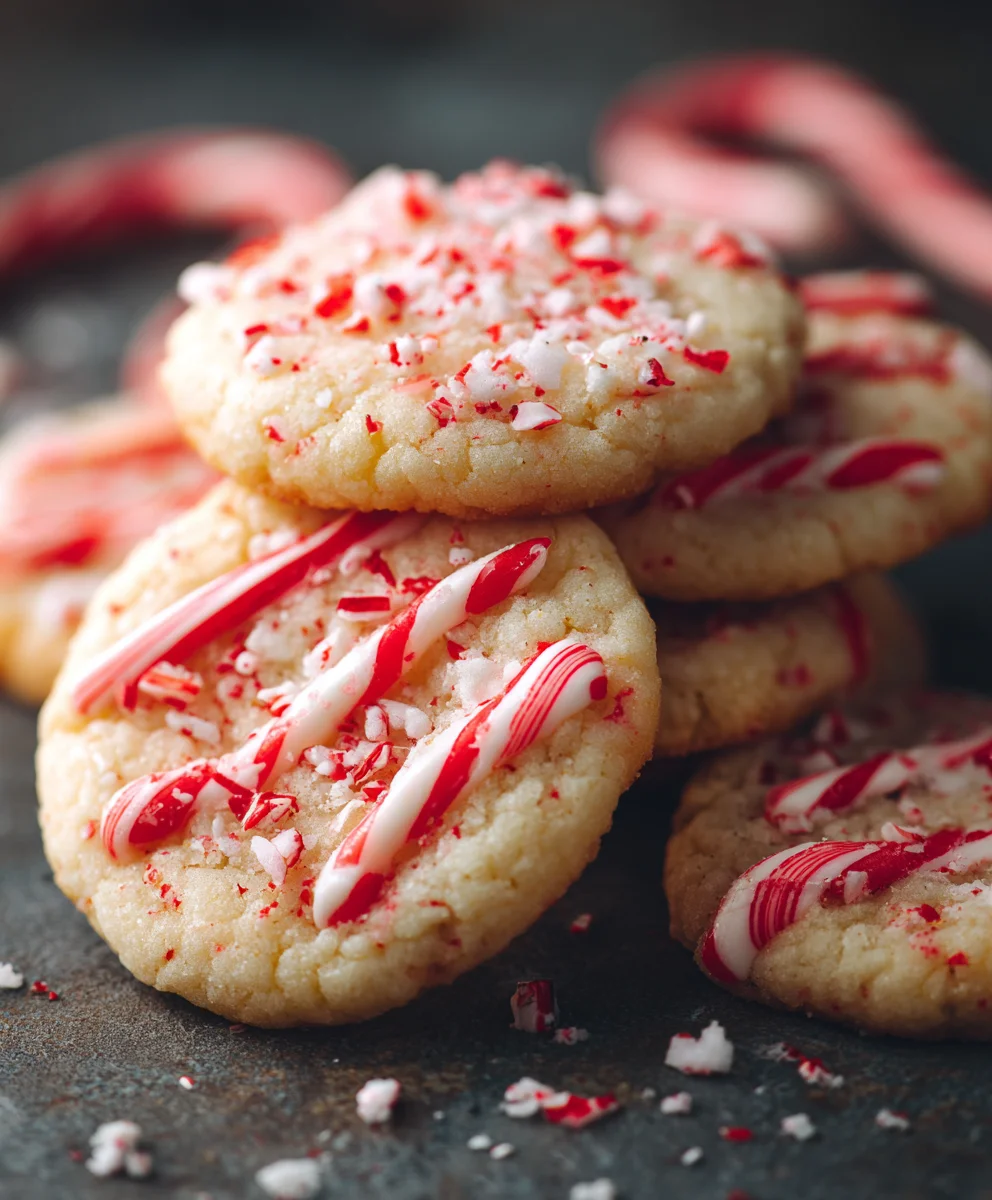
Candy Cane Cookies stand as a truly iconic symbol of holiday cheer and festive baking. As the colder months draw in and the spirit of the season begins to sparkle, there’s nothing quite like the sight and smell of these delightful treats emerging from the oven. I find their whimsical red and white stripes not only captivate the eye but also evoke a profound sense of nostalgia, taking many of us back to cherished childhood memories and joyous family gatherings. This particular cookie isn’t just a dessert; it’s a tradition, an edible piece of art that brightens any holiday spread and brings smiles to faces young and old.
The charm of these wonderful cookies lies not only in their stunning visual appeal, mimicking the classic holiday confection, but also in their irresistible flavor profile. The delicate, buttery shortbread base, often infused with a hint of vanilla, provides a perfect canvas for the vibrant burst of peppermint that truly defines the experience. It’s this harmonious blend of crisp texture and refreshing minty sweetness that makes Candy Cane Cookies a perennial favorite. They’re not just a delight to eat; the process of twisting and shaping the dough into their distinctive form is part of the fun, an engaging activity that can become a cherished part of your holiday preparations. Whether you’re baking for a cookie exchange, a festive party, or simply to fill your home with the joyous aroma of Christmas, these cookies are guaranteed to be a hit.

Ingredients:
- 2 ½ cups (300g) all-purpose flour: This forms the fundamental structure of our delightful Candy Cane Cookies. Using all-purpose flour ensures a tender yet sturdy cookie.
- 1 teaspoon baking powder: Our secret weapon for a slight lift and delicate texture, making these cookies wonderfully light.
- ½ teaspoon salt: Don’t skip the salt! It balances the sweetness and enhances all the other flavors, making every bite of your Candy Cane Cookies sing.
- 1 cup (226g) unsalted butter: Make sure it’s softened at room temperature. Butter is key for richness, flavor, and contributing to that melt-in-your-mouth tenderness. Using unsalted butter allows us to control the exact amount of salt in the recipe.
- 1 cup (200g) granulated sugar: Provides the perfect amount of sweetness and helps achieve that slightly crisp edge while keeping the inside soft.
- 1 large egg: At room temperature, please! Eggs act as a binder, adding moisture and structure, ensuring our cookies hold their iconic shape.
- 1 teaspoon pure vanilla extract: A classic flavor enhancer that complements the peppermint beautifully, providing a warm, inviting base note for your Candy Cane Cookies.
- ½ teaspoon pure peppermint extract: This is where the magic happens! Pure peppermint extract gives our cookies that unmistakable, refreshing holiday flavor and aroma. Adjust to your preference, but ½ teaspoon provides a lovely balance.
- Red gel food coloring: I highly recommend using gel food coloring over liquid. It provides a vibrant, intense red without adding excess liquid to the dough, which could alter the texture. This is essential for the striking visual appeal of our Candy Cane Cookies.
- Optional: ¼ cup extra granulated sugar for rolling: For an extra festive sparkle and a delightful textural crunch, you can roll the shaped cookies in sugar before baking. It’s a beautiful finishing touch for these holiday treats.
Preparing the Vibrant Dough for Your Candy Cane Cookies
- Gather Your Dry Ingredients with Care: First things first, let’s prepare our dry ingredients. In a medium-sized bowl, take your 2 ½ cups of all-purpose flour, 1 teaspoon of baking powder, and ½ teaspoon of salt. Give them a good whisk together. We want to ensure these are thoroughly combined and evenly distributed. This isn’t just a formality; it guarantees that every single one of our future Candy Cane Cookies will have a consistent texture and rise, with no pockets of unmixed baking powder or salt. A well-whisked dry mixture is the foundation for success, so take your time here. Once perfectly blended, set this bowl aside for a moment.
- Creaming Butter and Sugar to Perfection: Now, let’s move on to the star of our wet ingredients: the butter and sugar. In a large mixing bowl, or the bowl of your stand mixer fitted with the paddle attachment, combine your softened unsalted butter and granulated sugar. We’re going to beat these together until the mixture transforms into a light, fluffy, and pale yellow cloud. This usually takes about 2-3 minutes on medium speed. This creaming process is absolutely crucial because it incorporates air into the butter, which creates tiny pockets that will expand during baking, resulting in a wonderfully tender and light cookie texture. Make sure to scrape down the sides of the bowl frequently with a spatula to ensure everything is perfectly combined and no sugary bits are left untouched.
- Infusing Flavor and Binding with Egg and Extracts: Once your butter and sugar mixture is beautifully light and airy, it’s time to add the binding and signature flavors. Beat in the large room-temperature egg until it’s fully incorporated into the mixture. The egg acts as an emulsifier, helping everything come together smoothly. Then, it’s time for the magical aroma to begin! Add the 1 teaspoon of pure vanilla extract and ½ teaspoon of pure peppermint extract. Oh, the scent of peppermint instantly signals the holiday season, doesn’t it? Mix these wonderful extracts in until they are just combined. Be mindful not to overmix at this stage; we want to integrate the flavors without overworking the mixture.
- Gently Combining Wet and Dry for Tender Cookies: Now, for the final step of our dough creation. Gradually add your whisked dry flour mixture to the wet butter mixture. I recommend adding it in thirds, mixing on the lowest speed after each addition until just combined. The key here is to be incredibly gentle and vigilant. As soon as you see no dry streaks of flour remaining, stop mixing immediately. Overmixing the dough once the flour is added is the cardinal sin of cookie baking! It develops the gluten in the flour too much, which can lead to tough, chewy cookies – and we’re aiming for deliciously tender, melt-in-your-mouth Candy Cane Cookies. The dough at this point will be soft but should be manageable and cohesive.
Coloring and Chilling: The Foundation for Festive Candy Cane Cookies
- Dividing the Dough for Dual Colors: With our perfectly mixed dough ready, it’s time to bring our Candy Cane Cookies to life with their iconic colors! Carefully divide the dough exactly in half. For precision, you can use a kitchen scale to ensure two equal portions, but a good eye usually does the trick. Place one half back into the mixing bowl or a separate clean bowl, and place the other half onto a piece of plastic wrap or into another bowl. This separation is crucial for preparing our distinct red and white sections.
- Achieving That Perfect Festive Red Hue: To one half of the dough, add several drops of red gel food coloring. I suggest starting with about ½ teaspoon or more, depending on how intensely vibrant you want your red to be. Remember, gel coloring is highly concentrated, so a little goes a long way and is much better than liquid coloring which can alter the dough’s consistency. Now comes the kneading! Using your hands, gently but thoroughly knead the food coloring into the dough. A friendly tip: wear disposable gloves for this step! Unless you want festive red hands for the rest of the day, gloves are your best friend here. Continue kneading patiently until the color is completely uniform and vibrant, with absolutely no white streaks remaining. We want a truly rich, saturated red to create that striking contrast with the uncolored white dough, which will remain its natural, pale yellow hue. This vibrant color separation is what truly makes these Candy Cane Cookies visually stunning.
- The Essential Chill Time: Ensuring Perfectly Shaped Candy Cane Cookies: Once both dough portions (one vibrant red, one natural white) are prepared, gently flatten each into a disk shape. This makes them easier to wrap and chill evenly. Wrap each disk tightly in plastic wrap, making sure there are no air pockets. Now, here comes a step you absolutely cannot skip: refrigerate the dough for at least 2 hours. Chilling is a non-negotiable requirement for these Candy Cane Cookies! It firms up the butter in the dough, making it significantly easier to handle, roll, and shape without it becoming sticky or tearing. More importantly, it helps prevent the cookies from spreading excessively in the oven, ensuring they maintain their beautiful, intricate candy cane shape. You can even chill the dough overnight if you’re planning your baking ahead; just allow it to sit at room temperature for 10-15 minutes before you begin shaping if it feels too hard to work with initially. This patience now will lead to perfect cookies later!
Shaping the Iconic Candy Cane Cookies: Crafting Holiday Magic
- Preparing for Shaping: Working in Batches: After your dough has had its much-needed chill time, retrieve one portion of white dough and one portion of red dough from the refrigerator. It’s best to keep the remaining dough chilled until you are ready to work with it. This strategy helps maintain the dough’s cool temperature and firm consistency, preventing it from getting too warm, soft, and sticky during the shaping process. Working with smaller batches ensures easier handling and better results for your intricate Candy Cane Cookies.
- Rolling Even Dough Ropes: The Key to a Defined Swirl: Now for the truly creative and fun part: shaping! Take a small piece of white dough, roughly about 1 tablespoon in size. First, gently roll it between your palms to soften it slightly, then transfer it to a lightly floured surface (or a silicone mat, which I find even easier). Roll it into a rope that is approximately 6 inches long and ¼ inch thick. The goal here is uniformity; try your best to make the rope as even in thickness as possible along its entire length. Repeat this precise process with a small piece of red dough, aiming for another 6-inch rope of the exact same length and thickness. Consistency is your friend here! The smoother and more uniform your individual ropes are, the more perfectly defined and professional your final twisted Candy Cane Cookies will look.
- Twisting for that Classic Candy Cane Swirl: Once you have one perfect white rope and one perfect red rope, gently lay them side-by-side on your work surface. Carefully pinch them together at one end, ensuring they are securely joined. Now, with a delicate touch, begin to twist them around each other, creating that iconic spiral effect. Imagine gently braiding two strands of hair. Be gentle but firm enough to ensure the ropes adhere to each other without pulling apart. Once twisted, very lightly roll the combined, twisted rope on your work surface. This final gentle roll helps to smooth out any slight unevenness, further sets the twist, and slightly lengthens the combined rope to about 7-8 inches. This ensures a cohesive and beautifully structured dough for your magnificent Candy Cane Cookies.
- Forming the Signature “C” Shape: To form the classic candy cane shape, carefully bend one end of your twisted rope down to create the familiar curve, resembling an inverted “J” or a “C”. Handle the dough with care to avoid distorting the beautiful twist you’ve just created. Once shaped, gently place each candy cane onto a baking sheet that you’ve lined with parchment paper. Parchment paper is essential here! It not only prevents sticking but also ensures easy transfer of the delicate cookies after baking and makes cleanup a breeze. Make sure to leave about 1 ½ to 2 inches between each cookie to allow for a small amount of spreading during baking, ensuring they don’t merge into one giant cookie.
- Patience and Repetition: The Art of Many Candy Cane Cookies: Continue this entire shaping process (repeating steps 9, 10, and 11) with the remaining dough, working methodically and enjoying the process. It is a bit time-consuming, yes, but I promise you, the visual reward of a tray full of these perfectly shaped, festive Candy Cane Cookies is absolutely worth every moment of effort! If at any point during shaping the dough starts to feel too soft, sticky, or difficult to handle – which can happen if your kitchen is warm – don’t hesitate! Simply pop the dough back into the fridge for 10-15 minutes to firm up again. Patience and attention to dough temperature are your absolute best friends in this detailed stage of crafting your holiday treats.
- The Optional Sparkle: Elevating Your Candy Cane Cookies: For that extra touch of holiday magic and a truly glistening finish, consider this optional step: lightly sprinkle the shaped cookies with extra granulated sugar just before baking. This simple addition gives them a beautiful, sparkling exterior that catches the light and evokes a wonderful, festive spirit. It’s a small detail, but it truly makes a significant difference in the presentation and overall appeal of your already stunning Candy Cane Cookies.
Baking the Perfect Candy Cane Cookies: Achieving Golden Perfection
- Preheating Your Oven to the Ideal Temperature: Before you even think about putting those beautifully shaped cookies into the oven, make sure it’s properly preheated! Preheat your oven to 375°F (190°C). A fully and consistently preheated oven is absolutely critical for even baking and for ensuring our intricately designed Candy Cane Cookies hold their shape and bake uniformly. Position an oven rack in the center of the oven, which is typically the best spot for even heat distribution.
- Baking to Tender, Not Overdone, Perfection: Carefully transfer your baking sheets laden with lovely Candy Cane Cookies into the preheated oven. Bake them for approximately 8-10 minutes. How do you know when they’re done? Look for the edges to be very lightly golden, and the white portions of the cookies should appear set, no longer looking raw or wet. It’s important to watch them closely, as oven temperatures can vary. Be very careful not to overbake these cookies! Overbaking will make them too crisp and dry, causing them to lose their delightful, tender chewiness. The vibrant red color will remain brilliant, and your kitchen will be filled with the most wonderful, refreshing peppermint aroma – a sure sign that holiday magic is deliciously unfolding!
- Initial Cooling on the Baking Sheet: Building Strength: Once baked to perfection, gently remove the baking sheets from the oven. Resist the urge to immediately transfer the cookies! Allow them to cool on the baking sheets for about 5 minutes. These cookies are quite delicate and fragile when they are warm straight out of the oven, and this crucial resting period allows them to firm up slightly. This makes them much less prone to breaking or crumbling when you move them.
-
Complete Cooling on a Wire Rack: For Optimal Texture and Crispness: After their initial rest on the baking sheet, carefully transfer the slightly cooled Candy Cane Cookies to a wire rack. Let them cool completely on the wire rack. Cooling completely on a wire rack is essential because it allows air to circulate all around each cookie. This prevents them from getting soggy on the bottom due to trapped heat and moisture, ensuring they maintain their crispness on the outside and their wonderfully tender texture within. Once fully cooled, these festive treats are ready to be admired, shared, and most importantly, enjoyed! They will store beautifully in an airtight container at room temperature for up to a week, though I doubt they’ll last that long!
Conclusion:
Well, my friends, we’ve reached the sweet finale of our baking journey, and I genuinely hope you’re feeling inspired to roll up your sleeves and bring this incredible recipe to life in your own kitchen. I truly believe that these aren’t just any ordinary baked goods; these are the kind of treats that create lasting memories, fill your home with the most inviting aromas, and put a genuine smile on everyone’s face. The vibrant colors, the irresistible swirl, and that unmistakable burst of refreshing peppermint make this recipe an absolute showstopper, a true testament to simple ingredients coming together to create something extraordinary. It’s more than just a dessert; it’s an experience, a delightful sensory adventure that perfectly captures the spirit of joy and celebration. These cookies are destined to become a cherished part of your culinary traditions, year after year.
What makes these particular treats a definite must-try? For starters, it’s the magical combination of a perfectly tender, buttery cookie base infused with just the right amount of cooling peppermint. Each bite delivers a comforting richness followed by a bright, clean finish that leaves you craving just one more. Then there’s the visual appeal: the striking red and white twist isn’t just beautiful; it’s iconic, instantly recognizable, and brings an undeniable festive charm to any spread. This isn’t a complex recipe that demands hours of intricate work; rather, it’s designed to be approachable, making the process itself a joyful activity, whether you’re a seasoned baker or just starting your culinary adventures. The ease with which you can transform simple dough into these stunning edibles is truly rewarding, and the end result is a batch of cookies that look as professional as they taste. Believe me when I say, once you master these, they’ll become a staple in your repertoire, eagerly anticipated by family and friends alike. These Candy Cane Cookies aren’t just seasonal; they’re timelessly delightful, perfect for brightening any day with their unique charm and delicious flavor.
Now, let’s talk about how to make these delightful morsels even more special or how to enjoy them beyond just eating them straight from the cooling rack (which, let’s be honest, is a perfectly valid and highly recommended serving suggestion!). My absolute favorite way to serve them is alongside a steaming mug of rich hot chocolate, perhaps topped with a dollop of whipped cream and an extra sprinkle of crushed candy canes. The warm, chocolatey beverage provides a wonderful contrast to the cool, crisp peppermint, creating a symphony of flavors that is simply divine. They also make an incredibly thoughtful and visually stunning gift. Arrange them neatly in a clear cellophane bag tied with a festive ribbon, and you have a homemade present that speaks volumes of care and effort, perfect for neighbors, teachers, or colleagues. For a holiday platter, these cookies stand out beautifully among other festive treats, adding that essential pop of color and unique flavor that truly elevates the entire presentation. Don’t underestimate the power of a perfectly placed cookie!
If you’re feeling adventurous and want to put your own spin on things, the possibilities are virtually endless! For a subtle twist, try adding a touch of almond extract to the dough alongside the peppermint, creating a delightful underlying nutty note that complements the mint beautifully. Or, for those who prefer less intense peppermint, you could swap out half of the peppermint extract for pure vanilla extract, resulting in a milder, more universally appealing flavor that still retains its festive essence. Another fantastic variation involves dipping half of the cooled cookies into melted white chocolate and then sprinkling them with additional crushed candy canes or some festive sprinkles before the chocolate sets. This adds an extra layer of sweetness and texture, making them even more decadent and visually appealing. You could also experiment with food coloring; imagine swirling green and white dough for a different holiday theme, or even blue and white for a magical winter wonderland effect. Don’t be afraid to get creative with your color combinations and flavor additions; make them uniquely yours! For those with dietary considerations, many great gluten-free all-purpose flour blends can be substituted cup-for-cup, and vegan butter alternatives work wonderfully to maintain that rich, buttery texture, allowing everyone to enjoy these magnificent treats without compromise. These cookies are truly adaptable!
So, my fellow baking enthusiasts, I implore you: don’t let this recipe be just another bookmark in your browser! Take the leap, gather your ingredients, and immerse yourself in the joyful process of creating these exquisite Candy Cane Cookies. There’s a special kind of magic that happens when you’re in the kitchen, filling your home with the scent of freshly baked goods, and I truly want you to experience that firsthand. Imagine the pride you’ll feel when you present a platter of these perfectly swirled, minty wonders to your loved ones, or the pure joy in their eyes as they take that first delightful bite. This recipe is designed to be a success, to build your confidence, and to spread happiness. Once you’ve baked your batch, I would absolutely love to hear about your experience! Did you stick to the classic? Did you try a fun variation? Please, share your baking triumphs, your photos, and any tips you discovered along the way in the comments below. Your stories inspire me and help our wonderful community grow, fostering a space where we can all share our passion for delicious homemade treats. Thank you for joining me on this delicious adventure; happy baking, and I can’t wait to see what you create!
Candy Cane Cookies
Iconic red and white striped Candy Cane Cookies are a festive holiday treat. These tender, buttery shortbread cookies are infused with refreshing peppermint, making them a delicious and visually stunning addition to any holiday celebration.
Ingredients
-
2 ½ cups (300g) all-purpose flour
-
1 tsp baking powder
-
½ tsp salt
-
1 cup (226g) unsalted butter, softened
-
1 cup (200g) granulated sugar
-
1 large egg, room temperature
-
1 tsp pure vanilla extract
-
½ tsp pure peppermint extract
-
Red gel food coloring
-
¼ cup extra granulated sugar (optional, for rolling)
Instructions
-
Step 1
Whisk together 2 ½ cups (300g) all-purpose flour, 1 tsp baking powder, and ½ tsp salt in a medium bowl. Set aside. -
Step 2
In a large mixing bowl, cream 1 cup (226g) softened unsalted butter and 1 cup (200g) granulated sugar until light and fluffy (2-3 minutes). -
Step 3
Beat in 1 large room-temperature egg, then 1 tsp pure vanilla extract and ½ tsp pure peppermint extract until just combined. -
Step 4
Gradually add the whisked dry flour mixture to the wet ingredients, mixing on the lowest speed until just combined. Do not overmix. -
Step 5
Divide the dough in half. Knead red gel food coloring into one half until uniformly red. Leave the other half uncolored (white). -
Step 6
Flatten each dough half into a disk, wrap tightly in plastic wrap, and refrigerate for at least 2 hours, or until firm enough to handle. -
Step 7
Working with small portions of chilled red and white dough (keep the rest chilled), roll a tablespoon of each color into a 6-inch long, ¼-inch thick rope. -
Step 8
Lay the red and white ropes side-by-side, pinch one end together, then gently twist them around each other to form a spiral. Bend into a ‘C’ shape and place on a parchment-lined baking sheet, leaving 1.5-2 inches between cookies. -
Step 9
Optionally, sprinkle the shaped cookies with ¼ cup extra granulated sugar for a sparkling finish. -
Step 10
Preheat oven to 375°F (190°C). Bake cookies for 8-10 minutes, until the edges are very lightly golden and the white portions appear set. Do not overbake. -
Step 11
Remove baking sheets from the oven and let cookies cool on the sheets for 5 minutes to firm up. Then, carefully transfer them to a wire rack to cool completely before serving or storing.
Important Information
Nutrition Facts (Per Serving)
It is important to consider this information as approximate and not to use it as definitive health advice.
Allergy Information
Please check ingredients for potential allergens and consult a health professional if in doubt.
-
Leave a Comment