
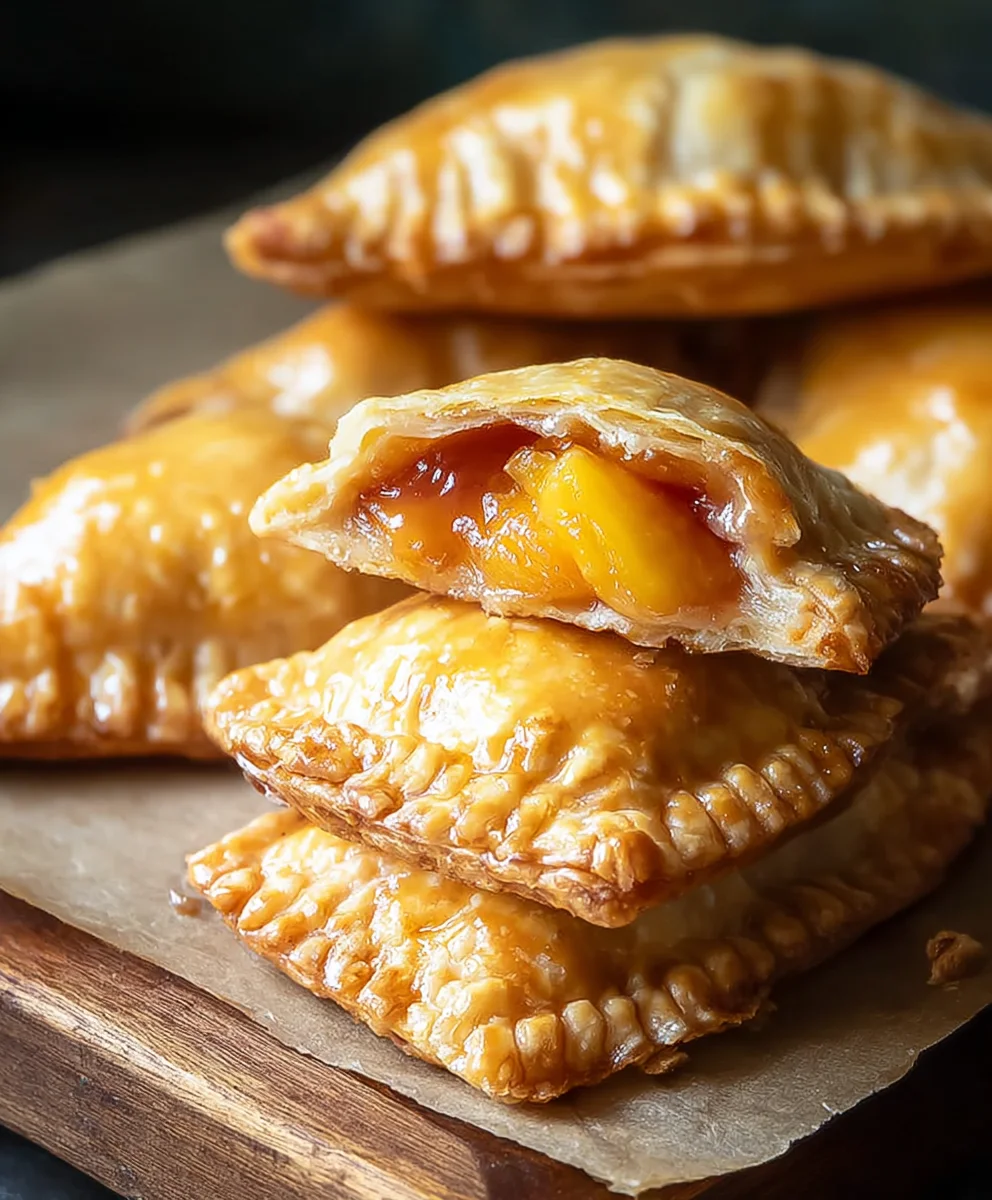
Peach Hand Pies – doesn’t that just evoke images of warm sunshine, juicy, ripe fruit, and effortless enjoyment? There’s something undeniably charming and utterly irresistible about a dessert designed for pure, unadulterated pleasure, no fork required. I’ve always been captivated by the humble yet versatile hand pie, a delightful culinary invention that speaks volumes about practicality meeting perfection. Tracing their lineage back to simpler times, these individual pastries have long been cherished as portable treats, ideal for everything from a farmer’s lunchbox to a festive picnic.
Why We Adore These Portable Delights
What makes Peach Hand Pies so beloved? It’s the exquisite symphony of flavors and textures. Imagine biting through a golden, flaky crust to reach a warm, luscious filling bursting with the natural sweetness and vibrant tang of peak-season peaches. It’s a sensory experience that instantly transports you to the heart of summer. Beyond their incredible taste, their convenience is unmatched. Perfect for sharing, for a treat on the go, or simply for savoring a personal slice of heaven without the fuss of a full-sized pie, these charming individual desserts are truly a joy to bake and to eat. Join me as we embark on a journey to create these quintessential summer treats.

Ingredients:
-
For the Irresistible Pie Dough (Makes 12-16 small Peach Hand Pies):
- 3 cups (about 360g) All-Purpose Flour: I always reach for a good quality all-purpose flour to ensure a tender, yet sturdy crust for our Peach Hand Pies.
- 1 tablespoon Granulated Sugar: A touch of sweetness helps to round out the flavor of the crust, complementing the sweet peach filling beautifully.
- 1 teaspoon Fine Sea Salt: Essential for balancing flavors in the dough and enhancing the overall taste.
- 1 cup (2 sticks or 226g) Unsalted Butter, very cold and cut into ½-inch cubes: This is the secret to a super flaky crust! Cold butter creates pockets of steam in the oven, leading to those wonderful layers we all love in a perfect pie. Don’t let it get warm.
- ½ cup (120ml) Ice Water, plus 1-2 tablespoons more if needed: Using ice water keeps the butter from melting and helps the dough come together without overworking it. I usually keep a small bowl of ice water ready with a few ice cubes in it.
-
For the Luscious Peach Filling:
- 4-5 cups (about 4-5 medium/large) Fresh Peaches, ripe but firm, peeled, pitted, and diced into ½-inch pieces: The star of our Peach Hand Pies! Choose peaches that are fragrant and slightly soft, but not mushy. If fresh aren’t available, frozen (thawed and drained well) can work in a pinch.
- ½ cup (100g) Granulated Sugar, or more to taste: The amount needed can vary based on the sweetness of your peaches. I always taste a small piece of peach first!
- ¼ cup (30g) Cornstarch or Tapioca Starch: This is crucial for thickening the peach juices, preventing a soggy bottom in our Peach Hand Pies. Tapioca starch often gives a slightly clearer, glossier finish.
- 1 tablespoon Fresh Lemon Juice: Brightens the flavor of the peaches and helps to balance the sweetness, preventing the filling from becoming cloyingly sweet.
- 1 teaspoon Pure Vanilla Extract: A classic pairing with peaches, adding warmth and depth to the filling.
- ½ teaspoon Ground Cinnamon: A comforting spice that beautifully complements the peaches.
- Pinch of Ground Nutmeg (optional): I find a tiny touch of nutmeg really enhances the peach flavor, but it’s optional if it’s not your favorite.
-
For the Egg Wash & Topping:
- 1 Large Egg: Beaten with a splash of water or milk, this creates a beautiful golden-brown crust.
- 1 tablespoon Water or Milk: Thins the egg wash, making it easier to brush.
- 2-3 tablespoons Coarse Sugar (like turbinado or demerara), optional: Sprinkling this on top before baking adds a lovely crunch and sparkle to your Peach Hand Pies.
-
For the Optional Glaze (After Baking, if desired):
- 1 cup (120g) Powdered Sugar (Confectioners’ Sugar): The base for a simple, sweet drizzle.
- 2-3 tablespoons Milk or Cream: Used to thin the glaze to your desired consistency.
- ½ teaspoon Pure Vanilla Extract: Enhances the flavor of the glaze.
Preparing the Perfectly Flaky Pie Dough for your Peach Hand Pies
- Combine Dry Ingredients: In a large mixing bowl, I start by whisking together the 3 cups of all-purpose flour, 1 tablespoon of granulated sugar, and 1 teaspoon of fine sea salt. This ensures all the dry components are evenly distributed before adding the fat. A well-mixed dry base is key for consistent dough.
- Incorporate the Cold Butter: Now comes the fun part! Add the 1 cup (2 sticks) of very cold, ½-inch cubed unsalted butter to the flour mixture. Using a pastry blender, two forks, or your fingertips, cut the butter into the flour until the mixture resembles coarse meal with some pea-sized pieces of butter still visible. It’s crucial not to overmix here; visible butter pieces are what create those glorious flaky layers in your Peach Hand Pies. If using your hands, work quickly to prevent the butter from warming too much. I sometimes even chill my bowl and pastry blender beforehand.
- Add the Ice Water: Gradually add the ½ cup of ice water, one tablespoon at a time, mixing gently with a fork or your hands until the dough just comes together. Be careful not to add too much water; the dough should be shaggy but cohesive enough to form a ball. You might need 1-2 extra tablespoons, but I always err on the side of less water, as you can always add a bit more. Overwatering leads to tough dough, and we want tender Peach Hand Pies!
- Form Discs and Chill: Divide the dough into two equal portions. Gently press each portion into a flat disc, about 1-inch thick. Wrap each disc tightly in plastic wrap. I then place these discs in the refrigerator for at least 1 hour, or preferably 2 hours. This chilling time allows the gluten to relax, making the dough easier to roll out, and ensures the butter stays cold. This step is non-negotiable for a flaky crust! You can even make the dough a day or two in advance.
Crafting the Luscious Peach Filling for Your Hand Pies
- Prepare the Peaches: First, I gently peel my ripe peaches. A simple trick is to blanch them in boiling water for 30-60 seconds, then immediately transfer them to an ice bath. The skins should slip right off! After peeling, I pit them and dice the peaches into uniform ½-inch pieces. This size ensures they cook evenly and fit nicely into our Peach Hand Pies without being too bulky. Aim for about 4-5 cups of diced peaches.
- Combine Filling Ingredients: In a medium bowl, I gently combine the diced peaches with ½ cup of granulated sugar (adjusting based on my peaches’ natural sweetness), ¼ cup of cornstarch (or tapioca starch), 1 tablespoon of fresh lemon juice, 1 teaspoon of pure vanilla extract, ½ teaspoon of ground cinnamon, and a tiny pinch of ground nutmeg, if I’m using it.
- Toss Gently and Let Sit: I toss all the ingredients together very gently until the peaches are evenly coated. Then, I let the mixture sit for about 10-15 minutes at room temperature. This allows the sugar to draw out some of the peach juices, which then combine with the cornstarch, creating a more cohesive and flavorful filling that thickens beautifully when baked. This brief maceration period is important for a perfectly saucy, not watery, filling inside your Peach Hand Pies.
Assembling Your Delicious Peach Hand Pies
- Prepare Your Work Surface: Remove one disc of chilled pie dough from the refrigerator. Lightly flour a clean work surface and your rolling pin. I always keep a little extra flour nearby in case the dough starts to stick.
- Roll Out the Dough: Roll out the dough disc into a large circle, about ⅛-inch thick. It’s important to roll evenly to ensure consistent cooking and flakiness. If the dough starts to crack, just let it warm up for a minute or two, or gently press the cracks back together.
- Cut Out Circles: Using a 3.5 to 4-inch round cookie cutter (or even an inverted glass with a sharp rim), cut out as many circles as possible from the rolled-out dough. Gather the scraps, gently knead them together, reroll, and cut out more circles until you’ve used most of the dough. You should get about 6-8 circles per dough disc, totaling 12-16 hand pies.
- Fill the Dough Circles: Take one dough circle and place about 1 ½ to 2 tablespoons of the peach filling onto one half of the circle, leaving a small border (about ½-inch) around the edge. Do not overfill! This is a common mistake that can lead to messy, leaky Peach Hand Pies. Less is more when it comes to filling for these portable treats.
- Fold and Crimp: Lightly moisten the edge of the dough circle with a little water using your fingertip or a pastry brush. Carefully fold the empty half of the dough over the filling to create a semi-circle. Gently press the edges together to seal. Then, use the tines of a fork to firmly crimp all along the curved edge. This not only creates a pretty pattern but also ensures a tight seal, preventing the filling from oozing out during baking.
- Vent and Prepare for Baking: Using a small sharp knife, cut 2-3 small slits on the top of each Peach Hand Pie. These vents allow steam to escape during baking, preventing the pies from bursting and ensuring a beautifully flaky crust. Transfer the assembled hand pies to a baking sheet lined with parchment paper. If you’re working in batches or your kitchen is warm, you can pop the assembled pies back into the fridge for 15-20 minutes to chill before baking. This helps the butter in the crust stay cold for maximum flakiness.
- Egg Wash and Coarse Sugar: In a small bowl, whisk together the large egg with 1 tablespoon of water or milk to create an egg wash. Brush the tops of each hand pie generously with the egg wash. This will give them a gorgeous golden-brown shine. If desired, sprinkle a generous amount of coarse sugar over the tops. The coarse sugar adds a lovely sparkle and a delightful textural crunch to the Peach Hand Pies.
Baking the Golden Peach Hand Pies to Perfection
- Preheat Your Oven: Preheat your oven to 400°F (200°C) with a rack in the center position. Proper preheating is essential for an even bake and a beautifully golden crust on your Peach Hand Pies.
- Bake Until Golden: Place the baking sheet with the Peach Hand Pies into the preheated oven. Bake for 20-25 minutes, or until the crust is deeply golden brown and the filling is visibly bubbling through the vents. I usually rotate the baking sheet halfway through baking to ensure even browning. Keep an eye on them; ovens can vary! A rich golden-brown color indicates a perfectly cooked, flaky crust.
- Cool Completely: Once baked, carefully remove the Peach Hand Pies from the oven and transfer them, still on the parchment paper, to a wire rack to cool. It’s vital to let them cool for at least 30 minutes to an hour before eating. The filling will be extremely hot and needs time to set properly. If you cut into them too soon, the filling might be runny and could burn your mouth. Patience is a virtue when waiting for these delicious Peach Hand Pies!
Optional Glaze: The Sweet Finish (If Desired)
- Whisk Glaze Ingredients: While the Peach Hand Pies are cooling, if you’ve decided to add a glaze, whisk together 1 cup of powdered sugar, 2-3 tablespoons of milk or cream, and ½ teaspoon of pure vanilla extract in a small bowl until smooth. You’re aiming for a consistency that’s thick enough to cling to the pies but thin enough to drizzle. I always start with less liquid and add more spoonful by spoonful until I reach my desired consistency. A perfectly balanced glaze adds another layer of sweetness and elegance to these homemade Peach Hand Pies.
- Drizzle Over Cooled Pies: Once the Peach Hand Pies have cooled to at least warm (not hot!), drizzle the glaze artistically over the tops. You can use a spoon or transfer the glaze to a small piping bag (or a Ziploc bag with a corner snipped off) for more control. Allow the glaze to set for a few minutes before serving. This optional step adds a beautiful, sweet finish that makes these Peach Hand Pies even more irresistible! The contrast between the warm fruit, flaky crust, and sweet, crisp glaze is truly delightful.
Tips for the Best Peach Hand Pies:
- Don’t Overwork the Dough: This is my number one rule for flaky pastry. Overworking develops gluten, leading to a tough crust. Handle the dough as little as possible.
- Keep Everything Cold: Cold butter and ice water are your best friends. If your kitchen is warm, you can even chill your flour for 15-20 minutes before starting.
- Choose Ripe Peaches: The quality of your peaches directly impacts the flavor of your Peach Hand Pies. Taste them beforehand!
- Prevent a Soggy Bottom: The cornstarch in the filling and ensuring your pies are baked long enough to achieve a golden-brown bottom crust are key. Some people even lightly dust the bottom dough with a little extra flour or cornstarch before adding the filling.
- Storage: Leftover Peach Hand Pies can be stored at room temperature in an airtight container for 2-3 days, or in the refrigerator for up to 5 days. For best results, I often warm them slightly in the oven or microwave before serving.
- Freezing: Unbaked Peach Hand Pies can be frozen for up to 3 months. Arrange them on a baking sheet and freeze until solid, then transfer to a freezer-safe bag. Bake directly from frozen, adding about 10-15 minutes to the baking time.
Conclusion:
So, as we reach the end of our culinary journey, I truly hope you’re feeling inspired to roll up your sleeves and bring these incredible treats to life in your own kitchen. After all, the heart of any great recipe lies in its execution, and I promise you, this one is worth every moment of your time. These aren’t just any pastries; they are a delightful fusion of comfort, elegance, and pure, unadulterated flavor. They embody the very essence of homemade goodness, offering a warmth and satisfaction that store-bought options simply can’t replicate. The meticulous balance of sweet, juicy peaches enveloped in that perfectly crisp, buttery, and flaky crust creates an unforgettable experience that will have everyone asking for more.
Why These Peach Hand Pies Are a Must-Try: Your New Go-To Dessert!
What truly makes these Peach Hand Pies a stand-out recipe and an absolute must-try? It’s that magical combination of simplicity and gourmet appeal. The filling, bursting with the natural sweetness of ripe peaches, brightened by a hint of lemon and perhaps a touch of cinnamon or nutmeg, sings a symphony of summer flavors. Each bite transports you to an orchard on a warm, sunny day. Then there’s the crust – oh, the crust! It’s designed to be effortlessly flaky, golden-brown, and just sturdy enough to hold all that delicious fruit filling without being tough. It’s a testament to the fact that homemade truly is best, and you’ll taste the love and effort in every single morsel. They are convenient, perfectly portioned, and incredibly versatile, making them ideal for everything from a quick snack to an elegant dessert. They strike that perfect balance between rustic charm and refined flavor, offering a dessert that feels both approachable and incredibly special. This recipe isn’t just about baking; it’s about creating memories and sharing joy.
Serving Suggestions & Creative Variations to Elevate Your Experience
Now, let’s talk about making these beauties even more spectacular! While these Peach Hand Pies are utterly divine served simply, warm from the oven, there are so many ways to personalize and elevate them. Imagine them still slightly warm, perhaps with a generous scoop of vanilla bean ice cream slowly melting over the top, creating a creamy, dreamy contrast to the crisp pastry. A dollop of freshly whipped cream, lightly sweetened and perhaps infused with a hint of almond extract, would also be an exquisite pairing. For those who appreciate a touch of sophistication, a drizzle of warm caramel sauce or a light dusting of powdered sugar adds both visual appeal and an extra layer of sweetness.
But don’t stop there! The beauty of baking lies in experimentation. If you’re feeling adventurous, consider folding in other fruits with your peaches – a handful of raspberries or blackberries could add a lovely tart counterpoint. For a different spice profile, a pinch of ground ginger or even a touch of cardamom would introduce a warm, aromatic complexity that’s truly captivating. You could also experiment with the crust itself; a sprinkle of demerara sugar before baking would give it an extra crunch and sparkle, or a brush of egg wash for an even glossier finish. For a more autumnal feel, consider incorporating a mix of apples and peaches, seasoned with classic pie spices like allspice and cloves. Or, for a truly decadent treat, spread a thin layer of cream cheese mixture on the bottom crust before adding the peach filling – it’s a game-changer! These little pies are a canvas for your culinary creativity, ready to adapt to your tastes and preferences.
Your Turn! Try This Recipe and Share Your Sweet Success!
I genuinely hope this recipe inspires you to dive into the wonderful world of baking and experience the sheer delight of creating something so utterly delicious with your own hands. There’s a profound satisfaction that comes from pulling a tray of these golden, fragrant pies from the oven, knowing you’ve crafted them from scratch. It’s more than just a dessert; it’s an act of love, a sensory experience, and a testament to the joy of home baking. So, please, give these a try! I am so confident that you’ll fall in love with them, just as I have. And once you do, I would absolutely adore hearing about your experience. Did you add your own unique twist? What did your family and friends think? Did you find them easier or more challenging than you expected? Please don’t hesitate to share your thoughts, your successes, and even your “lessons learned” in the comments or on social media. Your feedback and stories are what truly energize me and help our baking community grow. Happy baking, my friends! I can’t wait to hear all about your delicious creations.
Delicious Peach Hand Pies: Easy Recipe & Perfect Dessert
Charming and utterly irresistible, these individual Peach Hand Pies feature a golden, flaky crust and a warm, luscious filling bursting with the natural sweetness and vibrant tang of peak-season peaches. Perfect for sharing, on-the-go treats, or a personal slice of heaven without the fuss of a full-sized pie.
Ingredients
-
3 cups (360g) All-Purpose Flour
-
1 tablespoon Granulated Sugar (for dough)
-
1 teaspoon Fine Sea Salt
-
1 cup (2 sticks or 226g) Unsalted Butter, very cold, cut into ½-inch cubes
-
½ cup (120ml) Ice Water, plus 1-2 tablespoons more if needed
-
4-5 cups Fresh Peaches, ripe but firm, peeled, pitted, diced into ½-inch pieces
-
½ cup (100g) Granulated Sugar (for filling), or more to taste
-
¼ cup (30g) Cornstarch or Tapioca Starch
-
1 tablespoon Fresh Lemon Juice
-
1 teaspoon Pure Vanilla Extract (for filling)
-
½ teaspoon Ground Cinnamon
-
Pinch of Ground Nutmeg (optional)
-
1 Large Egg (for egg wash)
-
1 tablespoon Water or Milk (for egg wash)
-
2-3 tablespoons Coarse Sugar (optional, for topping)
-
1 cup (120g) Powdered Sugar (Confectioners’ Sugar, for glaze)
-
2-3 tablespoons Milk or Cream (for glaze)
-
½ teaspoon Pure Vanilla Extract (for glaze)
Instructions
-
Step 1
Whisk 3 cups flour, 1 tbsp granulated sugar, and 1 tsp salt. Cut in 1 cup very cold, cubed unsalted butter until mixture resembles coarse meal with pea-sized pieces. Gradually add ½ cup ice water, mixing until dough just comes together. Do not overmix. Divide dough into two discs, wrap, and chill for at least 1-2 hours. -
Step 2
Peel, pit, and dice 4-5 cups ripe peaches into ½-inch pieces. In a medium bowl, combine peaches with ½ cup granulated sugar, ¼ cup cornstarch (or tapioca starch), 1 tbsp fresh lemon juice, 1 tsp vanilla extract, ½ tsp ground cinnamon, and optional pinch of nutmeg. Toss gently and let sit for 10-15 minutes to macerate. -
Step 3
On a lightly floured surface, roll one chilled dough disc to ⅛-inch thick. Cut out 3.5-4 inch circles; reroll scraps for more. Place 1 ½ to 2 tbsp of peach filling on one half of each dough circle, leaving a ½-inch border. Lightly moisten the edge, fold the empty half over the filling, press to seal, then crimp edges firmly with a fork. Cut 2-3 small slits on top of each pie for venting. Transfer assembled pies to a parchment-lined baking sheet. -
Step 4
In a small bowl, whisk 1 large egg with 1 tbsp water or milk for an egg wash. Brush the tops of each hand pie generously with the egg wash. If desired, sprinkle with 2-3 tbsp coarse sugar. -
Step 5
Preheat oven to 400°F (200°C). Bake pies for 20-25 minutes, or until crust is deeply golden brown and filling is visibly bubbling through the vents. Rotate baking sheet halfway through for even browning. Remove from oven and transfer to a wire rack to cool for at least 30-60 minutes. -
Step 6
For the optional glaze, whisk 1 cup powdered sugar, 2-3 tbsp milk or cream, and ½ tsp vanilla extract in a small bowl until smooth. Once hand pies have cooled to at least warm, drizzle the glaze artistically over the tops. Allow glaze to set for a few minutes before serving.
Important Information
Nutrition Facts (Per Serving)
It is important to consider this information as approximate and not to use it as definitive health advice.
Allergy Information
Please check ingredients for potential allergens and consult a health professional if in doubt.

Leave a Comment