
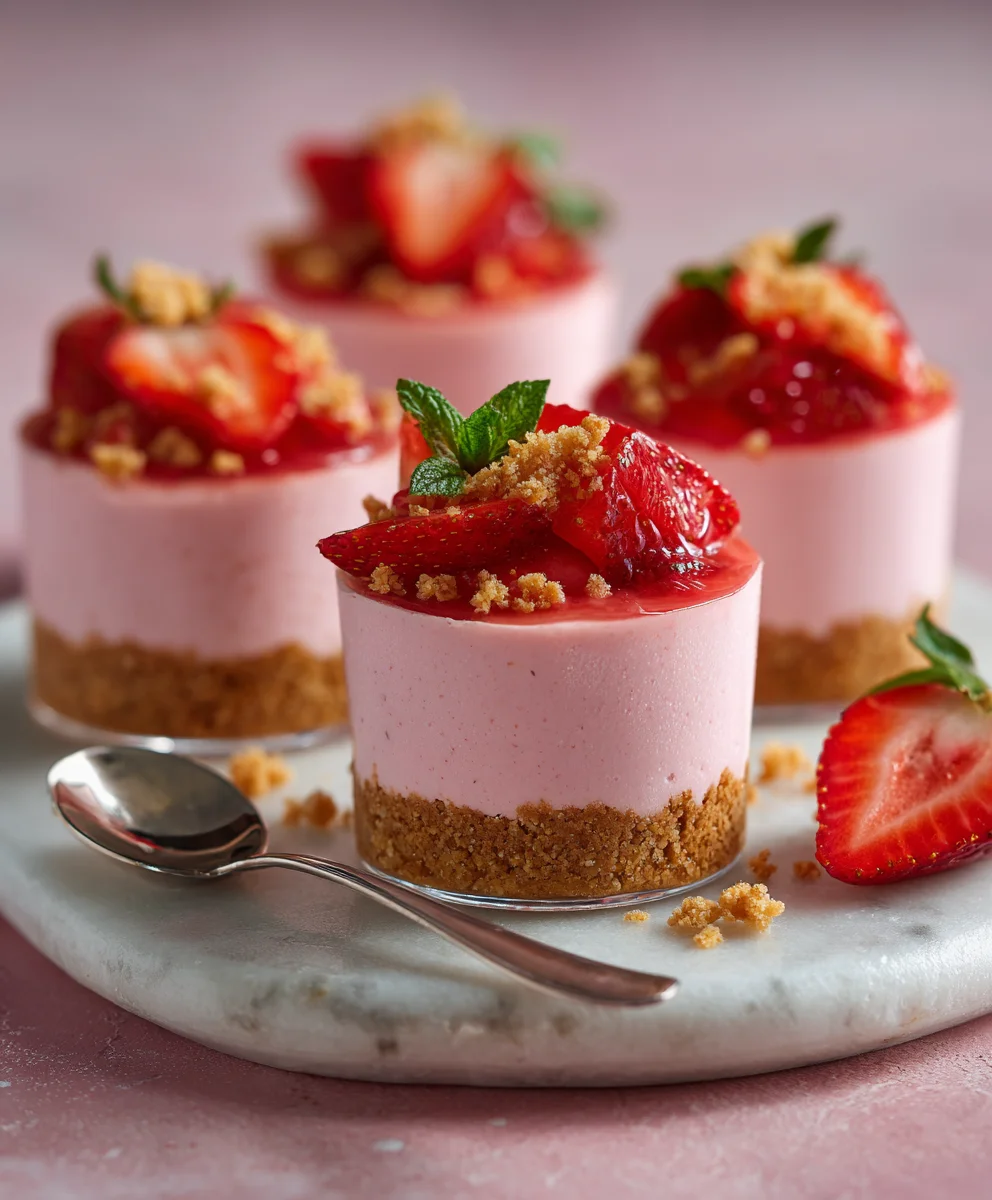
Strawberry Pink Pudding Cheesecake Cups are more than just a dessert; they are a vibrant, individual celebration in every single bite! I am absolutely thrilled to share this delightful recipe with you, one that promises a symphony of creamy, dreamy textures and the freshest burst of berry flavor, all nestled in a convenient, no-bake serving.
Imagine the collective joy of cheesecake, the comforting smoothness of pudding, and the bright, sweet essence of strawberries, perfectly blended into a treat that’s as beautiful to behold as it is delicious to devour. While the concept of cheesecake itself dates back to ancient Greece, and puddings have comforted generations worldwide, the genius of combining these beloved elements into an easy, elegant cup is a modern culinary marvel. This dish speaks to our desire for delightful indulgence without the fuss, bringing together classic tastes in an innovative, accessible format.
People adore these cups for their sheer simplicity, irresistible charm, and the sheer convenience of a no-bake recipe. They offer the rich, tangy profile of a classic cheesecake, but with an incredibly light and airy texture thanks to the pudding element, all infused with the sweet, romantic blush of fresh strawberries. Their individual portion size makes them an ideal choice for elegant gatherings, casual get-togethers, or a simple, joyful treat after a long day. These Strawberry Pink Pudding Cheesecake Cups are truly a universally appealing dessert that you’ll want to make again and again.
Ingredients:
- For the Graham Cracker Crust:
- 1 ½ cups (about 10-12 full sheets) graham cracker crumbs, finely crushed
- ¼ cup (½ stick or 56g) unsalted butter, melted
- 2 tablespoons granulated sugar
- For the Creamy Cheesecake Filling:
- 16 ounces (two 8-ounce packages) cream cheese, full-fat, softened at room temperature for at least 30 minutes
- ½ cup granulated sugar
- 1 teaspoon pure vanilla extract
- ¼ cup heavy cream, chilled
- For the Strawberry Pink Pudding Layer:
- One 3.4-ounce package (or 3.9-ounce package for slightly thicker results) instant vanilla pudding mix
- 2 cups cold whole milk
- ½ cup fresh strawberry puree (made from about 6-8 medium strawberries, hulled and blended until smooth)
- A few drops of red or pink food coloring (optional, for a more vibrant “Strawberry Pink Pudding” hue)
- For the Whipped Topping & Garnish:
- 1 cup heavy cream, chilled
- 2 tablespoons powdered sugar (confectioners’ sugar)
- ½ teaspoon pure vanilla extract
- ½ cup fresh strawberries, sliced or halved, for garnish
- Optional: Fresh mint leaves or finely chopped pistachios for additional garnish
Preparing the Graham Cracker Crust:
-
Crushing the Graham Crackers:
Begin by preparing your graham cracker crumbs. You can do this by placing the graham cracker sheets in a large zip-top bag and crushing them with a rolling pin until they resemble fine sand. Alternatively, a food processor can achieve this quickly and efficiently. Pulse the crackers until no large pieces remain. We’re aiming for about 1 ½ cups of finely crushed crumbs, which usually translates to around 10 to 12 full graham cracker sheets. Ensure the crumbs are as fine as possible for a cohesive crust.
-
Mixing the Crust Ingredients:
In a medium-sized mixing bowl, combine the finely crushed graham cracker crumbs with 2 tablespoons of granulated sugar. Stir them together until well blended. Then, pour in the ¼ cup of melted unsalted butter. Use a fork or a spatula to mix everything thoroughly until the crumbs are evenly moistened and resemble wet sand. Every crumb should be coated with butter, as this is what helps the crust hold its shape in your delightful Strawberry Pink Pudding Cheesecake Cups.
-
Pressing the Crust into Cups:
Gather your dessert cups. I typically use 8-ounce ramekins, mason jars, or clear dessert glasses to showcase the beautiful layers. Distribute the graham cracker mixture evenly among 6-8 individual dessert cups. For a standard 8-ounce cup, this will be about 2-3 tablespoons per cup. Use the back of a spoon or your fingertips to firmly press the mixture into an even layer at the bottom of each cup. Pressing firmly is crucial to prevent the crust from crumbling when serving. Once pressed, place the cups in the refrigerator to chill while you prepare the fillings. This helps the butter solidify, setting the crust.
Crafting the Creamy Cheesecake Filling:
-
Beating the Cream Cheese:
In a large mixing bowl, add the 16 ounces of softened full-fat cream cheese. It’s absolutely essential that your cream cheese is at room temperature to prevent lumps and ensure a perfectly smooth filling. Beat the cream cheese with an electric mixer on medium speed for 2-3 minutes, until it’s incredibly light, fluffy, and completely smooth. Make sure to scrape down the sides and bottom of the bowl frequently with a rubber spatula to ensure everything is evenly incorporated.
-
Adding Sweetness and Flavor:
Once the cream cheese is smooth, gradually add the ½ cup of granulated sugar to the bowl, beating on low speed until combined, then increase to medium and beat for another 1-2 minutes until the sugar is fully dissolved and the mixture is well blended and airy. Next, mix in 1 teaspoon of pure vanilla extract, beating until just incorporated.
-
Incorporating Heavy Cream for Lightness:
Pour in the ¼ cup of chilled heavy cream. Beat the mixture on medium-high speed for another 1-2 minutes. The heavy cream adds an incredible lightness and richness to the cheesecake filling, giving it that classic creamy texture without being overly dense. Continue beating until the mixture is thick, smooth, and holds soft peaks. This step creates a luxurious, cloud-like cheesecake base for our Strawberry Pink Pudding Cheesecake Cups. Scrape down the bowl one last time to ensure uniformity.
The Signature Strawberry Pink Pudding Layer:
-
Preparing the Strawberry Puree:
First, prepare your fresh strawberry puree. Hull about 6-8 medium fresh strawberries and place them in a small blender or food processor. Blend until completely smooth. If you prefer a very smooth pudding without seeds, you can press the puree through a fine-mesh sieve, but I often skip this step for a more rustic texture and to retain all the natural fiber. You should have about ½ cup of vibrant strawberry puree. This fresh puree is key to the natural flavor and beautiful “Strawberry Pink” hue.
-
Mixing the Pudding Base:
In a separate medium-sized mixing bowl, combine the instant vanilla pudding mix with 2 cups of cold whole milk. Whisk vigorously for about 2 minutes until the mixture begins to thicken. It’s important to use cold milk as it helps the pudding set properly and quickly.
-
Infusing with Strawberry Puree and Color:
Now, pour the ½ cup of fresh strawberry puree into the pudding mixture. Continue to whisk until the puree is fully incorporated and the pudding takes on a beautiful light pink color. If you desire a more intense “Strawberry Pink” shade, you can add a few drops of red or pink food coloring at this stage, mixing until the desired vibrancy is achieved. This vibrant color is what truly makes these “Strawberry Pink Pudding Cheesecake Cups” stand out! Let the pudding sit for 3-5 minutes to finish setting. It will thicken considerably.
Assembling Your Strawberry Pink Pudding Cheesecake Cups:
-
Layering the Cheesecake Filling:
Retrieve your chilled dessert cups with the graham cracker crusts. Using a spoon or a piping bag (for neater layers), carefully spoon or pipe an even layer of the creamy cheesecake filling over the graham cracker crust in each cup. This will be the first substantial layer. Aim for about one-third of the cup’s height for this layer. Smooth the top gently with the back of a spoon.
-
Adding the Strawberry Pink Pudding Layer:
Next, spoon or pipe an equally generous layer of the thickened Strawberry Pink Pudding over the cheesecake filling in each cup. This layer should be vibrant and inviting. Smooth it out gently. The contrast between the creamy white cheesecake and the pink pudding will look absolutely stunning through clear cups.
-
Repeating Layers (Optional, for more complex presentation):
Depending on the size of your cups and your preference, you can repeat the cheesecake and pudding layers one more time, or simply finish with one layer of each as described above. If repeating, ensure you leave enough room at the top for the whipped topping and garnish. The key is to create visually appealing, distinct layers that scream “Strawberry Pink Pudding Cheesecake Cups”!
-
Chilling for Perfection:
Once all your cups are layered, cover them loosely with plastic wrap. Place them in the refrigerator to chill for at least 3-4 hours, or ideally overnight. This chilling time is non-negotiable! It allows all the layers to set properly, for the flavors to meld beautifully, and for the cheesecake filling to firm up to the perfect consistency. Rushing this step will result in a less stable and enjoyable dessert.
Finishing Touches and Garnish:
-
Whipping the Cream:
Just before serving, prepare the whipped topping. In a clean, chilled mixing bowl, combine 1 cup of very cold heavy cream, 2 tablespoons of powdered sugar, and ½ teaspoon of pure vanilla extract. Using an electric mixer, beat on medium-high speed until firm peaks form. Be careful not to overbeat, or you’ll end up with butter! The whipped cream should be light, airy, and hold its shape beautifully.
-
Topping the Cups:
Remove your chilled Strawberry Pink Pudding Cheesecake Cups from the refrigerator. Spoon or pipe a generous dollop of freshly whipped cream onto the top of each cup. A piping bag with a star tip creates a particularly attractive finish, making these cups look even more professional and appealing.
-
Adding Fresh Strawberry Garnish:
Garnish each cup with fresh strawberry slices or halves. You can arrange them artfully on top of the whipped cream. A small sprig of fresh mint or a sprinkle of finely chopped pistachios can add a pop of contrasting color and a hint of freshness, elevating the presentation even further.
-
Serving and Enjoying:
Serve your spectacular Strawberry Pink Pudding Cheesecake Cups immediately after garnishing. These individual desserts are perfect for parties, gatherings, or a special treat at home. Their vibrant color and delightful layers make them as enjoyable to look at as they are to eat!
Tips for Perfect Strawberry Pink Pudding Cheesecake Cups:
-
Room Temperature Cream Cheese is Key:
I cannot stress this enough – ensure your cream cheese is adequately softened. If it’s too cold, your cheesecake filling will have lumps, no matter how long you beat it. Take it out of the fridge at least 30 minutes, preferably an hour, before you start.
-
The Purity of Vanilla:
Always opt for pure vanilla extract over imitation. The difference in flavor, especially in a creamy dessert like these Strawberry Pink Pudding Cheesecake Cups, is truly noticeable and makes a significant impact on the overall taste.
-
Adjusting Sweetness:
Feel free to adjust the amount of sugar in both the crust and the cheesecake filling to your personal taste. If your strawberries are particularly sweet, you might want to slightly reduce the sugar in the cheesecake.
-
Make-Ahead Magic:
These individual desserts are fantastic for making ahead! You can assemble the cups (without the whipped topping and fresh strawberry garnish) up to 24 hours in advance. Keep them covered in the refrigerator. Add the whipped cream and fresh fruit just before serving for the best presentation and texture.
-
Alternative Pudding Flavors:
While strawberry is the star here, you could experiment with other fruit purees or instant pudding flavors. Raspberry or cherry puree could also create a lovely pink hue and flavor profile, turning them into “Raspberry Pink Pudding Cheesecake Cups,” for instance.
-
Serving Vessels:
While I suggest 8-ounce cups, feel free to use smaller 4-ounce cups for mini portions, adjusting the number of servings accordingly. Clear glass containers are highly recommended to beautifully display all the distinct layers of your Strawberry Pink Pudding Cheesecake Cups.
-
Storing Leftovers:
Any leftover cups should be stored in an airtight container in the refrigerator for up to 3 days. If possible, remove the fresh strawberry garnish if you anticipate storing them for more than a day, as fresh fruit can sometimes become watery.
-
For a Gluten-Free Option:
Easily make this recipe gluten-free by using gluten-free graham crackers for the crust. The rest of the ingredients are naturally gluten-free, but always double-check product labels for cross-contamination if you have severe allergies.
-
Speedy Chilling:
If you’re in a hurry and absolutely must serve them sooner, you can place the layered cups in the freezer for about 30-60 minutes to speed up the setting process. However, the refrigerator is always best for a gradual, thorough set.
-
Why Fresh Strawberry Puree?
While you could use strawberry extract or flavored instant pudding, using fresh strawberry puree provides a more natural, nuanced flavor and contributes to the authentic “Strawberry Pink” color without relying solely on food coloring. It adds a lovely tartness that balances the sweetness of the cheesecake and pudding layers.

Conclusion:
And there you have it, my friends! We've reached the sweet end of our journey, but for you, it's just the beginning of a delightful culinary adventure. I genuinely believe that this recipe is more than just another dessert; it's a celebration of simplicity, vibrant flavors, and sheer joy. These Strawberry Pink Pudding Cheesecake Cups are, without a doubt, a must-try for anyone who loves a dessert that’s as beautiful to behold as it is delicious to devour. They embody everything wonderful about a homemade treat: they’re incredibly easy to whip up, require no baking whatsoever, and deliver an explosion of creamy, fruity, and tangy goodness with every single spoonful. The delicate balance of the luscious strawberry pudding, the rich, velvety cheesecake filling, and the crunchy, buttery crust creates a symphony of textures and tastes that is truly unforgettable. It’s the kind of dessert that looks impressively complex, yet it’s deceptively simple to assemble, making you look like a culinary genius with minimal effort. Imagine the smiles when you present these vibrant, individually portioned delights – they’re pure happiness in a cup!
Elevating Your Dessert Experience with Versatility
One of the many reasons I adore these Strawberry Pink Pudding Cheesecake Cups is their incredible versatility. While they are utterly perfect served chilled straight from the fridge, perhaps garnished with a delicate swirl of whipped cream and a fresh strawberry slice, don't stop there! Think about pairing them with a light, crisp sparkling wine or a refreshing glass of homemade lemonade on a warm afternoon. They make an exceptional individual dessert for dinner parties, saving you the hassle of slicing a traditional cake. For a charming touch, consider dusting them lightly with powdered sugar just before serving, or adding a sprig of fresh mint for an aromatic garnish that also provides a lovely color contrast. They are also absolutely ideal for potlucks, picnics, or any gathering where you need a portable, mess-free, yet utterly sophisticated dessert. Their individual portions mean no fuss, no sticky serving spoons, just pure, unadulterated dessert bliss for everyone. They are an instant crowd-pleaser and will undoubtedly become a staple in your dessert repertoire for any celebration, from casual get-togethers to more formal affairs. The vibrant pink hue alone makes them perfect for occasions like Valentine’s Day, baby showers, or simply brightening up a gloomy day with a burst of color and flavor.
Unleash Your Creativity: Wonderful Variations to Explore
But the fun doesn’t have to end with strawberries! This recipe provides a fantastic base for endless creativity. If you’re feeling adventurous, why not experiment with different fruit puddings? Imagine Blueberry Blush Cheesecake Cups, using blueberry instant pudding and fresh blueberries, or even a tropical twist with mango pudding and diced mangoes, perhaps even a hint of lime zest for an extra zing. You could easily swap out the graham cracker crust for a crushed shortbread cookie crust for a richer, buttery flavor, or even crushed chocolate wafers for a decadent chocolate-strawberry combination. For an extra layer of indulgence, consider adding a thin layer of melted white chocolate between the crust and the cheesecake filling, allowing it to set before adding the pudding. Or, for a more sophisticated flair, a tiny drizzle of balsamic glaze over the fresh strawberries just before serving can enhance their sweetness and add a surprising depth of flavor, transforming this simple dessert into something truly gourmet. You could even transform this concept into a stunning trifle by layering all the components in a large glass bowl, creating an impressive centerpiece for any celebration, making it a perfect dessert for a larger crowd. The possibilities are truly boundless, and I encourage you to make this recipe your own, adapting it to suit your favorite flavors and the seasonal availability of fresh fruits, ensuring you always have a delightful treat ready for any occasion.
Now, it's your turn! I have poured my heart into sharing this recipe, and I sincerely hope you feel inspired to give these delightful treats a try in your own kitchen. Don't let the simplicity fool you; the reward is immense. Picture yourself taking that first blissful bite, the creaminess melting on your tongue, the sweet and tangy notes dancing in perfect harmony. It’s a moment of pure culinary delight, and it’s easily within your grasp. Once you’ve created your own batch of these beautiful and delicious Strawberry Pink Pudding Cheesecake Cups, I would absolutely love to hear about your experience. Did you stick to the original? Did you get adventurous with variations? Please, share your thoughts, your successes, and even your creative tweaks in the comments below. Better yet, snap a photo of your magnificent creations and share them on social media! Tag me, or use a relevant hashtag so I can see and celebrate your kitchen triumphs with you. Your feedback and shared experiences are what truly make this culinary community thrive, and I can’t wait to see what deliciousness you bring to life. Happy baking (or rather, no-baking) and happy eating!
Strawberry Pink Pudding Cheesecake Cups
Strawberry Pink Pudding Cheesecake Cups are a fun, no-bake dessert that layers a classic graham cracker crust with a creamy cheesecake filling and sweet strawberry pudding. Topped with whipped cream and fresh strawberries, these cups offer a delightful mix of flavors and textures. Perfect for parties, family gatherings, or any time you crave a colorful and sweet treat!
Ingredients
-
1 ½ cups graham cracker crumbs
-
¼ cup unsalted butter, melted
-
2 tablespoons granulated sugar
-
16 ounces cream cheese, softened
-
½ cup granulated sugar
-
1 teaspoon pure vanilla extract
-
¼ cup heavy cream, chilled
-
One 3.4-ounce package instant vanilla pudding mix
-
2 cups cold whole milk
-
½ cup fresh strawberry puree
-
Red or pink food coloring (optional)
-
1 cup heavy cream, chilled
-
2 tablespoons powdered sugar
-
½ teaspoon pure vanilla extract
-
½ cup fresh strawberries, sliced
-
Optional: Fresh mint leaves or chopped pistachios
Instructions
-
Step 1
Finely crush graham crackers (approx. 1 ½ cups). In a bowl, combine crumbs with 2 tbsp granulated sugar and ¼ cup melted butter until moistened. Press 2-3 tbsp mixture firmly into the bottom of 6-8 individual dessert cups. Chill while preparing fillings. -
Step 2
In a large bowl, beat 16 oz softened cream cheese with an electric mixer for 2-3 minutes until light and smooth. Gradually add ½ cup granulated sugar, beating for 1-2 minutes until dissolved. Mix in 1 tsp vanilla extract. Pour in ¼ cup chilled heavy cream and beat on medium-high speed for another 1-2 minutes until the mixture is thick, smooth, and holds soft peaks. -
Step 3
Puree 6-8 medium fresh strawberries to yield ½ cup of strawberry puree. In a separate bowl, whisk one 3.4-ounce package instant vanilla pudding mix with 2 cups cold whole milk for about 2 minutes until it begins to thicken. Stir in the ½ cup fresh strawberry puree and optional food coloring until fully incorporated and the pudding is light pink. Let sit for 3-5 minutes to finish setting. -
Step 4
Retrieve chilled cups. Spoon or pipe an even layer of the creamy cheesecake filling over the graham cracker crust in each cup. Next, spoon or pipe an equally generous layer of the thickened strawberry pink pudding over the cheesecake filling. Repeat layers if desired. Cover cups loosely with plastic wrap and chill in the refrigerator for at least 3-4 hours, or ideally overnight, for best setting and flavor. -
Step 5
Just before serving, prepare whipped topping: In a chilled bowl, beat 1 cup cold heavy cream, 2 tbsp powdered sugar, and ½ tsp vanilla extract until firm peaks form. Top each chilled cheesecake cup with a generous dollop of whipped cream. Garnish with fresh strawberry slices or halves, and optionally with fresh mint leaves or chopped pistachios. Serve immediately.
Important Information
Nutrition Facts (Per Serving)
It is important to consider this information as approximate and not to use it as definitive health advice.
Allergy Information
Please check ingredients for potential allergens and consult a health professional if in doubt.

Leave a Comment