
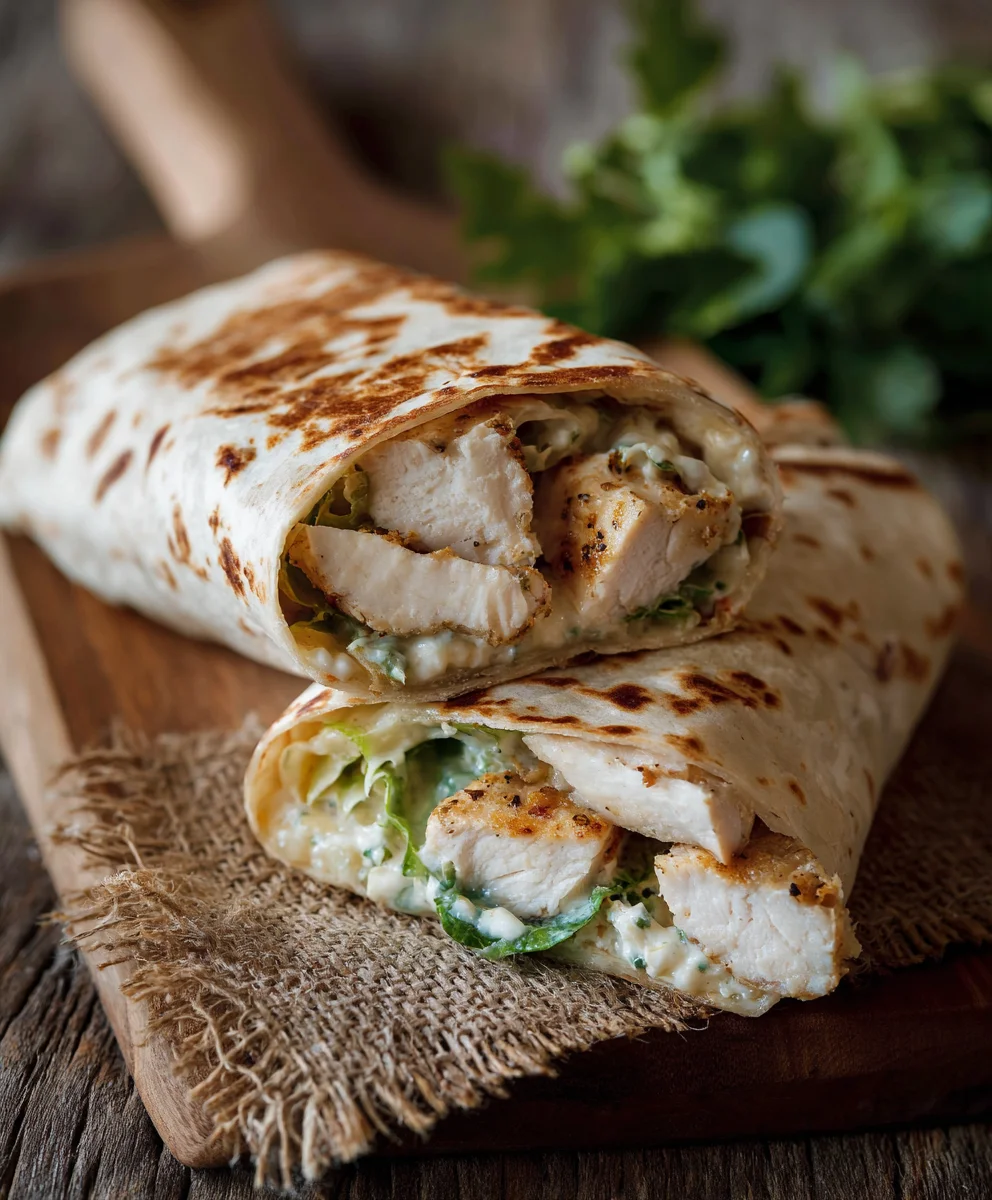
Cheesy Garlic Chicken Wraps are more than just a meal; they are a delightful culinary experience that promises to become a staple in your kitchen. Imagine tender, succulent chicken, generously coated in a rich, garlicky sauce, perfectly complemented by a luscious blanket of melted cheese, all encased within a soft, warm tortilla. This combination isn’t just a fantasy; it’s a perfectly achievable and incredibly satisfying reality that I am thrilled to share with you today. Forget complicated recipes and lengthy preparations; these wraps offer an explosion of flavor in a remarkably convenient package, making them ideal for busy weeknights, effortless lunches, or even a fun, casual gathering.
The concept of wraps has a long and varied history across cultures, from ancient flatbreads to modern-day tortilla-based creations, celebrated for their portability and versatility. Our interpretation takes this beloved format and infuses it with universally adored flavors: the robust aroma of garlic, the comforting embrace of melted cheese, and the satisfying protein of chicken. People genuinely adore this dish because it hits all the right notes: it’s incredibly flavorful, satisfyingly textual with a mix of soft tortilla and tender chicken, and wonderfully convenient to assemble and enjoy. The irresistible blend of savory garlic and creamy cheese makes our Cheesy Garlic Chicken Wraps utterly unforgettable.
I am confident that once you try this recipe, you’ll understand why it has quickly become a favorite. It’s a testament to how simple ingredients, when combined thoughtfully, can create something truly spectacular. Get ready to embark on a flavorful journey that will tantalize your taste buds and simplify your meal planning.

<h2>Ingredients:</h2>
<ul>
<li><strong>For the Flavorful Chicken:</strong></li>
<ul>
<li>2 lbs boneless, skinless chicken breasts or thighs, thinly sliced against the grain or cut into uniform bite-sized pieces</li>
<li>2 tablespoons high-quality olive oil</li>
<li>1 teaspoon smoked paprika, for a deep, smoky undertone</li&4>
<li>1/2 teaspoon onion powder</li>
<li>1/2 teaspoon garlic powder</li>
<li>1/4 teaspoon freshly ground black pepper</li>
<li>1/2 teaspoon dried oregano</li>
<li>1 teaspoon sea salt, or to your personal taste</li>
</ul>
<li><strong>For the Irresistible Garlic Butter Spread:</strong></li>
<ul>
<li>1/2 cup (1 standard stick) unsalted butter, crucial to be softened to room temperature for proper mixing</li>
<li>6 cloves fresh garlic, very finely minced, or 2 tablespoons of good quality pre-minced garlic for convenience</li>
<li>2 tablespoons fresh parsley, finely chopped, for vibrant color and fresh herbaceous notes</li>
<li>1 tablespoon fresh chives, finely chopped (optional, but I highly recommend it for that extra layer of delicate oniony flavor)</li>
<li>1/2 teaspoon dried Italian seasoning blend</li>
<li>A generous pinch of red pepper flakes (optional, for a very subtle, warming kick that enhances other flavors)</li>
<li>Salt and black pepper to taste, adjusting carefully since the chicken will also be seasoned</li>
</ul>
<li><strong>For Assembling the Ultimate Cheesy Garlic Chicken Wraps:</strong></li>
<ul>
<li>8-10 large flour tortillas (typically 10-12 inches in diameter), ensure they are fresh, soft, and pliable for easy folding</li>
<li>2 cups shredded mozzarella cheese, or a delightful blend of mozzarella and provolone for superior stretch and gooeyness</li>
<li>1 cup shredded Monterey Jack cheese, known for its fantastic creamy melt</li>
<li>1/2 cup finely grated Parmesan cheese, for a sharp, salty depth of flavor</li>
<li>1 cup fresh baby spinach or mixed greens (optional, but it adds a wonderful fresh crunch and a pop of color that balances the richness)</li>
<li>Sour cream or plain Greek yogurt, for a cooling and tangy dip (optional, but highly recommended for serving)</li>
<li>Your favorite salsa or a zesty hot sauce, for an extra layer of flavor and heat (optional)</li>
</ul>
</ul>
<h3>Preparing the Chicken for Our Cheesy Garlic Chicken Wraps</h3>
<ol>
<li>
<strong>Initial Chicken Preparation:</strong> The first step to incredible <strong>Cheesy Garlic Chicken Wraps</strong> is properly preparing your chicken. If you’re working with chicken breasts, I find that slicing them thinly, about 1/4 to 1/2 inch thick, against the grain makes them incredibly tender and ensures they cook quickly and evenly. This also creates a pleasant texture that’s easy to bite through in a wrap. Alternatively, cutting them into uniform bite-sized cubes, roughly 1-inch pieces, works perfectly too. If you prefer chicken thighs, trim any excess fat and cut them into similar bite-sized pieces; thighs offer a richer flavor and tend to stay juicier. Regardless of your cut, <strong>it’s crucial to thoroughly pat the chicken dry with paper towels.</strong> This removes surface moisture, which is essential for achieving a beautiful golden-brown sear, rather than just steaming the chicken in the pan. We want that delicious browned crust for maximum flavor.
</li>
<li>
<strong>Seasoning the Chicken to Perfection:</strong> In a medium-sized mixing bowl, combine the olive oil with our chosen array of spices: smoked paprika, onion powder, garlic powder, black pepper, dried oregano, and salt. The smoked paprika not only adds a beautiful color but also a subtle depth of flavor that complements the garlic beautifully. Add your prepared chicken pieces to this bowl. Now, get your hands in there and toss everything together vigorously, ensuring every single piece of chicken is thoroughly and evenly coated with this aromatic spice mixture. This seasoning is what will give our <strong>garlic chicken</strong> its core flavor. I recommend letting the chicken marinate at room temperature for at least 15-20 minutes while you prepare the garlic butter. If you have the luxury of time, covering the bowl and refrigerating it for 30 minutes to an hour will allow the spices to penetrate deeper into the chicken, resulting in even more intensely flavored <strong>cheesy garlic chicken wraps</strong>.
</li>
</ol>
<h3>Crafting the Irresistible Garlic Butter Spread</h3>
<ol start=”3″>
<li>
<strong>Combining the Aromatics and Butter:</strong> In a small mixing bowl, place your softened unsalted butter. <strong>This step is non-negotiable for a perfect spread!</strong> The butter absolutely needs to be at true room temperature – soft enough to easily dent with your finger, but not melted. If it’s too cold, you won’t be able to properly incorporate all the wonderful flavors. To the softened butter, add the finely minced garlic. The more finely minced, the better the flavor distribution. Stir in the fresh chopped parsley, which adds a bright, herbaceous freshness, and the chopped chives if you’ve decided to use them – they contribute a delicate, oniony nuance that truly elevates the butter. Finally, add the dried Italian seasoning and a pinch of red pepper flakes if you desire that subtle warmth. Season with a small pinch of salt and black pepper; remember we’ve already seasoned the chicken, so taste as you go.
</li>
<li>
<strong>Achieving a Homogenous Blend:</strong> Using a sturdy fork or a small spatula, diligently mash and mix all these ingredients together. You want to continue mixing until everything is thoroughly combined, and you have a beautifully uniform, fragrant, and herbaceous garlic butter spread. It should be easy to spread smoothly. <strong>This garlic butter is the secret weapon</strong> for our <strong>Cheesy Garlic Chicken Wraps</strong>. It’s what will infuse the exterior of the tortilla with incredible flavor and help it achieve that desirable golden, crispy crust when cooked. Give it a quick taste to ensure the seasoning is to your liking and adjust if necessary. Set this glorious butter aside; its time to shine is coming soon!
</li>
</ol>
<h3>Cooking the Flavorful Chicken Filling</h3>
<ol start=”5″>
<li>
<strong>Heating the Skillet for the Sear:</strong> Place a large, heavy-bottomed skillet or a cast-iron pan over medium-high heat. Allow it to heat up for a few minutes until it’s genuinely hot. <strong>A hot pan is essential for a good sear</strong> and to prevent the chicken from sticking. You can add another tablespoon of olive oil to the pan now if you feel it needs it, though the seasoned chicken already carries some oil. Watch for a slight shimmer in the oil or faint wisps of smoke if the pan is dry, indicating it’s ready.
</li>
<li>
<strong>Cooking the Seasoned Chicken:</strong> Carefully add the seasoned chicken pieces to the hot skillet, ensuring they are in a single layer. <strong>It’s critically important not to overcrowd the pan.</strong> If you put too much chicken in at once, the temperature of the pan will drop dramatically, causing the chicken to steam rather than sear, which means no beautiful browning or flavorful crust. If necessary, cook the chicken in two or even three batches. Cook for approximately 3-5 minutes on the first side, allowing it to develop a rich, golden-brown crust. Then, flip the chicken pieces and cook for another 2-3 minutes, or until they are cooked through, with no pink remaining inside. The exact cooking time will vary based on the thickness of your chicken pieces. Once perfectly cooked, remove the chicken from the pan and transfer it to a clean bowl. <strong>Do not clean the pan yet!</strong> Those browned bits (fond) left behind in the skillet are packed with incredible flavor and will contribute to the overall depth of taste in our <strong>Cheesy Garlic Chicken Wraps</strong>.
</li>
<li>
<strong>Shredding or Dicing the Cooked Chicken:</strong> Allow the cooked <strong>garlic chicken</strong> to cool for a few minutes until it’s comfortable enough to handle. At this point, you have a couple of options: you can either shred it using two forks (this method creates a lovely, rustic texture that absorbs sauces well and holds together beautifully in a wrap) or dice it into smaller, uniform pieces. I personally lean towards shredding for <strong>cheesy chicken wraps</strong> because it integrates seamlessly with the melted cheese and other fillings, making each bite cohesive and utterly delicious.
</li>
</ol>
<h3>Assembling Our Delicious Cheesy Garlic Chicken Wraps</h3>
<ol start=”8″>
<li>
<strong>Setting Up Your Assembly Line:</strong> Before you begin, take a moment to gather all your prepared ingredients. Having your cooked <strong>garlic chicken</strong>, the fragrant garlic butter spread, the assorted shredded cheeses, your stack of soft tortillas, and any optional greens within easy reach will make the assembly process incredibly smooth and enjoyable. This little bit of mise en place makes a big difference.
</li>
<li>
<strong>Buttering the Tortillas:</strong> Lay one large flour tortilla flat on a clean, dry surface. Using a small spatula, a butter knife, or even the back of a spoon, spread a generous amount (about 1 to 1.5 tablespoons) of your homemade garlic butter evenly over one entire side of the tortilla. <strong>This buttered side is crucial</strong> because it will become the exterior of your wrap. When cooked, this side will transform into a gloriously golden, crispy, and intensely garlicky crust, which is one of the signature features of our <strong>Cheesy Garlic Chicken Wraps</strong>.
</li>
<li>
<strong>Layering the Trio of Cheeses:</strong> Now, flip the tortilla over so that the buttered side is facing down against your work surface. On the unbuttered side (which will become the interior of your wrap), sprinkle about a quarter cup of your mixed shredded cheeses. I like to spread the cheese over just one half of the tortilla, forming a semi-circle. This helps in folding and sealing the wrap later. The blend of mozzarella, Monterey Jack, and Parmesan is carefully chosen: mozzarella provides that classic stretch, Monterey Jack ensures a creamy melt, and Parmesan adds a sharp, savory kick. <strong>Don’t be shy with the cheese!</strong> A generous amount is key for truly <strong>cheesy chicken wraps</strong> that are delightfully gooey.
</li>
<li>
<strong>Adding the Star Filling and Greens:</strong> Spoon a substantial portion (approximately 1/4 to 1/3 cup, depending on how hearty you like your wraps) of the cooked and shredded <strong>garlic chicken</strong> over the layer of cheese. Try to distribute it evenly within the cheese semi-circle. If you’re incorporating fresh baby spinach or mixed greens, now is the perfect time to add a small handful directly on top of the chicken. These greens provide a wonderful contrast in texture and a burst of freshness that cuts through the richness of the chicken and cheese.
</li>
<li>
<strong>Folding the Wraps with Care:</strong> Gently but firmly, fold the empty half of the tortilla over the filling, creating a neat half-moon shape. Carefully press down along the edges to help seal the wrap and compact the filling slightly. While a perfect, airtight seal isn’t strictly necessary at this stage, aiming for a relatively tight fold will prevent too much filling from escaping during cooking. <strong>Take your time with each wrap</strong> to ensure even distribution of ingredients; this attention to detail results in the most satisfying <strong>Cheesy Garlic Chicken Wraps</strong>. Repeat this assembly process with the remaining tortillas and filling, stacking the finished wraps on a plate as you go.
</li>
</ol>
<h3>Cooking Our Golden Cheesy Garlic Chicken Wraps</h3>
<ol start=”13″>
<li>
<strong>Preparing the Pan for Crisping:</strong> Heat a large, non-stick skillet, a griddle, or even a heavy cast-iron pan over medium heat. <strong>A crucial detail here: you generally won’t need to add any additional oil or butter to the pan.</strong> The exterior of each assembled wrap is already generously coated with our fragrant garlic butter spread. As the wraps cook, this butter will melt, sizzle, and caramelize, creating that absolutely divine golden-brown and crispy crust we’re aiming for. Let the pan heat for a good 2-3 minutes to ensure even cooking and browning.
</li>
<li>
<strong>Cooking the First Side of the Wraps:</strong> Carefully place one or two of your assembled <strong>cheesy garlic chicken wraps</strong> into the hot skillet, ensuring the butter-coated side is facing down. Be mindful not to overcrowd the pan, as this can lower the temperature and prevent proper crisping. Cook for approximately 3-4 minutes on this first side. You’re looking for the tortilla to turn a beautiful golden brown and become wonderfully crispy. You’ll also notice the cheese inside starting to melt and get gooey – often, you’ll see a slight bubbling or the tortilla puffing up a bit. <strong>Keep a watchful eye on them</strong>, as butter can brown quickly, and we want golden, not burnt! The incredible aroma of garlic butter and toasted tortilla filling your kitchen right now is a clear sign that magic is happening.
</li>
<li>
<strong>Flipping and Finishing:</strong> Once the first side is perfectly golden and crisp, carefully use a spatula to flip the wrap over. Cook for another 2-3 minutes on the second side, or until that side is equally golden brown and crispy, and, most importantly, the cheese inside is fully melted, bubbling, and wonderfully gooey. <strong>A perfectly melted cheese interior</strong> is what truly defines these <strong>Cheesy Garlic Chicken Wraps</strong>. For an even flatter and more uniformly browned wrap, you can gently press down on them with your spatula as they cook. This ensures good contact with the pan and helps create that desirable, all-over crispy texture.
</li>
<li>
<strong>Serving Your Culinary Masterpiece:</strong> As each <strong>garlic chicken wrap</strong> reaches golden-brown perfection, remove it from the skillet and place it on a clean cutting board. Allow it to rest for just a minute or two. This brief resting period is important because it helps the piping hot cheese set ever so slightly, preventing it from oozing out excessively when you cut into it. Then, using a sharp knife, slice each wrap in half or into thirds. This makes them much easier to handle, share, and dip! <strong>These wraps are absolutely best enjoyed hot and fresh</strong>, right off the pan, when the cheese is at its peak gooiness and the tortilla is perfectly crispy.
</li>
<li>
<strong>Enhancing with Optional Dips:</strong> To complete the experience, serve your glorious <strong>Cheesy Garlic Chicken Wraps</strong> alongside some cool, creamy sour cream or tangy plain Greek yogurt for dipping. The refreshing coolness and slight tang provide a delightful contrast to the rich, savory flavors of the chicken, garlic, and cheese. If you’re a fan of a little extra heat or zest, a side of your favorite salsa or a drizzle of hot sauce can add another fantastic layer of flavor to this already incredible dish!
</li>
</ol>
<h4>Tips for Perfect Cheesy Garlic Chicken Wraps:</h4>
<ul>
<li><strong>Don’t Overcrowd the Pan for Searing and Crisping:</strong> Whether you’re cooking the chicken or crisping the wraps, resist the urge to pack too many pieces into the skillet at once. Overcrowding significantly lowers the pan’s temperature, which leads to steaming instead of searing or crisping. For the chicken, this means less flavor development. For the wraps, it results in a soggy rather than crispy tortilla. <strong>Patience is a true virtue in cooking</strong>; working in batches guarantees superior results for your <strong>Cheesy Garlic Chicken Wraps</strong>.</li>
<li><strong>Room Temperature Butter is Your Best Friend:</strong> For the garlic butter spread, the softness of your butter is paramount. If your butter is too cold and hard, it will be extremely difficult to thoroughly combine with the minced garlic and fresh herbs, resulting in a lumpy, uneven spread. Ideally, let it sit on your counter for an hour or two. If you’re short on time, gently warm it in the microwave for just 5-10 seconds – you want it pliable, not melted. <strong>This seemingly small detail makes all the difference</strong> for a smooth, flavor-packed butter.</li>
<li><strong>The Magic of a Multi-Cheese Blend:</strong> While you could use just one type of cheese, a thoughtful blend like mozzarella, Monterey Jack, and Parmesan offers the best of all worlds for <strong>cheesy chicken wraps</strong>. Mozzarella provides that satisfying stretch, Monterey Jack ensures a creamy, smooth melt, and Parmesan adds a salty, umami depth. For the absolute best melt and flavor, <strong>I highly recommend shredding your own cheese from blocks</strong> rather than using pre-shredded varieties, which often contain anti-caking agents that can hinder a truly gooey melt.</li>
<li><strong>Choose Quality Tortillas for Flexibility:</strong> The foundation of any great wrap is a good quality tortilla. Opt for fresh, large flour tortillas that are soft, pliable, and flexible. Stiff or dry tortillas are prone to cracking when folded, making assembly a frustrating experience. If your tortillas feel a bit stiff, you can gently warm them in the microwave for 10-15 seconds before assembly; this will make them much more pliable and easier to work with, ensuring your <strong>Cheesy Garlic Chicken Wraps</strong> hold together beautifully.</li>
<li><strong>Customization is Highly Encouraged:</strong> This recipe for <strong>Cheesy Garlic Chicken Wraps</strong> is a fantastic base, but don’t hesitate to make it your own! Consider adding other delicious components like thinly sliced sautéed onions, colorful bell peppers, finely diced jalapeños for an extra kick, or even a drizzle of your favorite ranch dressing or buffalo sauce inside the wrap before folding. <strong>Experiment and discover your perfect combination!</strong></li>
<li><strong>Storage and Reheating for Later Enjoyment:</strong> While these wraps are undoubtedly at their peak when served fresh and hot, leftovers can be stored in an airtight container in the refrigerator for up to 2-3 days. To reheat, I strongly advise against using a microwave, as it often leads to a soggy tortilla. Instead, reheat them in a dry skillet over medium-low heat for a few minutes per side until warmed through and re-crisped, or use a toaster oven for similar results. <strong>Enjoying them warm and with a crispy exterior is key!</strong></li>
</ul>
Conclusion:
Well, there you have it! We’ve journeyed through the simple steps to creating what I genuinely believe will become a new staple in your kitchen. From the initial aroma that fills your home to that first satisfying bite, these are more than just a meal; they’re an experience waiting to happen. I’m absolutely convinced that once you try this recipe, you’ll understand why I’m so enthusiastic about it. It’s the perfect blend of comfort food and effortless preparation, hitting all the right notes for both busy weeknights and relaxed weekend gatherings. The magic truly lies in how straightforward it is to achieve such incredible flavor. We’re talking about tender, juicy chicken, perfectly seasoned with aromatic garlic, and enveloped in a warm, soft tortilla with melty, gooey cheese – a combination that simply can’t be beaten.
Why You Absolutely Must Try This Recipe
If you’re looking for a dish that consistently delivers on taste without demanding hours of your precious time, then this is it. This recipe isn’t just easy; it’s foolproof. Whether you’re a seasoned chef or just starting your culinary adventures, you’ll find the process incredibly rewarding. The beauty of these Cheesy Garlic Chicken Wraps is their universal appeal. Kids adore them, adults crave them, and everyone appreciates the sheer deliciousness packed into each bite. They’re hearty enough to satisfy a big appetite but light enough not to leave you feeling overly stuffed. Plus, they’re incredibly versatile, adapting seamlessly to whatever ingredients you might have on hand. It’s truly a testament to how simple, good-quality ingredients can come together to create something spectacular. Imagine the joy of serving up something homemade, wholesome, and utterly delightful that everyone raves about. That’s the power of this recipe.
Unleash Your Creativity: Serving Suggestions & Brilliant Variations
Now, while these wraps are spectacular on their own, don’t be afraid to elevate your mealtime with some fantastic accompaniments or by adding your own personal twist. For a complete and balanced dinner, I love serving my wraps with a crisp, refreshing side salad, perhaps with a light vinaigrette to cut through the richness. A bowl of warm tomato soup or a creamy roasted red pepper soup also makes for an incredible pairing on a cooler evening. If you’re leaning into the comfort food vibe, a side of crispy sweet potato fries or a generous serving of homemade coleslaw would be absolutely divine.
But the fun doesn’t stop there! This recipe is a blank canvas for your culinary imagination. Think of the cheese possibilities: switch out the mozzarella for sharp cheddar, a Monterey Jack, or even a spicy pepper jack for an extra kick. For those who love a bit of greens, a handful of fresh spinach or some sautéed bell peppers and onions can be added to the filling with the chicken. Black beans and corn would also make a delightful, hearty addition, transforming it into a slightly more Tex-Mex inspired wrap.
Want to turn up the heat? A dash of your favorite hot sauce, a sprinkle of red pepper flakes, or even some diced jalapeños can inject some fiery flavor. And if chicken isn’t your preferred protein, this recipe is incredibly adaptable: try it with cooked shrimp, thinly sliced steak, or even a plant-based alternative like chickpeas or grilled halloumi for a vegetarian option. Don’t limit yourself to just flour tortillas either; whole wheat, spinach, or even gluten-free tortillas can work beautifully. And let’s not forget the dipping sauces! A side of creamy ranch, a tangy honey mustard, or a zesty sriracha mayo can take your wrap experience to the next level. You could even transform this concept into a quesadilla, pressing it on a griddle until golden and crispy, or serve the filling over a bed of rice or greens for a delightful “wrap bowl.” The options are truly limitless, and each variation promises a new adventure for your taste buds.
Your Turn! Try It and Share Your Culinary Journey!
So, what are you waiting for? I’ve shared my passion for these delightful Cheesy Garlic Chicken Wraps, and now it’s your turn to experience the magic for yourself. I genuinely believe that this recipe will become a go-to in your cooking repertoire, a dish you’ll find yourself making again and again, whether for a quick lunch, a satisfying dinner, or even as a crowd-pleasing appetizer when cut into smaller pieces.
I urge you to give this recipe a try this week!
Experiment with the variations, make it your own, and most importantly, enjoy every single delicious bite. I would absolutely love to hear about your experience. Did you add something unexpected? Did you serve it with a unique side? Share your creations and feedback with me! Snap a photo of your masterpiece and tag me on social media, or simply drop a comment below. Your insights and culinary adventures inspire me, and I can’t wait to see how you make these irresistible wraps your very own. Happy cooking, and prepare to fall in love with your new favorite chicken dish!
Cheesy Garlic Chicken Wraps
Cheesy Garlic Chicken Wraps are a delightful culinary experience. Imagine tender, succulent chicken, generously coated in a rich, garlicky aioli, perfectly complemented by a luscious blanket of melted cheese, all encased within a soft, warm tortilla. This recipe offers an explosion of flavor in a remarkably convenient package, ideal for busy weeknights, effortless lunches, or casual gatherings.
Ingredients
-
2 cups cooked chicken, shredded
-
1/2 cup garlic aioli
-
1 cup cheddar cheese, shredded
-
4 large flour tortillas
-
Salt and pepper to taste
Instructions
-
Step 1
In a bowl, combine the shredded cooked chicken with salt, pepper, and a pinch of your favorite spices (like smoked paprika or dried oregano) to taste. Mix well to ensure the chicken is evenly seasoned. -
Step 2
Lay one large flour tortilla flat. Spread about 2 tablespoons of garlic aioli evenly over one entire side of the tortilla. Flip the tortilla so the aioli-coated side is down. On the unbuttered side, sprinkle about 1/4 cup of shredded cheddar cheese over one half of the tortilla. Spoon a portion (approximately 1/2 cup) of the seasoned chicken over the cheese. -
Step 3
Gently fold the empty half of the tortilla over the filling, creating a neat half-moon shape. Press down along the edges to help seal the wrap. Repeat for the remaining tortillas and filling. -
Step 4
Heat a large non-stick skillet over medium heat. Place one or two assembled wraps into the hot skillet with the aioli-coated side facing down. Cook for 3-4 minutes per side, until the tortilla is golden brown and crispy, and the cheese inside is fully melted and gooey. Gently press down with a spatula for even browning. -
Step 5
Remove cooked wraps from the skillet and let them rest for a minute. Slice each wrap in half or thirds and serve immediately. Optionally, serve with sour cream or salsa for dipping.
Important Information
Nutrition Facts (Per Serving)
It is important to consider this information as approximate and not to use it as definitive health advice.
Allergy Information
Please check ingredients for potential allergens and consult a health professional if in doubt.
Leave a Comment