
Easy Chocolate Swiss Roll – doesn’t that just sound like a dream come true? Imagine sinking your teeth into a light, airy chocolate sponge, perfectly rolled around a luscious, creamy filling. It’s a classic dessert that instantly brings a smile, evoking memories of joyful celebrations and delightful afternoon treats. There’s something truly magical about a dessert that looks so elegant yet promises a straightforward baking experience.
A Sweet History and Irresistible Charm
While often associated with Swiss confectionery, the origins of the “Swiss roll” or “roll cake” are actually quite diverse, with similar sponge cakes rolled around fillings popular across Europe and beyond since the 19th century. Regardless of its exact birthplace, this rolled wonder has captured hearts globally with its elegant appearance and irresistible flavor profile. People adore the Easy Chocolate Swiss Roll for so many reasons. Its balance of rich cocoa notes with the cool, smooth cream is simply divine, offering a texture combination that’s both comforting and exciting. Plus, the sheer satisfaction of presenting such a beautiful, seemingly complex dessert, knowing you created it with ease, is incredibly rewarding. It’s the perfect showstopper for any gathering or a wonderfully indulgent treat just for yourself.
Ingredients:
-
For the Easy Chocolate Swiss Roll Sponge:
- 4 large eggs, at room temperature (this is crucial for volume!).
- 1/2 cup (100g) granulated sugar, plus extra for dusting.
- 1/4 cup (30g) unsweetened cocoa powder, sifted.
- 1/4 cup (30g) all-purpose flour, sifted.
- 1 teaspoon baking powder.
- 1/4 teaspoon salt.
- 1 teaspoon pure vanilla extract.
-
For the Silky Chocolate Buttercream Filling:
- 1/2 cup (113g) unsalted butter, softened to room temperature.
- 2 cups (240g) powdered sugar (confectioners’ sugar), sifted.
- 1/2 cup (60g) unsweetened cocoa powder, sifted.
- 1/4 cup (60ml) whole milk or heavy cream, plus more if needed.
- 1 teaspoon pure vanilla extract.
- Pinch of salt (enhances the chocolate flavor!).
-
Essential Equipment:
- A large baking sheet (approximately 10×15 inches or 25×38 cm).
- Parchment paper.
- Electric mixer (stand or hand-held).
- Rubber spatula.
- Cooling rack.
- Clean kitchen towel or additional sheet of parchment paper.
- Fine-mesh sieve for sifting.
Preparing for Your Easy Chocolate Swiss Roll Sponge
- Preheat and Prepare Your Pan: First things first, let’s get our oven ready. Preheat your oven to 375°F (190°C). While that’s heating up, grab your 10×15-inch baking sheet. Line the bottom of it with parchment paper, making sure the paper extends a little over the short edges. This will create “handles” that make it so much easier to lift the baked sponge later. I like to lightly grease the pan first to help the parchment stick, preventing any annoying bumps during baking.
- Sift Your Dry Ingredients: In a medium bowl, combine the sifted cocoa powder, sifted all-purpose flour, baking powder, and salt. Whisk them together thoroughly until they are uniformly mixed. Sifting is non-negotiable here! It breaks up any lumps in the cocoa and flour, ensuring a super smooth batter and a tender, even-textured sponge for your Easy Chocolate Swiss Roll. Set this bowl aside for now.
- Whip the Eggs and Sugar to Perfection: Now for the magic that creates that light, airy sponge. In the bowl of your electric mixer (or a large bowl with a hand mixer), combine the four large eggs and the granulated sugar. Begin beating on medium-high speed. You’ll want to continue beating for a good 7-10 minutes. This stage is critical! The mixture should transform into a pale yellow, very thick, and fluffy consistency. When you lift the beater, a thick ribbon of the mixture should slowly fall back into the bowl, holding its shape on the surface for a few seconds before dissolving. This is what we call the “ribbon stage,” and it means you’ve incorporated enough air to make your Easy Chocolate Swiss Roll wonderfully light.
- Add the Vanilla Extract: Once your egg mixture has reached that perfect ribbon stage, gently beat in the vanilla extract for just about 30 seconds until it’s fully combined. The vanilla adds that lovely aromatic depth that complements the chocolate so well.
- Gently Fold in the Dry Ingredients: This is where we need to be delicate to preserve all that lovely air we’ve whipped into the eggs. Add about one-third of your sifted dry ingredients to the egg mixture. Using a large rubber spatula, gently fold them in. Use a “cut and fold” motion: slice down through the center of the batter, scoop up from the bottom, and fold it over the top. Turn the bowl a quarter turn and repeat. Continue adding the dry ingredients in two more batches, folding just until no streaks of flour remain. Overmixing at this stage is the enemy of a light sponge! It will deflate all the air and lead to a tough, dense cake. We want fluffy for our Easy Chocolate Swiss Roll.
- Spread the Batter Evenly: Pour the carefully folded batter onto your prepared baking sheet. Using your offset spatula or the back of a spoon, gently spread the batter evenly across the entire surface of the parchment paper. Try to get it as uniform in thickness as possible, right up to the edges. A few gentle taps of the baking sheet on your countertop can help release any large air bubbles.
- Bake the Sponge: Place the baking sheet into your preheated oven. Bake for approximately 8-10 minutes. The sponge is done when it springs back lightly when gently touched in the center, and the edges look set. Don’t overbake, or it will be dry and prone to cracking when you roll it.
- Prepare for the Roll: While your sponge is baking, get ready for the immediate roll. Lay out a clean kitchen towel or another sheet of parchment paper on your countertop. Dust it generously with about 2 tablespoons of granulated sugar. This sugar helps prevent sticking and adds a little sweetness to the exterior of your Easy Chocolate Swiss Roll.
Rolling the Warm Sponge for Your Easy Chocolate Swiss Roll
- Invert the Hot Sponge: As soon as the sponge comes out of the oven, immediately invert the entire baking sheet onto your sugar-dusted towel/parchment. Don’t hesitate! Speed is key here to prevent the sponge from drying out.
- Carefully Peel off Parchment: Gently peel the parchment paper off the bottom of the warm sponge. Do this slowly and carefully to avoid tearing the delicate cake. If it sticks a little, you can dampen the back of the parchment with a tiny bit of water, but usually, it comes off easily.
- Trim the Edges (Optional but Recommended): For a neater finish and to prevent cracking, I like to trim off about 1/4 inch from all four edges of the sponge using a sharp knife. These edges tend to be a bit drier and less pliable. This small step ensures a much cleaner roll for your Easy Chocolate Swiss Roll.
- Perform the First Roll: Starting from one of the short ends (the 10-inch side), carefully and gently begin to roll the warm sponge tightly into a log. Use the towel or parchment to help you, tucking the edge of the cake into itself. Roll it up completely, along with the towel/parchment. This first roll, while the cake is still warm and pliable, trains it to hold its shape later.
- Cool Completely in Rolled State: Leave the rolled sponge wrapped in the towel/parchment and place it on a wire rack to cool down completely to room temperature. This can take at least an hour, sometimes more. Patience is a virtue here! Cooling it while rolled prevents cracking when you eventually unroll and fill it. This step is essential for an “Easy Chocolate Swiss Roll” that looks as good as it tastes.
Crafting the Silky Chocolate Buttercream Filling
- Cream the Butter: While your sponge is cooling, let’s make that luscious chocolate buttercream. In the bowl of your electric mixer, add the softened unsalted butter. Beat it on medium speed for about 2-3 minutes, until it becomes light, creamy, and pale in color. This aerates the butter, which is key for a fluffy buttercream.
- Gradually Add Powdered Sugar and Cocoa: In a separate bowl, sift together the powdered sugar and unsweetened cocoa powder. With the mixer on low speed, begin adding the sifted sugar and cocoa mixture to the creamed butter, about half a cup at a time. Beat well after each addition. Start on a very low speed to avoid creating a “sugar cloud” that will cover your kitchen (and you!). Once combined, you can increase the speed to medium.
- Incorporate Milk and Vanilla: Once all the sugar and cocoa are incorporated, add the vanilla extract and the pinch of salt. Now, add the milk or heavy cream, one tablespoon at a time, beating after each addition, until your buttercream reaches a smooth, spreadable, and fluffy consistency. You might not need all of the milk, or you might need a tiny bit more – it all depends on the humidity and the exact consistency you’re looking for. I usually aim for something that’s easy to spread but holds its shape. This is the delicious heart of your Easy Chocolate Swiss Roll, so make sure it’s perfect!
- Beat Until Light and Fluffy: Once all ingredients are in, increase the mixer speed to medium-high and beat for another 2-3 minutes. This final beating incorporates more air, making the buttercream even lighter and fluffier, and ensures any remaining sugar crystals dissolve for that silky-smooth texture.
Assembling Your Easy Chocolate Swiss Roll
- Gently Unroll the Sponge: Once the chocolate sponge is completely cool, carefully unroll it onto your clean work surface. It should now hold its rolled shape without cracking. If it resists a little, be extra gentle.
- Spread the Buttercream: Using an offset spatula or the back of a spoon, evenly spread a generous layer of your silky chocolate buttercream over the entire surface of the unrolled sponge, leaving about a 1/2-inch border along one of the long edges clean. This small border prevents the filling from oozing out too much when you re-roll, keeping your Easy Chocolate Swiss Roll looking neat and tidy.
- Re-roll Carefully: Starting from the short end you initially rolled, carefully but firmly re-roll the sponge into a tight log. Take your time, making sure to keep the roll as tight as possible to avoid large gaps in the center. Your initial roll-and-cool process should make this much easier!
- Transfer to Serving Platter: Once rolled, carefully lift your Easy Chocolate Swiss Roll and transfer it to a serving platter, positioning it seam-side down.
Finishing Touches and Chilling for Perfection
- Decorate the Exterior (Optional): For a classic “Easy Chocolate Swiss Roll” look, you can dust the top generously with a little extra unsweetened cocoa powder or powdered sugar using a fine-mesh sieve. If you have any leftover buttercream, you could pipe some decorative swirls on top using a star tip. Or, for a simple yet elegant finish, just leave it as is after dusting.
- Chill Your Swiss Roll: This is a step you absolutely do not want to skip! Cover your Easy Chocolate Swiss Roll loosely with plastic wrap and refrigerate it for at least 1 to 2 hours. This chilling period is crucial as it allows the buttercream to firm up, setting the shape of the roll and making it much, much easier to slice neatly without the filling squishing out. The flavors will also meld beautifully during this time.
- Slice and Serve: When you’re ready to indulge, take the chilled Easy Chocolate Swiss Roll out of the refrigerator. For the cleanest slices, use a very sharp knife that has been warmed under hot water and wiped dry between each cut. This will ensure your slices are picture-perfect.
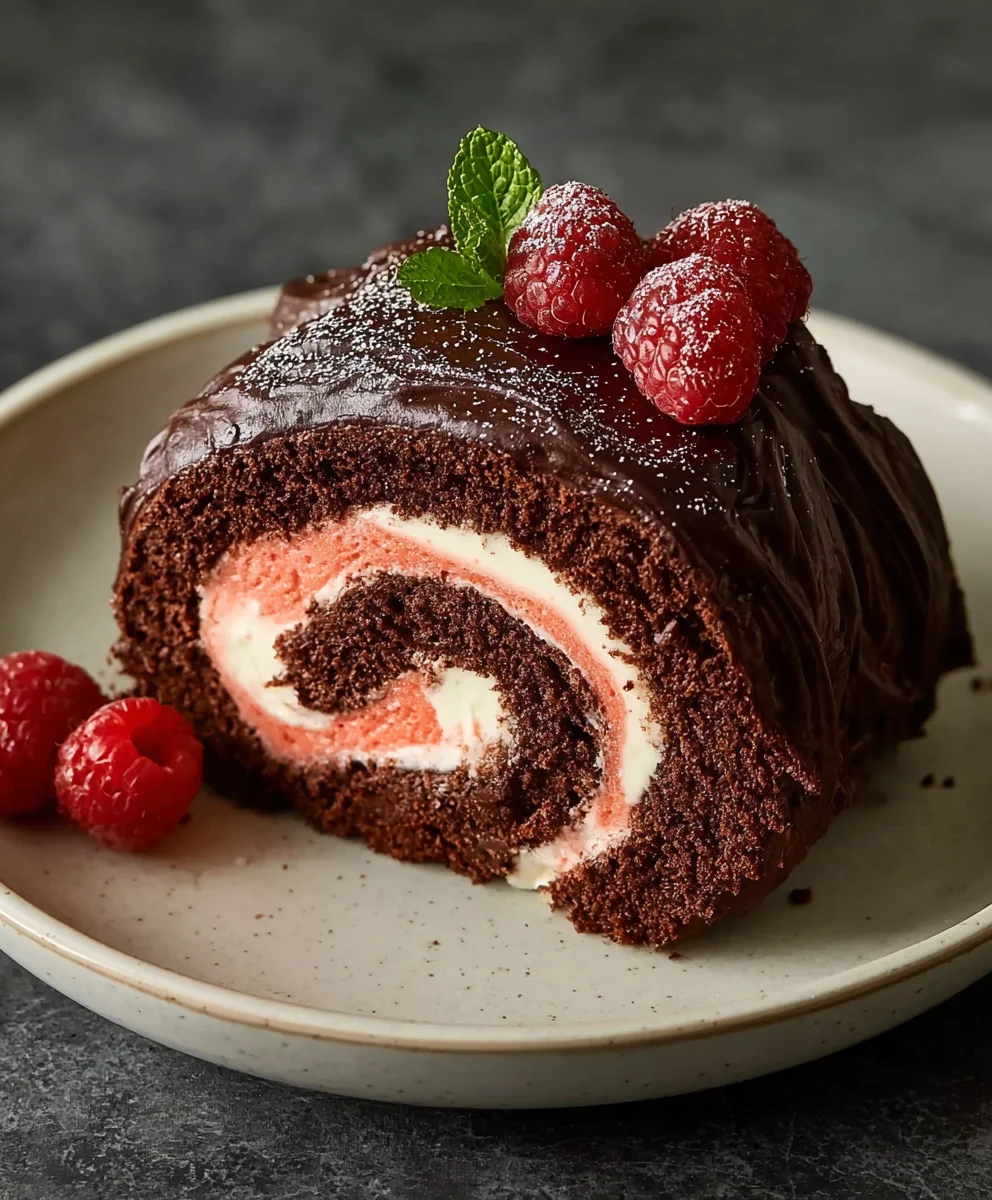
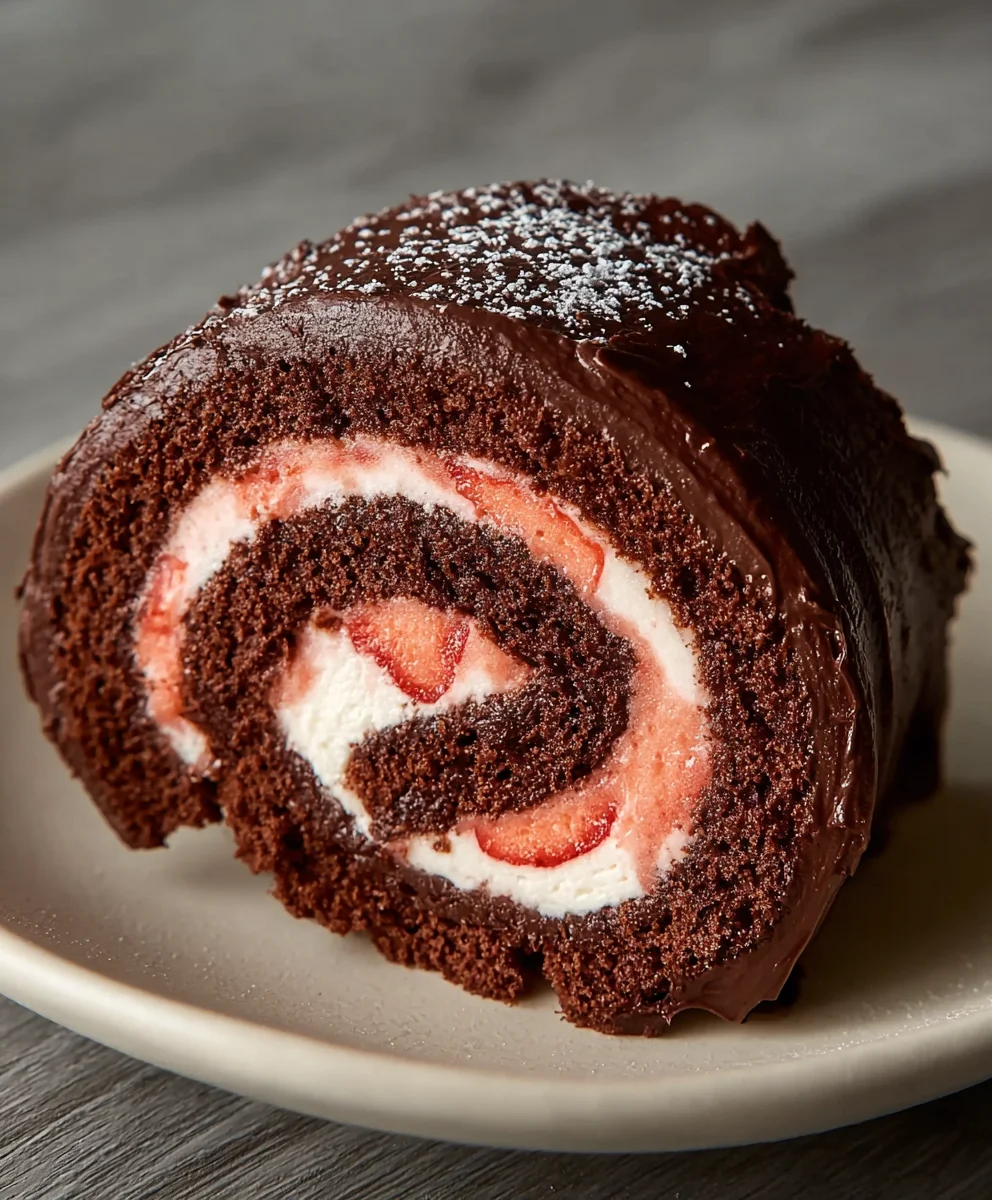
- Enjoy Your Homemade Masterpiece: Serve your beautiful Easy Chocolate Swiss Roll with a smile! You’ll love the tender chocolate sponge and the rich, creamy chocolate buttercream filling. It’s a delightful treat that’s perfect with a cup of coffee or tea, or as a dessert for any occasion. Each slice reveals that iconic spiral of cake and filling, a testament to your baking prowess!
Conclusion:
So, my fellow baking enthusiasts, we’ve reached the sweet finale of our delicious journey together. I genuinely hope you’ve enjoyed discovering the secrets to this truly exceptional dessert. This isn’t just another recipe; it’s an invitation to create something spectacular yet surprisingly approachable in your own kitchen. I’ve shared every tip and trick I know, because I believe everyone deserves to experience the sheer delight of baking and tasting this magnificent creation. It’s a dessert that perfectly balances elegance with a comforting familiarity, making it a go-to for countless occasions.
Why do I insist this recipe is an absolute must-try? Well, for starters, it’s all about the perfect harmony of textures and flavors. Imagine: a delightfully soft, springy chocolate sponge that practically melts in your mouth, gently rolled around a cloud-like, luscious cream filling. It’s a combination that delivers pure bliss with every single bite. Unlike some chocolate cakes that can be overly dense or too rich, our Easy Chocolate Swiss Roll strikes that ideal balance, offering a light yet satisfying indulgence. It’s rich enough to feel decadent but airy enough that you’ll easily find yourself reaching for a second slice!
Beyond the Basic Slice: Serving Suggestions and Creative Variations
While a simple dusting of powdered sugar is always a classic and beautiful finish, don’t hesitate to get creative with your serving! For an extra touch of elegance, I often serve a slice with a dollop of fresh whipped cream and a sprinkle of chocolate shavings. If you’re a fruit lover, a vibrant berry compote or a handful of fresh raspberries and blueberries make for a wonderful, tangy contrast that brightens the entire dessert. During the cooler months, a warm cup of coffee or a glass of milk is the perfect accompaniment, turning a simple dessert into a cozy experience.
But let’s talk about variations – this is where you can truly make this recipe your own! The filling is your canvas. Instead of a plain vanilla cream, why not try folding in some finely chopped toasted hazelnuts for a delightful crunch and nutty flavor? Or, for a seasonal twist, consider a peppermint cream filling during the holidays, or a zesty orange cream for a burst of citrus. A coffee-flavored cream could also be absolutely divine for the espresso lovers among us. For those who adore extra richness, you could even spread a thin layer of raspberry jam on the sponge before adding the cream, creating an exciting fruit and chocolate symphony. The possibilities are truly endless, limited only by your imagination and what delicious ingredients you have on hand.
Your Journey to a Perfect Roll Starts Now!
Now, it’s your turn. I wholeheartedly encourage you to clear your counter, gather your ingredients, and embark on this wonderful baking adventure. Don’t let the thought of rolling intimidate you; it’s a lot simpler than it looks, and with my step-by-step guidance, you’ll master it in no time. Remember, even if your first roll isn’t perfectly symmetrical, it will still taste incredible, and that’s what truly matters! The joy of baking is in the process, the aromas filling your kitchen, and the proud moment you present your homemade masterpiece.
I would absolutely love, love, love to see your beautiful creations and hear about your baking experience. Did you try a unique filling? Did you serve it with a special garnish? Was it a huge hit with your family and friends? Please, come back and share your stories and any photos you might have. Your feedback not only inspires me but also helps other home bakers in our growing community. Let’s celebrate the magic of baking together and make this scrumptious Easy Chocolate Swiss Roll a regular star in all our kitchens!
Easy Chocolate Swiss Roll Recipe: Simple & Delicious!
A classic dessert featuring a light, airy chocolate sponge cake perfectly rolled around a luscious, creamy chocolate buttercream filling. This elegant treat is surprisingly straightforward to bake and perfect for any occasion.
Ingredients
-
4 large eggs, room temperature
-
1/2 cup (100g) granulated sugar, plus extra for dusting
-
1/4 cup (30g) unsweetened cocoa powder, sifted
-
1/4 cup (30g) all-purpose flour, sifted
-
1 tsp baking powder
-
1/4 tsp salt (for sponge)
-
1 tsp pure vanilla extract (for sponge)
-
1/2 cup (113g) unsalted butter, softened
-
2 cups (240g) powdered sugar, sifted
-
1/2 cup (60g) unsweetened cocoa powder, sifted (for filling)
-
1/4 cup (60ml) whole milk or heavy cream
-
1 tsp pure vanilla extract (for filling)
-
Pinch of salt (for filling)
Instructions
-
Step 1
Preheat oven to 375°F (190°C). Line a 10×15-inch baking sheet with parchment paper, extending over the short edges. -
Step 2
In a medium bowl, whisk together sifted cocoa powder, flour, baking powder, and 1/4 tsp salt. Set aside. -
Step 3
In an electric mixer, beat eggs and 1/2 cup granulated sugar on medium-high for 7-10 minutes until pale, very thick, and forming a ribbon. Beat in 1 tsp vanilla extract. -
Step 4
Gently fold the dry ingredients into the egg mixture in three additions until just combined, being careful not to overmix and deflate the air. -
Step 5
Pour the batter onto the prepared baking sheet and spread evenly. Bake for 8-10 minutes, until the sponge springs back lightly when touched. -
Step 6
Immediately invert the hot sponge onto a clean, sugar-dusted kitchen towel or parchment paper. Gently peel off the baking parchment. Trim about 1/4 inch from all four edges of the sponge for a neater roll. -
Step 7
Starting from one of the short ends, tightly roll the warm sponge (with the towel/parchment inside) into a log. Place it on a wire rack and cool completely to room temperature while rolled (at least 1 hour). -
Step 8
For the buttercream: In an electric mixer, beat softened unsalted butter on medium speed for 2-3 minutes until light and creamy. -
Step 9
Gradually add sifted powdered sugar and 1/2 cup cocoa powder to the butter on low speed, then increase to medium. Add 1 tsp vanilla extract, a pinch of salt, and milk or cream (1 tablespoon at a time) until the buttercream is smooth, spreadable, and fluffy. Beat on medium-high for another 2-3 minutes to aerate. -
Step 10
Once the chocolate sponge is completely cool, gently unroll it onto your clean work surface. -
Step 11
Evenly spread a generous layer of the chocolate buttercream over the entire surface of the unrolled sponge, leaving about a 1/2-inch border clean along one of the long edges. -
Step 12
Carefully but firmly re-roll the sponge into a tight log, starting from the short end you initially rolled. Transfer the roll to a serving platter, seam-side down. -
Step 13
Optionally, dust the top generously with extra unsweetened cocoa powder or powdered sugar. Cover loosely with plastic wrap and refrigerate for at least 1-2 hours (or longer) to allow the buttercream to firm up and set the roll’s shape. -
Step 14
When ready to serve, use a very sharp knife, warmed under hot water and wiped dry between each cut, to slice the chilled Easy Chocolate Swiss Roll neatly. Enjoy your homemade masterpiece!
Important Information
Nutrition Facts (Per Serving)
It is important to consider this information as approximate and not to use it as definitive health advice.
Allergy Information
Please check ingredients for potential allergens and consult a health professional if in doubt.


Leave a Comment