
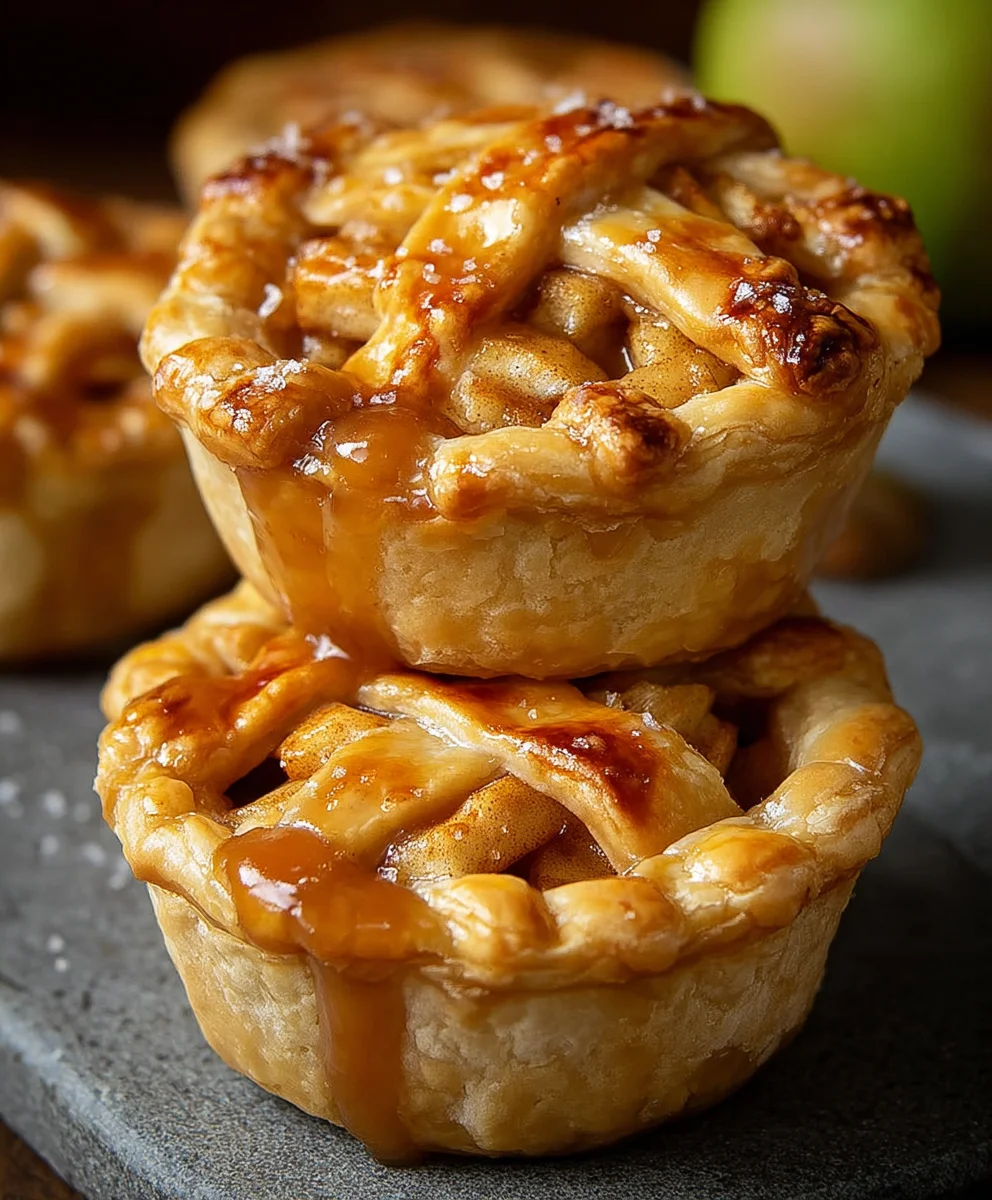
Easy Mini Apple Pies are here to redefine your dessert experience, transforming a beloved classic into perfectly portioned, irresistible treats that I am absolutely thrilled to share with you. Few desserts evoke the same sense of comfort and nostalgia as a warm apple pie, a culinary icon deeply woven into the fabric of American home baking and holiday traditions. Imagine that cherished flavor and flaky goodness, but in a convenient, personal size, eliminating the fuss of slicing and serving. This innovative approach takes all the charm of a rustic, homemade pie and makes it accessible for any occasion, whether a casual gathering or a quiet evening at home.
Why You’ll Fall in Love with These Mini Delights
People adore this dish for countless reasons, and I know you will too. Each bite delivers that delightful combination of tender, spiced apples—sweet yet tart—nestled in a golden, buttery crust, creating a symphony of textures and flavors that’s hard to resist. The individual servings make them not only incredibly convenient for entertaining but also a thoughtful personal indulgence. Furthermore, the “easy” aspect means you no longer need to dread the intricate process often associated with baking a full-sized pie; these Easy Mini Apple Pies simplify the journey from pantry to plate, proving that sometimes, the best things come in small, manageable packages. Prepare to enjoy all the classic appeal with none of the usual fuss!
Ingredients:
-
For the Pie Dough:
- 2 boxes (4 crusts total) of store-bought refrigerated pie dough. I always opt for brands like Pillsbury or Trader Joe’s for convenience when making Easy Mini Apple Pies, but feel free to use your favorite homemade recipe if you have the time!
- All-purpose flour, for dusting your work surface.
-
For the Apple Filling:
- 6-8 medium-sized baking apples (about 6-7 cups diced). My personal favorite blend for Easy Mini Apple Pies is a mix of Granny Smith for tartness and Honeycrisp or Fuji for sweetness and texture.
- ½ cup granulated sugar, adjust to taste depending on the sweetness of your apples.
- ¼ cup packed light brown sugar. This adds a lovely molasses note.
- 2 tablespoons all-purpose flour or cornstarch. This is our trusty thickener to ensure a perfectly set filling.
- 1 teaspoon ground cinnamon.
- ¼ teaspoon ground nutmeg.
- ⅛ teaspoon ground allspice (optional, but highly recommended for depth of flavor!).
- 1 tablespoon fresh lemon juice. This isn’t just to prevent browning; it really brightens up the apple flavor!
- 2 tablespoons unsalted butter, cut into small cubes.
-
For the Egg Wash & Topping:
- 1 large egg.
- 1 tablespoon water or milk.
- 1-2 tablespoons coarse turbinado sugar, for that beautiful sparkle and added crunch.
-
Equipment You’ll Need:
- Standard 12-cup muffin tin (you might need two, or bake in batches).
- Round cookie cutters: one approximately 3.5 to 4 inches in diameter for the bottom crusts, and another approximately 2.5 to 3 inches in diameter for the top crusts (or a knife if you’re freehanding it!).
- Rolling pin.
- Large mixing bowls.
- Vegetable peeler and apple corer.
- Sharp knife and cutting board.
- Pastry brush.
- Wire cooling rack.
Preparing the Pie Dough for Your Easy Mini Apple Pies
One of the keys to making truly Easy Mini Apple Pies is starting with excellent dough. While I often use store-bought, treating it right makes all the difference.
- First things first, take your refrigerated pie dough out of the fridge about 10-15 minutes before you plan to use it. This allows it to warm up just slightly, making it more pliable and less prone to cracking when you unroll it. You want it cool, but not stiffly cold.
- Lightly flour your work surface and your rolling pin. Unroll one sheet of pie dough and place it on the floured surface.
- Using your larger round cookie cutter (around 3.5 to 4 inches in diameter), cut out as many circles as you can from the dough. These will be the bottom crusts for your mini pies. For a standard muffin tin, you’ll likely get 4-6 circles per dough sheet, so aim for at least 12 circles from your first two sheets. Gently gather the scraps, form them into a ball, and very lightly re-roll them to cut out more circles. Don’t overwork the dough here, or it can become tough.
- Carefully place each dough circle into the cups of your muffin tin. Gently press the dough down into the bottom and up the sides of each cup, making sure there are no air bubbles underneath. You can use your fingers to crimp the edges slightly if you like, but the main goal is to create a sturdy cup for your filling.
- Repeat the process with another sheet of pie dough, but this time, use your smaller cookie cutter (around 2.5 to 3 inches in diameter) to cut out circles for the top crusts. You’ll need as many top crusts as you have bottom crusts. If you prefer a lattice top, you can use a pastry wheel or knife to cut thin strips from these smaller circles or from a separate dough sheet.
- Once all your bottom crusts are nestled in their muffin tin cups, and you have your top crusts ready, pop the muffin tin (with the bottom crusts) and the top crusts into the refrigerator for at least 15-20 minutes. This chilling step is absolutely crucial! It helps the crusts hold their shape and prevents them from shrinking excessively while baking, ensuring you don’t end up with sad, shrunken crusts for your beautiful Easy Mini Apple Pies.
Crafting the Delicious Apple Filling for Easy Mini Apple Pies
The heart of any apple pie is, of course, the filling! A perfect balance of sweetness, spice, and tender apples will make your Easy Mini Apple Pies truly irresistible.
- Begin by preparing your apples. Peel all your apples using a vegetable peeler. Then, core them and dice them into small, uniform ½-inch pieces. Uniformity is key here because it ensures even cooking in the small format of a mini pie. Plus, smaller pieces are much easier to fit into those cute little crusts!
- Place all the diced apples into a large mixing bowl.
- In a separate small bowl, whisk together the granulated sugar, light brown sugar, all-purpose flour (or cornstarch if you’re using that), ground cinnamon, ground nutmeg, and optional allspice. Giving the dry ingredients a quick mix ensures they’re evenly distributed throughout the apples.
- Pour the sugar and spice mixture over the diced apples. Add the fresh lemon juice.
- Using a large spoon or your hands, gently toss the apples until they are thoroughly coated with the sugar, spice, and flour mixture. You want every apple piece to have a little kiss of that delicious coating. Let this mixture sit for about 10-15 minutes at room temperature. This allows the apples to macerate slightly, releasing some of their juices, which will then combine with the thickener to create that perfect pie filling consistency.
Assembling Your Easy Mini Apple Pies
This is where your Easy Mini Apple Pies really start to take shape! Precision and care here will lead to beautiful, well-filled pies.
- Preheat your oven to 375°F (190°C).
- Retrieve your chilled muffin tin with the bottom crusts from the refrigerator.
- Fill each pie crust cup with the apple mixture. Spoon the apples in generously, mounding them slightly above the rim of the crust. Don’t be shy with the filling, but also be mindful not to overfill so much that it’s impossible to add a top crust. The apples will cook down, so a little mound is perfect. Divide the small cubes of butter evenly among the filled cups, placing a tiny piece or two on top of the apple filling in each pie. This small touch of butter will melt into the filling, adding richness and a lovely sheen.
- Now it’s time for the top crusts! If you’re using solid circles, place one small dough circle over the apple filling in each cup. Gently press the edges of the top crust down onto the edges of the bottom crust, sealing them together. You can use a fork to crimp the edges all around, creating a pretty, sealed border. If you opted for lattice tops, carefully weave your strips over the filling and crimp the edges to the bottom crust.
- Using a small, sharp knife, cut a few small slits (vent holes) into the top of each pie, especially if you’re using solid top crusts. These vents are essential for allowing steam to escape during baking, preventing the crust from puffing up too much and ensuring a perfectly baked interior.
Baking Your Easy Mini Apple Pies to Golden Perfection
The aromas that will soon fill your kitchen are one of the best parts of baking these Easy Mini Apple Pies! Baking them correctly ensures a flaky crust and tender, bubbly filling.
- In a small bowl, whisk together the large egg and 1 tablespoon of water or milk to create your egg wash. This magical mixture will give your pies a beautiful golden-brown, glossy finish.
- Using a pastry brush, lightly brush the tops of all your assembled mini pies with the egg wash. Be thorough, but don’t drench them.
- Generously sprinkle the coarse turbinado sugar over the egg-washed tops. This adds a lovely crunch and a sparkling, professional look to your Easy Mini Apple Pies.
- Carefully place the muffin tin on a baking sheet (just in case any filling bubbles over) and transfer it to your preheated 375°F (190°C) oven.
- Bake for 30-35 minutes, or until the crusts are deeply golden brown and you can see the apple filling bubbling through the vent holes. About halfway through the baking time, if you notice the edges of the crusts are browning too quickly, you can loosely tent the muffin tin with aluminum foil to prevent over-browning.
- Once baked to perfection, carefully remove the muffin tin from the oven.
- Allow the Easy Mini Apple Pies to cool in the muffin tin for about 10-15 minutes. This cooling time is important because it allows the filling to set slightly, making them much easier to remove without breaking apart.
- After 10-15 minutes, gently run a thin knife or offset spatula around the edges of each pie to loosen it, then carefully transfer the pies to a wire cooling rack to cool completely. This step is crucial! The filling will continue to set as it cools, giving you that perfect sliceable texture. If you cut into them too soon, the filling might still be a bit runny.
Serving Suggestions and Storage Tips for Your Easy Mini Apple Pies
Once cooled, your Easy Mini Apple Pies are ready to be enjoyed! They’re delightful on their own, but a few additions can elevate them even further. And, of course, knowing how to store them is important.
- Serving:
- Serve warm or at room temperature. While delicious cold, a slightly warm pie really brings out the flavors of the apples and spices.
- For an extra special treat, serve your mini apple pies à la mode with a scoop of vanilla bean ice cream. The cold, creamy ice cream melting into the warm, spiced apples is pure heaven!
- A dollop of freshly whipped cream or a drizzle of caramel sauce also makes a fantastic accompaniment.
- These mini pies are perfect for parties, potlucks, or just a sweet everyday indulgence. Their individual size makes them super convenient and elegant.
- Storage:
- Leftover Easy Mini Apple Pies can be stored at room temperature, loosely covered, for up to 2 days. For longer storage, refrigerate them in an airtight container for up to 4-5 days.
- To reheat, simply pop them in a preheated oven at 300°F (150°C) for about 10-15 minutes, or until warmed through. You can also microwave them, but the crust won’t be as crisp.
Variations and Pro Tips for Your Easy Mini Apple Pies:
Making Easy Mini Apple Pies can be a fun adventure in customization! Here are some ideas and advice to make your experience even better.
- Apple Varieties: While I love the Granny Smith and Honeycrisp blend, feel free to experiment with other baking apples like Braeburn, Jonagold, or Gala. A mix often yields the best flavor and texture. Avoid overly soft apples like Red Delicious, as they can turn to mush.
- Spice It Up: Don’t limit yourself to just cinnamon and nutmeg! A pinch of ground ginger, cardamom, or even a tiny bit of cloves can add another layer of warmth and complexity to your apple filling. A little dash of pure vanilla extract or a tablespoon of apple brandy (if adult-friendly) can also work wonders.
- Crust Customization:
- Lattice Top: Instead of solid tops, try a simple lattice. It looks beautiful and allows more steam to escape, sometimes resulting in a slightly crispier top crust. Use a pastry wheel or knife to cut thin strips.
- Crumble Topping: If you’re a fan of apple crumble, you can skip the top crust altogether and make a simple crumble topping (flour, sugar, cold butter, and maybe some oats) to sprinkle over the filling before baking. This makes for an even easier mini apple pie!
- Gluten-Free: Many brands now offer excellent gluten-free pie crusts that work wonderfully for this recipe, making it accessible to more people.
- Preventing Soggy Bottoms:
- Blind Baking (for homemade crusts): If you’re using homemade dough and are worried about a soggy bottom, you can pre-bake the empty pie crusts for 10-15 minutes before filling them. This isn’t usually necessary for sturdy store-bought dough used in muffin tins, but it’s an option.
- Chilling Dough: As mentioned, chilling the formed crusts before filling is crucial for maintaining their structure and preventing shrinking, which can contribute to sogginess.
- Hot Oven: Baking at the correct temperature ensures the crust bakes quickly and crisps up before the filling’s moisture can penetrate too deeply.
- Freezing Your Mini Apple Pies:
- Unbaked: You can assemble the mini pies completely, then freeze them unbaked on a baking sheet until solid. Once frozen, transfer them to a freezer-safe bag or container for up to 3 months. When ready to bake, place them frozen into a preheated oven (you might need to add 10-15 minutes to the baking time and tent with foil if browning too fast).
- Baked: Fully baked and cooled mini apple pies can also be frozen. Wrap them individually in plastic wrap, then place them in a freezer-safe container for up to 2-3 months. Thaw at room temperature or reheat in the oven until warmed through.
- Uniformity is Key: Especially for mini pies, try to dice your apples into similar-sized pieces. This ensures they cook evenly and you don’t end up with some crunchy bits and some mushy bits.
- Don’t Overfill: While it’s tempting to cram in as much apple as possible, overfilling can lead to bubbling-over messes and soggy crusts. Mound the filling slightly, knowing it will cook down.
- The Power of Patience: Allow your Easy Mini Apple Pies to cool completely on a wire rack. I know it’s hard to resist, but this allows the filling to fully set, giving you perfect, neat pies that hold their shape.
Enjoy baking and sharing your delightful batch of Easy Mini Apple Pies!

Conclusion:
So, there you have it – my absolute go-to recipe for those moments when you crave something truly special, yet delightfully simple. These aren’t just any apple pies; they’re your ticket to a world of warm, comforting flavors, perfectly portioned, and utterly irresistible. What makes this particular recipe a resounding must-try, you ask? Well, for starters, it delivers on its promise of incredible taste without the usual fuss and intimidation that can come with baking a full-sized pie. Each glorious bite is a symphony of tender, warmly spiced apples nestled in a flaky, golden crust – a quintessential classic combination elevated by its convenient, individual serving size. Imagine the sheer joy of holding your own personal pie, still warm from the oven, without the need for plates and forks if you’re feeling adventurous and enjoying it on the go! They are the epitome of comfort food, made accessible for even the most novice of bakers, guaranteeing impressive results every single time.
Beyond their undeniable deliciousness, these mini pies are also incredibly versatile. They are perfect for practically any occasion – from a cozy family dessert to a charming addition to a brunch spread, a delightful treat for a potluck, or even a thoughtful, homemade gift. Their individual nature means less waste, easier serving, and a beautiful presentation that will undoubtedly garner compliments. The aroma alone, as these bake, is enough to transform your kitchen into the most inviting space imaginable, a precursor to the deliciousness that awaits. There’s an unparalleled satisfaction in creating something so delectable from scratch, especially when the final product is as consistently delightful and universally loved as these little wonders.
Taking Your Mini Apple Pies to the Next Level: Serving Suggestions & Creative Variations
Now, let’s talk about elevating these already phenomenal treats even further. While they are undeniably perfect straight from the oven, perhaps with a slight cooling period to let the filling set properly, there are so many delightful ways to enjoy them. My personal favorite? A generous scoop of creamy vanilla bean ice cream melting luxuriously over the warm pastry – a classic ‘a la mode’ experience that, frankly, can’t be beaten. The exquisite contrast of the cold sweetness of the ice cream with the warm, spiced apples is pure magic. But don’t stop there! A dollop of freshly whipped cream, perhaps infused with a hint of vanilla extract or a dash of cinnamon, also makes for an elegant and light topping. For those with an insatiable sweet tooth, a drizzle of homemade or high-quality store-bought caramel sauce adds a rich, luxurious touch that’s simply divine. And for a simpler, yet equally charming finish, a dusting of powdered sugar or a sprinkle of cinnamon sugar can both enhance their appearance and add an extra layer of sweetness.
The true beauty of this recipe lies not just in its simplicity but also in its remarkable adaptability. Don’t feel confined to just apples, wonderful as they are! While this guide champions our beloved apples, consider experimenting with other fruits. Pears, cherries (pitted, of course), mixed berries, or even a delightful combination of these can create entirely new and exciting taste sensations. You could also play with the spice profile – a touch of nutmeg, allspice, or even a tiny pinch of cardamom can add wonderful depth and complexity to the apple filling. For a different textural experience, consider adding a streusel topping instead of a full top crust for some of your batch; a simple mix of butter, flour, sugar, and oats creates a delightful crumbly finish that’s always a hit. Or, for a slightly healthier twist, try incorporating a whole wheat pastry flour for a nuttier flavor in the crust. You can even mix in a handful of chopped walnuts or pecans into the apple filling for added crunch and richness. These small tweaks can truly transform your baking experience and help you discover new personal favorites, making each batch uniquely yours.
Your Turn to Bake & Share!
I genuinely hope that reading through this has ignited a spark of inspiration within you to preheat your oven and get baking! There’s an unparalleled satisfaction in creating something so utterly delicious from scratch, especially when the results are as consistently delightful and impressive as these Easy Mini Apple Pies. They are truly perfect for any occasion, from a simple weeknight dessert to an elegant party favor. Don’t be shy; give this recipe a whirl. I promise you won’t regret the effort, which is minimal for such a grand reward. Once you’ve whipped up your very own batch of these golden, fragrant wonders, I would absolutely love to hear about your experience! Did you stick to the classic formula, or did you venture into exciting variations? What was your favorite part of the process, and, more importantly, the eating? Please, share your baking triumphs, your creative serving ideas, and even your candid photos in the comments section below or tag me on social media. Your feedback and creativity truly inspire me and this wonderful community of home bakers. Let’s make some magic in the kitchen together!
People Also Ask:
Can I make these mini apple pies ahead of time?
Yes, absolutely! You have a few options for making them ahead. You can prepare the apple filling a day in advance and store it in an airtight container in the refrigerator. You can also assemble the pies completely, unbaked, and then freeze them for baking later, or bake them fully and store them as directed below.
How do I store baked mini apple pies?
Once your mini apple pies have cooled completely to room temperature, store them in an airtight container. They will keep well at room temperature for up to 2-3 days. For slightly longer storage, you can refrigerate them for up to 5 days. For the best flavor and texture, I recommend warming them slightly before serving if they’ve been refrigerated.
Can I freeze mini apple pies?
Yes, you certainly can freeze them, either baked or unbaked! To freeze unbaked pies, assemble them in your muffin tin, then place the entire tin in the freezer until the pies are solid. Once frozen, carefully remove them and transfer them to a freezer-safe bag or container, layered with parchment paper, for up to 3 months. When ready to bake, place frozen pies directly into a preheated oven (no need to thaw), adding about 10-15 minutes to the original baking time. To freeze baked pies, allow them to cool completely. Wrap each pie individually in plastic wrap, then in aluminum foil, and store in a freezer-safe bag or container for up to 3 months. Reheat in a 350°F (175°C) oven until warmed through.
What are the best apples for apple pie?
For a perfect apple pie, a mix of apples is often best to achieve a balance of sweetness, tartness, and texture. I highly recommend using firm, crisp apples that hold their shape well when baked, rather than turning mushy. Some excellent choices include Granny Smith (for a lovely tartness that cuts through the sweetness), Honeycrisp, Braeburn, Fuji, or Golden Delicious. Using a combination of two or three types will give your filling a more complex and satisfying flavor profile.
Why are my mini apple pies soggy on the bottom?
A soggy bottom can be a common frustration in pie baking, but it’s usually preventable! It often happens if the apple filling is too wet or if the bottom crust doesn’t cook thoroughly. To avoid this, ensure your apple filling isn’t excessively juicy – you might need to pre-cook the apples slightly to release some moisture, or add a tiny bit more flour or cornstarch as a thickener to absorb liquids. Baking your pies on a preheated baking sheet or a pizza stone can also make a significant difference, as it helps conduct heat directly to the bottom crust, ensuring it cooks more quickly and crisply. Also, double-check that your oven is accurately heated to the correct temperature!
Can I use store-bought pie crust for this recipe?
Absolutely, yes! Using store-bought pie crust is a fantastic and incredibly convenient time-saver, and it works perfectly for these mini pies. In fact, it makes the “easy” part of “Easy Mini Apple Pies” even easier! Just make sure to follow the package instructions for rolling and cutting the crust to fit your muffin tin openings. It’s a wonderful shortcut that doesn’t compromise on taste or texture for this recipe.
Easy Mini Apple Pies
Transforming a classic dessert into perfectly portioned, irresistible treats, these Easy Mini Apple Pies offer all the comfort of a warm, homemade apple pie in a convenient, personal size. Featuring tender, spiced apples in a golden, buttery crust, they’re perfect for any occasion without the fuss.
Ingredients
-
2 boxes (4 crusts) refrigerated pie dough
-
All-purpose flour, for dusting
-
6-8 medium baking apples, diced (about 6-7 cups)
-
½ cup granulated sugar
-
¼ cup packed light brown sugar
-
2 tablespoons all-purpose flour or cornstarch
-
1 teaspoon ground cinnamon
-
¼ teaspoon ground nutmeg
-
⅛ teaspoon ground allspice (optional)
-
1 tablespoon fresh lemon juice
-
2 tablespoons unsalted butter, cubed
-
1 large egg
-
1 tablespoon water or milk
-
1-2 tablespoons coarse turbinado sugar
Instructions
-
Step 1
Remove refrigerated pie dough 10-15 minutes before use. Flour a surface and rolling pin. Unroll dough sheets. Cut 3.5-4 inch circles for bottom crusts, gently re-roll scraps for more. Press circles into muffin tin cups. Cut 2.5-3 inch circles for top crusts (or strips for lattice). Chill bottom crusts in muffin tin and top crusts for 15-20 minutes. -
Step 2
Peel, core, and dice apples into ½-inch pieces; place in a large bowl. In a separate small bowl, whisk together granulated sugar, light brown sugar, 2 tablespoons flour (or cornstarch), cinnamon, nutmeg, and optional allspice. Pour mixture over apples, add lemon juice, and toss to coat. Let sit 10-15 minutes. -
Step 3
Preheat oven to 375°F (190°C). Fill chilled bottom crusts generously with apple mixture, mounding slightly. Place small butter cubes on top of the apple filling in each. Place top crusts (circles or lattice) over filling and crimp edges to seal. Cut a few small vent slits into the top of each pie. -
Step 4
Whisk 1 large egg with 1 tablespoon water or milk for an egg wash. Lightly brush the tops of the assembled pies with the egg wash, then generously sprinkle with coarse turbinado sugar. Place muffin tin on a baking sheet. Bake for 30-35 minutes, or until crusts are deeply golden brown and filling is bubbling. If edges brown too quickly, loosely tent with aluminum foil. Cool in the muffin tin for 10-15 minutes, then transfer to a wire rack to cool completely. -
Step 5
Serve warm or at room temperature. Optionally, serve à la mode with vanilla ice cream, whipped cream, or caramel sauce. Store leftovers loosely covered at room temperature for up to 2 days, or refrigerate in an airtight container for 4-5 days. Reheat in a 300°F (150°C) oven for 10-15 minutes.
Important Information
Nutrition Facts (Per Serving)
It is important to consider this information as approximate and not to use it as definitive health advice.
Allergy Information
Please check ingredients for potential allergens and consult a health professional if in doubt.


Leave a Comment