
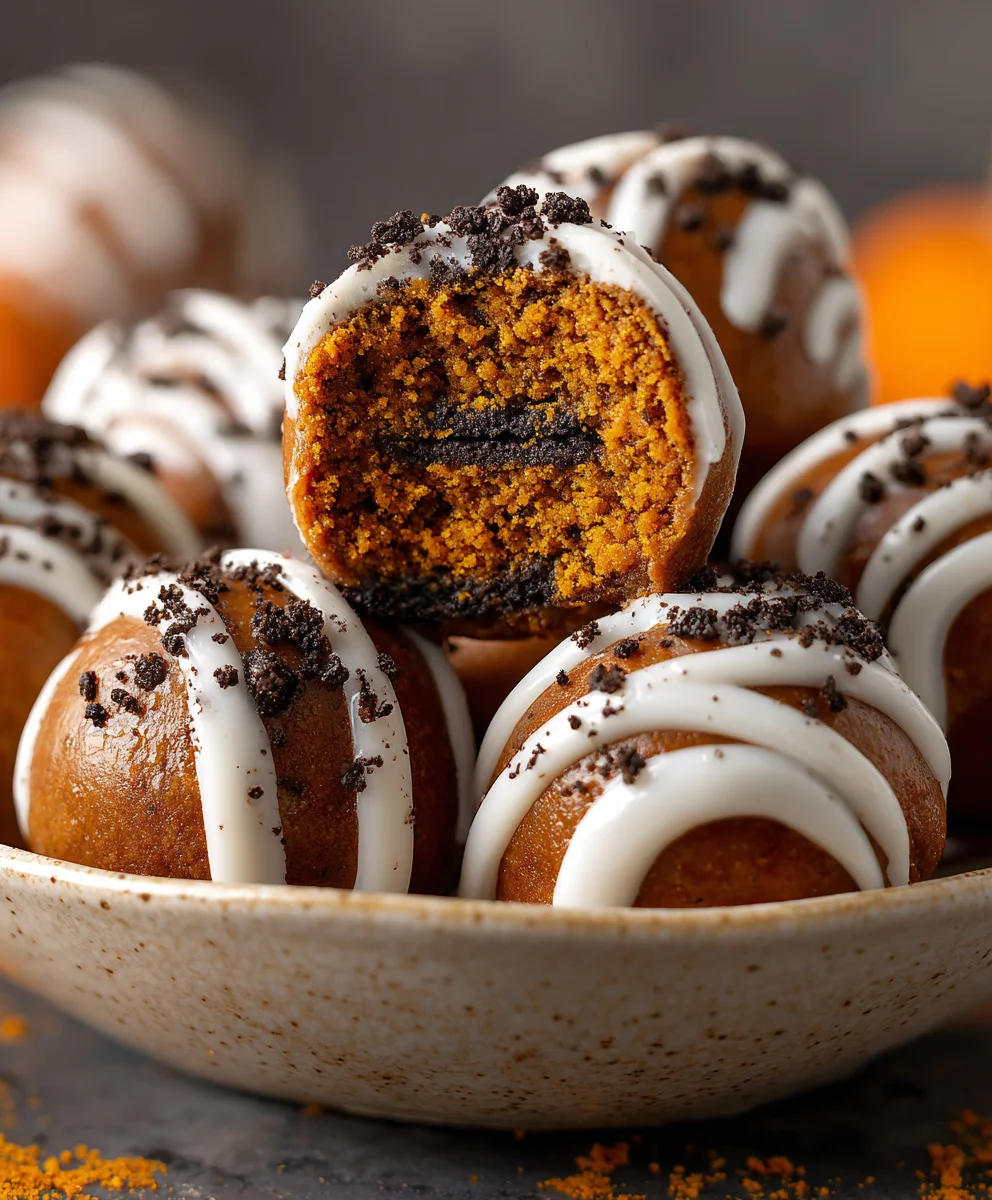
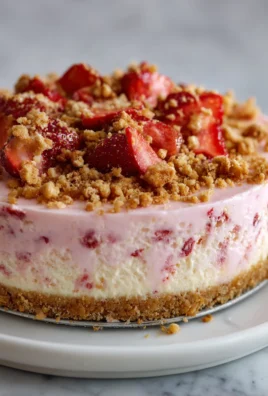
Pumpkin Oreo Balls are, without a doubt, one of the most delightful and effortlessly festive treats you can whip up for autumn gatherings or a cozy night in. Imagine the rich, spiced warmth of pumpkin perfectly blended with the iconic chocolatey crunch of Oreo cookies, all rolled into a bite-sized sphere of pure joy. It’s a symphony of seasonal flavors that consistently steals the show, offering a unique twist on classic fall desserts that everyone adores.
While these delightful confections may not boast centuries of culinary history, their emergence as a beloved staple in modern fall baking traditions speaks volumes. They represent the ingenuity of no-bake desserts, offering incredible flavor with minimal effort, making them a go-to for busy hosts and sweet-toothed enthusiasts alike, especially during the bustling holiday season. I often find myself turning to this recipe when I need a quick yet impressive dessert that perfectly captures the spirit of autumn.
What truly makes these treats irresistible is their incredible combination of textures and tastes: the creamy, spiced pumpkin filling contrasted beautifully with the crushed Oreo cookies, all often enrobed in a delicate white chocolate shell. Their convenience is unmatched; no oven required, making them a stress-free option for potlucks, Halloween parties, or Thanksgiving dessert tables. I love how simple they are to prepare, and yet they always elicit gasps of delight. These Pumpkin Oreo Balls are a guaranteed crowd-pleaser, delivering maximum autumnal cheer in every single bite.
Ingredients:
- One (1) Package (14.3 oz) Original Oreo Cookies: These iconic chocolate sandwich cookies are the backbone of our delicious Pumpkin Oreo Balls. We’re going for the classic flavor here, but feel free to experiment with “Golden Oreos” for a different base, though the original really brings out that deep, rich chocolate contrast to the pumpkin. Make sure they’re fresh for the best crunch and flavor.
- Eight (8) Ounces Cream Cheese, softened: I always recommend using full-fat cream cheese for the creamiest, most decadent results. It binds everything together beautifully and provides a wonderful tangy counterpoint to the sweetness. Remember to take it out of the refrigerator at least an hour before you plan to start, or gently soften it in the microwave in 15-second intervals until it’s pliable but not melted. This is crucial for a smooth, lump-free mixture.
- Half (1/2) Cup Pumpkin Puree: Be absolutely certain you are using 100% pure pumpkin puree, not pumpkin pie filling. Pumpkin pie filling already contains spices and sugar, which would throw off our delicate flavor balance. For the best consistency, I often press my pumpkin puree between a few layers of paper towels to remove any excess moisture. This prevents our Pumpkin Oreo Balls from becoming too soft or sticky, ensuring they hold their shape perfectly.
- One (1) Teaspoon Pumpkin Pie Spice: This warm, aromatic blend typically includes cinnamon, nutmeg, ginger, and cloves, which perfectly complements the natural sweetness of the pumpkin. If you don’t have pumpkin pie spice on hand, you can easily make your own by combining 1/2 teaspoon cinnamon, 1/4 teaspoon ground ginger, 1/8 teaspoon ground nutmeg, and a tiny pinch of ground cloves. The spices are what give these treats that quintessential autumnal flavor.
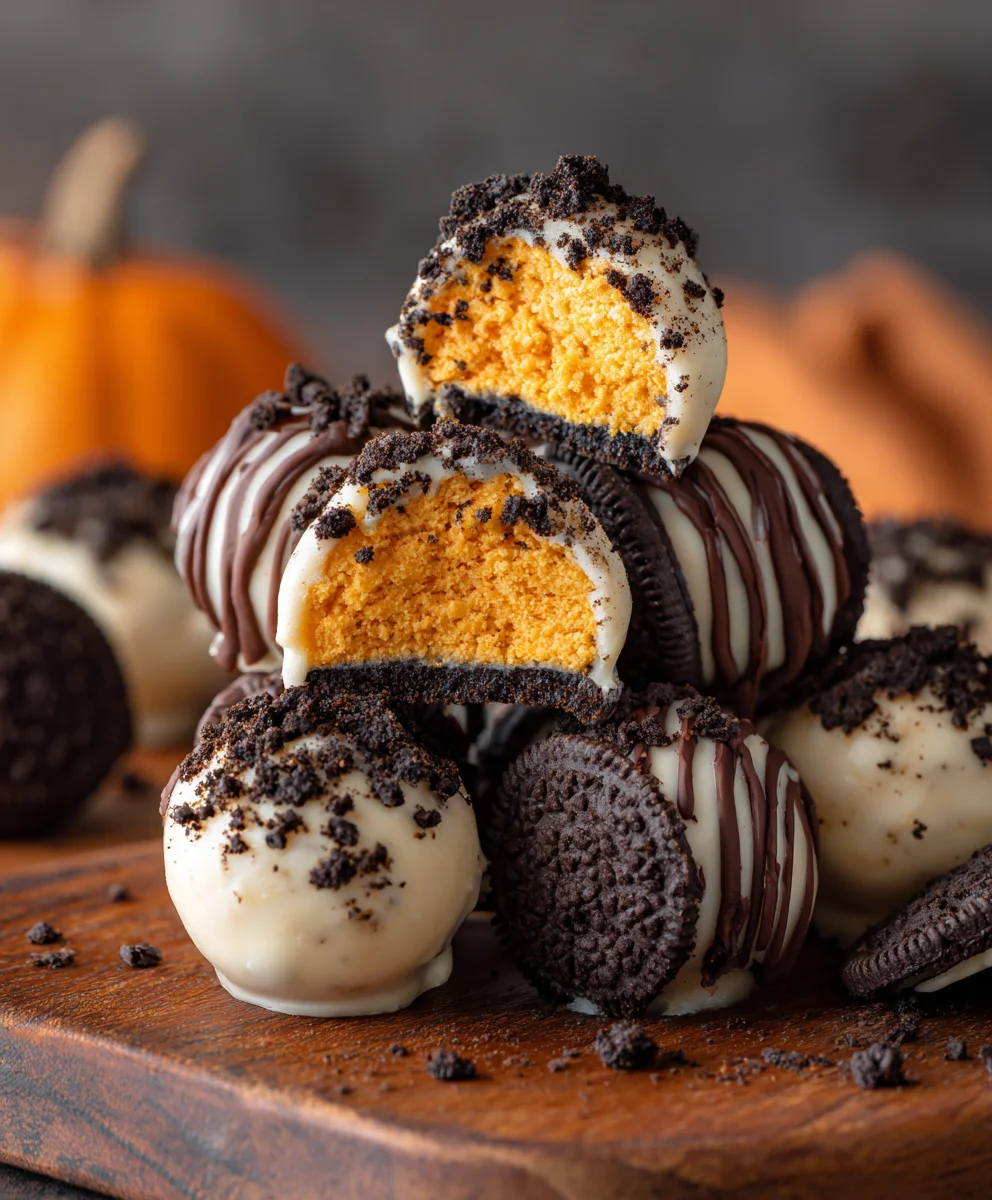
- Eighteen (18) Ounces White Chocolate or White Candy Melts: This will be our primary coating, providing a beautiful, smooth finish and a lovely sweet shell for our Pumpkin Oreo Balls. Candy melts are often easier to work with as they melt more smoothly and set more quickly, but good quality white chocolate works just as well. I prefer a high-quality brand for a superior taste and texture in the final product.
- Optional: Two (2) Ounces Semi-Sweet or Milk Chocolate Chips: These are primarily for drizzling and decoration, adding an elegant touch and another layer of chocolatey goodness. A contrasting drizzle elevates the visual appeal of our Pumpkin Oreo Balls immensely.
- Optional: Fall-Themed Sprinkles or Crushed Pecans: To add a festive flourish and a bit of textural interest, sprinkles in autumnal colors or finely crushed pecans are wonderful additions. They make each Pumpkin Oreo Ball look extra special and ready for any gathering.
Phase 1: Preparing the Oreo Crumb Base
-
Prepare Your Oreos: This is where the magic begins for our Pumpkin Oreo Balls! Take your entire package of original Oreo cookies – yes, the filling and all – and place them into the bowl of a food processor. I find a food processor is the most efficient and effective way to get perfectly fine crumbs, which is essential for a smooth, consistent base. If you don’t have a food processor, don’t worry! You can place the cookies in a large, heavy-duty Ziploc bag, seal it well, and then use a rolling pin or a sturdy pan to crush them until they are very fine. The key here is consistency; we want as fine a crumb as possible, almost like sand, without any large chunks remaining. This ensures that when we mix it with our pumpkin cream cheese, it creates a uniform dough that holds together beautifully and offers a delightful texture in every bite of your Pumpkin Oreo Balls.
Why this step is important: Fine crumbs integrate better with the cream cheese mixture, preventing a crumbly texture and ensuring a smooth, uniform base for your delicious Pumpkin Oreo Balls. Large chunks will make the mixture difficult to roll and less pleasant to eat. Take your time to get this right!
Phase 2: Crafting the Pumpkin Cream Cheese Filling
-
Combine Cream Cheese and Pumpkin Puree: In a large mixing bowl, add your softened cream cheese. Remember, it’s vital that your cream cheese is at room temperature to prevent lumps. To the cream cheese, add your half cup of pumpkin puree. As I mentioned in the ingredients, if you can, press some of the excess moisture out of your pumpkin puree using a paper towel before adding it; this small step can make a big difference in the final consistency of your Pumpkin Oreo Balls. Now, using an electric mixer on medium speed, or a sturdy spatula if mixing by hand, beat these two ingredients together until they are completely smooth and well combined. You’re looking for a uniform, creamy mixture with no visible streaks of cream cheese or pumpkin.
My personal tip: Scrape down the sides of the bowl frequently to ensure everything gets incorporated evenly. This base sets the stage for the rich, autumnal flavor of our Pumpkin Oreo Balls. -
Infuse with Spices: To that creamy pumpkin and cream cheese mixture, add your teaspoon of pumpkin pie spice. This is where we truly bring in those cozy, fall-inspired aromas and flavors that make these Pumpkin Oreo Balls so irresistible. Continue mixing on low speed, just until the spice is evenly distributed throughout the mixture. Avoid overmixing once the spices are in, as we just want to ensure they’re thoroughly incorporated. The aroma that fills your kitchen at this stage is absolutely delightful and promises the deliciousness to come!
Flavor check: At this point, you can even taste a tiny bit of the mixture (before adding the Oreos) to ensure the spice level is to your liking. If you prefer a bolder spice profile, feel free to add another 1/4 teaspoon, but be mindful not to overpower the pumpkin flavor. -
Integrate the Oreo Crumbs: Now for the magical combination! Add your finely crushed Oreo crumbs directly into the pumpkin cream cheese mixture. This is the moment our mixture truly starts to take on its unique “Pumpkin Oreo Ball” identity. Using a sturdy spoon or a rubber spatula, begin to fold the Oreo crumbs into the wet ingredients. Mix until everything is thoroughly combined. You’ll notice the mixture transforming into a thick, dark, and slightly sticky “dough.” It should be firm enough that it starts to pull away from the sides of the bowl, but still pliable enough to scoop and roll.
Don’t overmix: While you want it well combined, avoid overmixing which can develop the gluten in the cookies (yes, cookies have some too!) and lead to a tougher texture. Mix just until no dry crumbs remain and the mixture is uniformly colored. The resulting dough is the foundation of our delightful Pumpkin Oreo Balls.
Phase 3: Shaping and Chilling the Pumpkin Oreo Balls
-
Chill the Mixture: This is a critically important step for making beautiful, easy-to-handle Pumpkin Oreo Balls. Cover your bowl with plastic wrap and place the entire mixture into the refrigerator for at least 30 minutes. I often chill mine for an hour or even longer if I’m not in a rush.
Why we chill: Chilling allows the cream cheese to firm up and the Oreo crumbs to fully absorb the moisture from the pumpkin and cream cheese. This makes the mixture much easier to scoop and roll without it sticking excessively to your hands. It also helps the balls maintain their shape perfectly. Skipping this step often results in a messy, frustrating rolling process. Patience here pays off in perfectly formed Pumpkin Oreo Balls! -
Scoop and Roll Your Balls: Once your mixture is adequately chilled, line a baking sheet with parchment paper or a silicone baking mat. This will prevent your Pumpkin Oreo Balls from sticking. Using a small cookie scoop (about 1 tablespoon in size) or simply a regular tablespoon, scoop out portions of the mixture. Then, using your hands, gently roll each portion into a smooth, compact ball. Aim for uniformity in size – this ensures even coating later and a more professional presentation. Place the rolled balls onto your prepared baking sheet.
Pro-tip for rolling: If the mixture starts to get too sticky as you’re rolling, pop it back into the fridge for another 10-15 minutes. A little trick is to lightly dampen your hands with water before rolling, which can help prevent sticking. Work relatively quickly to keep the mixture cool. You’ll be amazed at how many delightful Pumpkin Oreo Balls you can make from one batch! -
Second Chill for Setting: Once all your Pumpkin Oreo Balls are rolled and neatly arranged on the baking sheet, place the entire sheet back into the refrigerator. This second chill should be for at least another 20-30 minutes, or even in the freezer for 10-15 minutes if you’re in a hurry.
Why the second chill is essential: This step is paramount for ensuring your Pumpkin Oreo Balls are firm and cold when they hit the warm melted chocolate. A cold ball will help the chocolate set more quickly and create a thicker, more even coating, preventing the balls from melting or falling apart in the warm chocolate. It truly makes the coating process so much smoother and more enjoyable, resulting in beautiful, perfectly coated Pumpkin Oreo Balls.
Phase 4: Preparing the Delicious Coating
-
Melt the White Chocolate or Candy Melts: Now for the glorious coating! There are a couple of excellent ways to melt your white chocolate or candy melts.
Microwave Method: Place your white chocolate or candy melts into a microwave-safe bowl. Heat in 30-second intervals, stirring thoroughly after each interval. White chocolate can be finicky and seize up if overheated, so low and slow is key. Continue heating and stirring until the chocolate is smooth and completely melted. This usually takes about 1.5 to 3 minutes total, depending on your microwave and the amount of chocolate.
Double Boiler Method: If you prefer a more controlled melt, set up a double boiler. Place a heat-proof bowl over a saucepan of simmering water, ensuring the bottom of the bowl does not touch the water. Add your white chocolate or candy melts to the bowl and stir continuously until smooth and melted. This method provides a very gentle heat, reducing the risk of scorching or seizing your chocolate.
Tip for smoothness: If your melted chocolate seems a bit too thick for easy dipping, you can stir in 1/2 to 1 teaspoon of coconut oil or vegetable shortening. This will thin it out slightly and give your Pumpkin Oreo Balls a smoother, glossier finish. - Prepare for Decoration (Optional): If you plan to add a contrasting chocolate drizzle, now is a good time to melt your semi-sweet or milk chocolate chips. Follow the same melting instructions as above, either in a separate small bowl in the microwave or using a small double boiler setup. Once melted, you can transfer this chocolate to a piping bag with a very small tip, or a Ziploc bag with a tiny corner snipped off, or simply use a fork for drizzling. Have your sprinkles or crushed pecans ready in a shallow dish, as you’ll want to apply them immediately after dipping.
Phase 5: Coating and Decorating the Pumpkin Oreo Balls
-
Dip the Pumpkin Oreo Balls: Retrieve your chilled Pumpkin Oreo Balls from the refrigerator. Working with one ball at a time, carefully drop a ball into the melted white chocolate. Using a fork or a candy dipping tool, gently roll the ball to coat it completely. Lift the ball out of the chocolate, tapping the fork against the side of the bowl to allow any excess chocolate to drip off. This helps prevent puddles of chocolate around the base and ensures a neat, even coating.
Technique matters: The goal is a thin, even layer of chocolate that completely envelops the ball. If your chocolate starts to cool and thicken during this process, gently re-warm it in the microwave for a few seconds (10-15 seconds at a time) or over the double boiler until it’s back to a smooth, dippable consistency. - Place on Parchment Paper: Once coated, carefully transfer the dipped Pumpkin Oreo Ball back to your parchment-lined baking sheet. The parchment paper will prevent sticking and make for easy removal once the chocolate sets.
- Decorate Immediately (Optional): If you are adding sprinkles or crushed pecans, do so immediately after placing the coated ball on the parchment paper, while the white chocolate is still wet. This ensures the decorations adhere firmly. A light sprinkle is often all you need to add that festive touch. For a more sophisticated look, simply leave them plain, or prepare for the drizzle.
- Continue Dipping and Decorating: Repeat steps 10-12 for all of your Pumpkin Oreo Balls. It’s a good idea to work in batches, keeping the remaining un-dipped balls in the refrigerator to stay firm. This helps maintain the integrity of each Pumpkin Oreo Ball as you work your way through the batch.
-
Drizzle with Contrasting Chocolate (Optional): Once all your Pumpkin Oreo Balls are coated and any immediate sprinkles have been added, and if you decided to go for the drizzle, now’s the time! With your melted semi-sweet or milk chocolate in a piping bag or a fork, drizzle decorative lines across the tops of the white chocolate-coated balls. Be creative! You can do zig-zags, straight lines, or abstract patterns. The contrast of the dark chocolate against the white coating is visually striking and adds another layer of flavor to your already delightful Pumpkin Oreo Balls.
Timing is key: Make sure the white chocolate coating is still slightly tacky, but not completely set, for the drizzle to adhere best. If the white chocolate is fully set, the drizzle might just flake off later.
Phase 6: Setting and Storage
- Allow to Set: Once all your Pumpkin Oreo Balls are dipped and decorated, place the entire baking sheet back into the refrigerator for at least 30 minutes, or until the chocolate coating is completely set and firm to the touch. You’ll know they’re ready when they can be easily picked up without any stickiness or deformation. This chilling time solidifies the chocolate shell, locking in all the wonderful flavors and textures.
-
Storage: Once completely set, transfer your beautiful Pumpkin Oreo Balls to an airtight container. Store them in the refrigerator. They will stay fresh and delicious for up to 1-2 weeks, though I highly doubt they’ll last that long once people discover them! You can also stack them with layers of parchment paper in between to prevent sticking.
Serving suggestion: For the best texture and flavor, I find that letting them come to room temperature for about 10-15 minutes before serving enhances their creaminess and allows the flavors to truly shine. However, they are equally delicious straight from the fridge if you prefer a firmer, colder treat.
And there you have it! A comprehensive guide to making the most incredible Pumpkin Oreo Balls. These festive treats are perfect for fall gatherings, holiday parties, or simply as a special indulgence for yourself. Each bite offers a delightful combination of rich chocolate, spiced pumpkin, and creamy goodness. Enjoy the process and, more importantly, enjoy devouring these little spheres of autumnal joy!
Conclusion:
So, there you have it – the complete guide to creating these utterly irresistible treats. I truly believe that these aren’t just a dessert; they’re a little bite of pure joy, a testament to how simple ingredients can come together to create something truly extraordinary. The unique blend of creamy, spiced pumpkin, the delightful texture of crushed Oreo cookies, and the smooth, sweet coating makes for a sensational experience that’s hard to beat. These are the kind of treats that bring smiles, spark conversations, and disappear from serving platters faster than you can say “more, please!”
What makes these wonderful morsels an absolute must-try? Firstly, their sheer simplicity is a game-changer. As a no-bake wonder, they eliminate the stress of oven temperatures, tricky baking times, and elaborate cooling processes, making them perfect for even the most novice of bakers or for those busy holiday seasons when time is a precious commodity. Secondly, the flavor profile is simply unparalleled. You get that comforting, warm, and inviting spice from the pumpkin, beautifully balanced by the rich, chocolatey depth of the Oreos, all enrobed in a creamy, tangy, and subtly sweet outer layer. It’s a symphony of textures and tastes in every bite – a soft, fudgy interior, a slight crunch from the cookie bits, and a wonderfully smooth outer shell. They truly cater to every palate, appealing to both die-hard pumpkin spice enthusiasts and devoted chocolate lovers alike. These treats are the perfect embodiment of festive cheer, easy to whip up, and guaranteed to be the star of any party. Trust me, once you make a batch of these glorious Pumpkin Oreo Balls, you’ll understand why they’re so incredibly addictive. They strike that perfect balance between decadently rich and delightfully approachable, making them an instant classic in your recipe repertoire.
Now, let’s talk about how to make these delightful morsels even more spectacular, because while they are phenomenal on their own, a little creativity can elevate them further and make them truly your own.
Serving Suggestions:
For presentation, arrange your finished Pumpkin Oreo Balls on a beautiful serving platter, perhaps dusted lightly with a bit of cinnamon or cocoa powder for an extra touch of elegance. They make fantastic additions to a dessert charcuterie board, nestled amongst fresh fruits, crunchy nuts, and other delightful confections. These treats are absolutely ideal for holiday gatherings, office potlucks, or even as a thoughtful homemade gift for friends, family, or neighbors. Package a few in a decorative box with a festive ribbon, and you’ve got a gift that truly comes from the heart. They are best served chilled, allowing the flavors to meld beautifully and the texture to firm up just right. Imagine serving these with a warm mug of coffee, a steaming cup of hot chocolate, or a fragrant spiced cider on a crisp autumn evening – pure, unadulterated bliss!
Creative Variations:
Don’t be afraid to experiment with the coating! While white chocolate provides a classic contrast and allows the pumpkin color to subtly shine through, a dark chocolate drizzle or even a full coating of milk chocolate can offer a different, equally delicious experience, appealing to those who prefer a richer, more intense chocolate flavor. For a truly festive touch, add a sprinkle of autumn-themed nonpareils, chopped pecans, or crushed graham crackers to the wet coating before it sets – the extra texture and visual appeal are fantastic. If you’re feeling adventurous, try swapping out the classic Oreos for Golden Oreos for a brighter, more vanilla-centric flavor, or even mint Oreos for a surprising and refreshing twist, though the original is hard to beat! A pinch of nutmeg, allspice, or an extra dash of ginger added to the pumpkin mixture can intensify those warm, cozy fall flavors even further. You could also experiment with adding a tiny bit of orange zest for a bright, zesty kick, or a drop of maple extract for an even richer, deeper autumn taste. Another fun idea is to use different types of cream cheese or even a subtly flavored cream cheese (like honey or a hint of vanilla bean) in the filling, though always be mindful of how that might interact with the pumpkin flavor profile. The possibilities are truly endless, making these Pumpkin Oreo Balls incredibly versatile and endlessly customizable.
I genuinely hope you’re feeling inspired and excited to roll up your sleeves and give these fantastic treats a try. They are surprisingly simple to make, yet yield such impressive results that your friends and family will undoubtedly think you spent hours slaving away in the kitchen. There’s a special kind of satisfaction that comes from creating something delicious with your own hands, and these Pumpkin Oreo Balls offer that in spades. Please, don’t keep your culinary adventures to yourself! I would absolutely love to hear about your experience. Did you try a unique variation? Were they a massive hit at your last gathering? Did you manage to save any for yourself, or did they disappear instantly? Share your photos, your stories, and any clever tips or creative twists you discovered along the way in the comments section. Your feedback and creativity inspire me and other readers to continue exploring the wonderful world of home baking (or in this delightful case, no-baking!). Happy rolling!
Easy No-Bake Pumpkin Oreo Balls – Delicious Fall Treat!
Pumpkin Oreo Balls are a delightful and effortlessly festive no-bake treat perfect for autumn. These bite-sized spheres combine the rich, spiced warmth of pumpkin with the iconic chocolatey crunch of Oreo cookies, often enrobed in a delicate white chocolate shell. A unique twist on classic fall desserts, they’re a guaranteed crowd-pleaser for any gathering.
Ingredients
-
1 (14.3 oz) package Original Oreo Cookies
-
8 oz cream cheese, softened
-
1/2 cup 100% pure pumpkin puree (not pie filling)
-
1 tsp pumpkin pie spice
-
18 oz white chocolate or white candy melts
-
2 oz semi-sweet or milk chocolate chips (optional, for drizzle)
-
Fall-themed sprinkles or crushed pecans (optional)
Instructions
-
Step 1
Crush the entire package of Oreo cookies (filling included) finely in a food processor or a heavy-duty bag with a rolling pin until sand-like. Set aside. -
Step 2
In a large bowl, beat softened cream cheese and pumpkin puree until smooth. Add pumpkin pie spice and mix until evenly distributed. Fold in the crushed Oreo crumbs until a thick, uniform dough forms; avoid overmixing. -
Step 3
Cover the bowl with plastic wrap and chill the mixture in the refrigerator for at least 30 minutes (or longer) until firm and easy to handle. -
Step 4
Line a baking sheet with parchment paper. Scoop out 1-tablespoon portions of the chilled mixture and roll them into smooth, compact balls. Place on the prepared sheet. -
Step 5
Place the rolled balls back into the refrigerator for another 20-30 minutes, or the freezer for 10-15 minutes, ensuring they are very firm before coating. -
Step 6
Melt white chocolate or candy melts in a microwave-safe bowl (in 30-second intervals, stirring) or using a double boiler until smooth. If too thick, stir in 1/2 to 1 teaspoon of coconut oil or vegetable shortening. If decorating, melt optional semi-sweet/milk chocolate chips in a separate bowl. -
Step 7
Retrieve chilled pumpkin Oreo balls. One at a time, drop a ball into the melted white chocolate, roll to coat completely, then lift with a fork, tapping off excess. Place on the parchment-lined baking sheet. Immediately add sprinkles or crushed pecans if desired, while the chocolate is still wet. Repeat for all balls. For a drizzle, apply melted contrasting chocolate in patterns over the slightly tacky white chocolate coating. -
Step 8
Refrigerate the finished Pumpkin Oreo Balls for at least 30 minutes, or until the chocolate coating is completely set and firm. Store in an airtight container in the refrigerator for up to 1-2 weeks. For best flavor, let them come to room temperature for 10-15 minutes before serving.
Important Information
Nutrition Facts (Per Serving)
It is important to consider this information as approximate and not to use it as definitive health advice.
Allergy Information
Please check ingredients for potential allergens and consult a health professional if in doubt.
Leave a Comment