
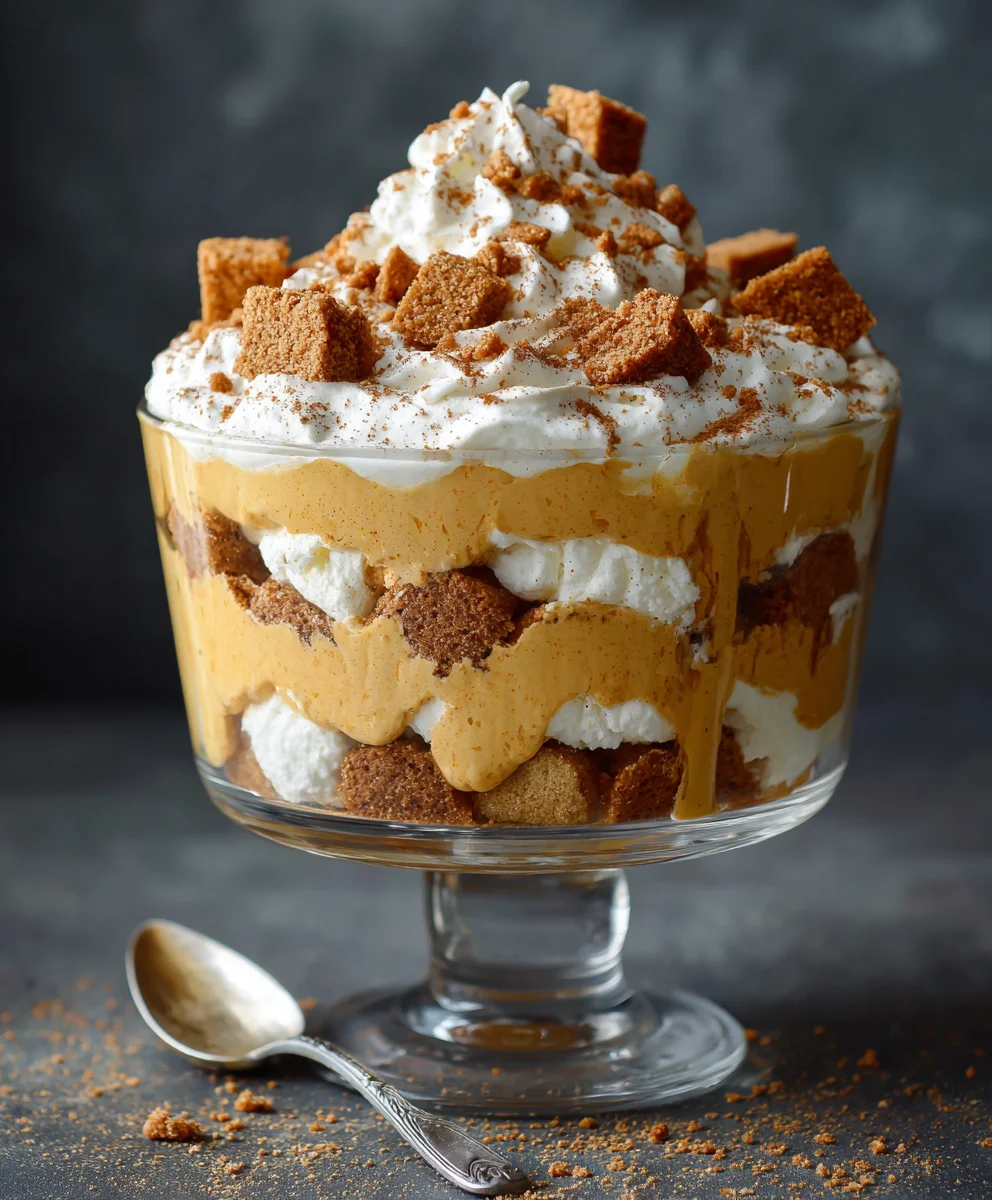
Pumpkin Pie Cheesecake Trifle is not merely a dessert; it is an unforgettable, layered masterpiece that promises to elevate any seasonal gathering into a truly special occasion. As the leaves begin to turn and the air grows crisp, our palates instinctively crave the comforting spices and rich textures that define autumn. This spectacular creation perfectly encapsulates that longing, merging the nostalgic warmth of traditional pumpkin pie with the luxurious creaminess of a cheesecake, all presented in the elegant, layered fashion of a classic trifle.
A Feast for the Senses and a Nod to Tradition
The concept of a trifle, with its delightful strata of cake, cream, and fruit, dates back centuries in British culinary history. Here, this beloved structure is given a distinctly American fall twist, paying homage to the quintessential flavors of Thanksgiving and the festive season. People adore this dish for countless reasons: the harmonious blend of sweet, spiced pumpkin puree, the tangy and smooth cheesecake mousse, the delightful crunch of graham cracker crumbles, and the ethereal lightness of whipped cream. Each spoonful offers a symphony of textures and tastes, creating a truly immersive dessert experience.
Beyond its incredible flavor profile, the convenience of preparing a Pumpkin Pie Cheesecake Trifle is a significant draw. It’s often a make-ahead marvel, allowing you to assemble it hours, or even a day, in advance, freeing up precious time when entertaining. I am incredibly excited to share my ultimate recipe for this exquisite dessert, a showstopper that I am confident will become a treasured centerpiece on your autumn and holiday tables for years to come.

Ingredients:
Creating this spectacular Pumpkin Pie Cheesecake Trifle is an adventure in layers of flavor and texture, and it all starts with gathering our wonderful components. I’ve broken down the ingredients by the distinct parts of our trifle, making it super easy to follow along!
For the Spiced Pumpkin Cheesecake Mousse Layer:
- 15 ounces (about 1 ¾ cups) pure pumpkin puree: Make sure it’s 100% pure pumpkin, not pumpkin pie filling. We want to control our own spices and sweetness!
- 8 ounces cream cheese: Full-fat, softened to room temperature. This is crucial for a smooth, lump-free mousse.
- ½ cup granulated sugar: Adjust to your sweetness preference, but this provides a lovely balance.
- ¼ cup packed light brown sugar: Adds a beautiful molasses note that complements the pumpkin perfectly.
- 2 teaspoons pumpkin pie spice: Or, if you’re feeling adventurous, you can make your own blend with cinnamon, nutmeg, ginger, and cloves.
- ½ teaspoon ground cinnamon: Extra warmth and aromatic richness.
- ½ teaspoon pure vanilla extract: A must-have for depth of flavor.
- ½ cup heavy cream: Chilled, for whipping into a light, airy texture.
- Optional: ¼ teaspoon ground ginger or a tiny pinch of ground cloves for an extra kick!
For the Decadent No-Bake Vanilla Cheesecake Layer:
- 16 ounces (two 8-ounce blocks) cream cheese: Again, full-fat and very soft, sitting at room temperature for at least an hour. This is the cornerstone of our creamy cheesecake layer!
- 1 cup powdered sugar (confectioners’ sugar): Sifted, if possible, to prevent lumps and ensure a silky smooth texture.
- 1 teaspoon pure vanilla extract: High quality vanilla makes a huge difference here.
- Pinch of salt: Just a tiny bit to balance the sweetness and enhance the flavors.
- 1 ½ cups heavy cream: Chilled, for whipping. We’ll be whipping this separately to fold into our cream cheese mixture, giving us that signature light and airy cheesecake consistency.
For the Spiced Gingersnap & Graham Cracker Crumble:
- 1 ½ cups (about 15-20 cookies) gingersnap cookies: Crushed into fine crumbs. These add a fantastic spiced crunch.
- 1 cup (about 8-10 full sheets) graham cracker crumbs: Also crushed fine. The classic base for any cheesecake-inspired treat.
- ¼ cup granulated sugar: Just a little extra sweetness for our crumble.
- ½ teaspoon ground cinnamon: To further enhance those warm, inviting spice notes.
- ¼ cup (4 tablespoons) unsalted butter: Melted. This binds our crumble together and adds richness.
For the Whipped Cream Topping & Garnish:
- 1 ½ cups heavy cream: Well-chilled, for whipping.
- ¼ cup powdered sugar: Or to taste, depending on how sweet you like your whipped cream.
- 1 teaspoon pure vanilla extract: Adds that lovely aromatic quality.
- Optional garnishes: A sprinkle of cinnamon, a few reserved gingersnap crumbs, or even some candied pecans if you’re feeling fancy!
Step-by-Step Instructions for Your Pumpkin Pie Cheesecake Trifle:
Alright, friends, let’s dive into creating this masterpiece! Building a Pumpkin Pie Cheesecake Trifle is all about patience and layering, but each step is incredibly rewarding. We’ll tackle this layer by layer, ensuring every component is perfect before it finds its place in our glorious trifle dish.
Preparing the Spiced Gingersnap & Graham Cracker Crumble:
This is where we lay the foundation of crunch and spice for our trifle. A well-made crumble provides a delightful contrast to the creamy layers, truly embodying that “pie” aspect of our Pumpkin Pie Cheesecake Trifle.
- Get Crushing: Start by crushing your gingersnap cookies and graham crackers. I find the easiest way to do this is to place them in a large zip-top bag and use a rolling pin to crush them into fine crumbs. Alternatively, a food processor works wonders for a uniform texture. Aim for crumbs that are fine but still have a bit of texture – we don’t want flour, but we also don’t want huge chunks.
- Combine Dry Ingredients: In a medium bowl, combine your crushed gingersnap crumbs, graham cracker crumbs, ¼ cup granulated sugar, and ½ teaspoon ground cinnamon. Give these a good stir with a fork or whisk to ensure everything is evenly distributed. You want those spices woven throughout!
- Add Melted Butter: Pour the ¼ cup of melted unsalted butter over the crumb mixture. Stir thoroughly with a spoon or your hands (it’s a bit messy but effective!) until all the crumbs are moistened and resemble wet sand. This butter is what binds everything together and gives us that wonderful, slightly crisp texture.
- Bake (Optional, but Recommended for Extra Flavor): For an even deeper flavor and crunch, you can spread the crumble mixture evenly on a baking sheet lined with parchment paper. Bake in a preheated oven at 350°F (175°C) for about 8-10 minutes, or until lightly golden brown and fragrant. Keep a close eye on it, as crumbs can burn quickly! If you prefer a no-bake option, you can skip this step, but baking truly elevates the flavor.
- Cool Completely: Once baked, remove the crumble from the oven and let it cool completely on the baking sheet. This step is important! We don’t want warm crumbs melting our lovely cheesecake layers. While it cools, you can get started on your other components.
Crafting the Spiced Pumpkin Cheesecake Mousse Layer:
This layer is the heart of our Pumpkin Pie Cheesecake Trifle, bringing together the comforting flavors of pumpkin pie with the irresistible creaminess of cheesecake. Achieving a smooth, luscious texture here is key.
- Cream the Cheese and Sugars: In a large mixing bowl, using an electric mixer (handheld or stand mixer with a paddle attachment), beat the softened 8 ounces of cream cheese on medium speed until it’s light and fluffy, about 2-3 minutes. Make sure there are absolutely no lumps! Then, add the ½ cup granulated sugar and ¼ cup packed light brown sugar. Continue beating for another 2-3 minutes until the mixture is smooth, creamy, and the sugars are fully dissolved. Scrape down the sides of the bowl frequently to ensure everything is incorporated.
- Incorporate Pumpkin and Spices: Add the 15 ounces of pure pumpkin puree, 2 teaspoons pumpkin pie spice, ½ teaspoon ground cinnamon, and ½ teaspoon pure vanilla extract to the cream cheese mixture. Beat on medium-low speed until everything is fully combined and the mixture is a uniform orange color. Again, scrape down the bowl to catch any unmixed bits.
- Whip the Heavy Cream: In a separate, chilled bowl (I like to chill my bowl and whisk attachment in the freezer for 10-15 minutes beforehand), pour in the ½ cup of chilled heavy cream. Using clean beaters, whip the cream on medium-high speed until it forms soft peaks. Be careful not to over-whip, or it will turn grainy!
- Fold Gently: Now, this is where we achieve that lovely mousse-like texture. Gently fold the whipped cream into the pumpkin mixture using a rubber spatula. Use a light, lifting motion from the bottom of the bowl upwards, being careful not to deflate the air we just whipped into the cream. Continue folding until no streaks of whipped cream remain and the mixture is light and airy. This gentle folding is vital for the fluffy texture of our Pumpkin Pie Cheesecake Trifle layer.
- Chill (Briefly): Cover the pumpkin cheesecake mousse and place it in the refrigerator to chill while you prepare the next layer. This helps it firm up slightly and makes it easier to work with.
Mixing the Luxurious No-Bake Vanilla Cheesecake Layer:
This creamy, rich layer provides a perfect counterpoint to the spiced pumpkin, enhancing the “cheesecake” aspect of our Pumpkin Pie Cheesecake Trifle. Its velvety texture is simply irresistible.
- Beat Cream Cheese until Fluffy: In another large mixing bowl, beat the 16 ounces of softened cream cheese on medium speed until it is incredibly smooth and fluffy, about 3-4 minutes. This extensive beating is crucial for ensuring a lump-free cheesecake layer. We want it light and airy even before we add the whipped cream.
- Add Powdered Sugar and Vanilla: Gradually add the 1 cup of sifted powdered sugar to the cream cheese, beating on low speed until combined, then increase to medium-high and beat until fully incorporated and smooth. Add the 1 teaspoon pure vanilla extract and the pinch of salt, beating until just combined. Scrape down the bowl as needed. The mixture should be thick and very creamy.
- Whip the Remaining Heavy Cream: In a separate, very clean and chilled bowl, pour the 1 ½ cups of chilled heavy cream. Using clean beaters, whip the cream on medium-high speed until stiff peaks form. Again, watch closely to avoid over-whipping.
- Gently Fold for Lightness: Just like with our pumpkin layer, we want to gently fold the whipped cream into the cream cheese mixture using a rubber spatula. Take about a third of the whipped cream and fold it into the cream cheese mixture to lighten it. Then, add the remaining whipped cream and fold until just combined, ensuring no streaks remain. The goal is a light, airy, and luscious cheesecake filling. This delicate folding technique is essential for the airy mouthfeel of your No-Bake Vanilla Cheesecake Layer.
Assembling Your Magnificent Pumpkin Pie Cheesecake Trifle:
Now for the fun part – building our spectacular Pumpkin Pie Cheesecake Trifle! The visual appeal of a trifle is almost as important as its taste, so take your time to create neat, defined layers. A large, clear glass trifle bowl (usually 3-4 quart capacity) is ideal for showcasing all those beautiful layers.
- Gather Your Components: Make sure your gingersnap-graham cracker crumble is completely cool, and both your pumpkin cheesecake mousse and vanilla cheesecake layers are ready. Have your trifle dish at hand.
- First Crumble Layer: Start by spooning about one-third of your cooled gingersnap & graham cracker crumble evenly into the bottom of your trifle dish. Gently press it down lightly to form a base. This provides a wonderful textural contrast right from the first bite.
- First Pumpkin Layer: Carefully spoon about half of the Spiced Pumpkin Cheesecake Mousse over the crumble layer. Use the back of your spoon or an offset spatula to gently spread it out evenly, reaching the edges of the bowl to create a clean, distinct layer.
- First Cheesecake Layer: Next, spoon about half of the Luxurious No-Bake Vanilla Cheesecake Layer over the pumpkin mousse. Again, spread it out gently and evenly. Take care not to mix the layers.
- Repeat the Layers: Now, repeat the process:
- Spoon another third of the gingersnap & graham cracker crumble over the vanilla cheesecake layer.
- Add the remaining half of the Spiced Pumpkin Cheesecake Mousse, spreading it out smoothly.
- Follow with the remaining half of the Luxurious No-Bake Vanilla Cheesecake Layer, creating your final creamy layer.
You should have used all of your pumpkin and vanilla cheesecake fillings by this point.
- Chill for Setting: Cover the trifle dish loosely with plastic wrap. Place it in the refrigerator to chill for at least 4 hours, but ideally overnight. This chilling time is non-negotiable! It allows the layers to firm up, the flavors to meld beautifully, and ensures your Pumpkin Pie Cheesecake Trifle holds its shape when serving.
Finishing Touches and Serving Your Pumpkin Pie Cheesecake Trifle:
The final steps are all about presentation and creating that irresistible crowning glory for your magnificent Pumpkin Pie Cheesecake Trifle. A beautiful topping makes all the difference!
- Whip the Topping Cream: Just before serving, prepare your final whipped cream. In a chilled bowl, combine the 1 ½ cups heavy cream, ¼ cup powdered sugar, and 1 teaspoon pure vanilla extract. Whip on medium-high speed until stiff peaks form. You can either spoon this directly onto the trifle or, for a fancier presentation, pipe it using a piping bag fitted with a star tip.
- Top with Whipped Cream: Gently spread or pipe the whipped cream over the top layer of your chilled trifle. You can create beautiful swirls or peaks, making it as rustic or elegant as you like.
- Final Garnish: Sprinkle the remaining one-third of your spiced gingersnap & graham cracker crumble over the whipped cream. This not only adds more delightful crunch but also serves as a visual cue to the delicious layers within. A light dusting of ground cinnamon or a few candied pecans would also be lovely additions.
- Serve and Enjoy: Use a large serving spoon to scoop generous portions of your incredible Pumpkin Pie Cheesecake Trifle into individual bowls. Each serving will reveal all those beautiful layers you painstakingly created.
- Storage: Any leftover trifle should be covered loosely with plastic wrap and stored in the refrigerator for up to 3-4 days. While it’s best enjoyed fresh, the flavors can actually deepen over the next day or two! However, the crumble might soften a bit over time, but it will still be incredibly delicious.
There you have it – a show-stopping Pumpkin Pie Cheesecake Trifle that is sure to impress everyone. Each spoonful delivers a harmonious blend of creamy cheesecake, spiced pumpkin, and crunchy crumble, truly making it a dessert to remember. Enjoy every delicious bite!
Conclusion:
So, there you have it – my absolute favorite recipe that I just know you’re going to adore. We’ve journeyed through the simple, joyful process of creating something truly spectacular, a dessert that effortlessly combines the comforting flavors of autumn with the creamy indulgence we all crave. This isn’t just any sweet treat; it’s a celebration in a bowl, a vibrant testament to how incredible a no-bake dessert can be. I promise you, once you dive into this, you’ll understand why I’m so passionate about it.
What makes this recipe an absolute must-try? Well, for starters, it’s the symphony of textures and tastes. Imagine spoonfuls of spiced pumpkin puree, rich and smooth, mingling with a velvety, tangy cheesecake filling that simply melts in your mouth. Then, add the delightful crunch of graham crackers (or your chosen cookie base) and the airy lightness of whipped cream. Each layer builds upon the last, creating a harmonious blend that’s both familiar and excitingly new. It’s comforting, yet sophisticated enough to impress at any gathering, from a casual family dinner to your grandest holiday feast. Plus, the visual appeal of a layered trifle is simply unparalleled – it’s a showstopper even before the first bite!
But beyond the incredible flavor profile, there’s the sheer convenience. The beauty of a no-bake dessert, especially one as magnificent as this, cannot be overstated. No oven needed, no tricky baking techniques, just simple layering and a little patience for chilling. This means you can create a truly stunning dessert without the stress, freeing up your oven and your time for other holiday preparations, or simply allowing you to enjoy your guests’ company. It’s a lifesaver for busy hosts and a fantastic project for anyone looking to create something impressive without culinary gymnastics.
Now, let’s talk about making this truly your own. While the core recipe is perfection, there are so many ways to customize your creation. For an extra touch of elegance, consider garnishing each serving with a dusting of cinnamon, a sprinkle of toasted pecans, or a delicate drizzle of caramel sauce. Want to experiment with the cookie layer? Try gingersnap cookies for a spicier kick, or shortbread for a buttery, crumbly base. You could even fold in a handful of mini chocolate chips into the cheesecake layer for a delightful surprise. For individual servings, prepare them in charming mason jars or elegant parfait glasses – perfect for portion control and easy distribution. This also makes the Pumpkin Pie Cheesecake Trifle incredibly versatile, adapting to your personal taste and presentation desires.
Thinking seasonally? In the fall, a few candied cranberries scattered on top would add a wonderful tart counterpoint. Or, if you’re a fan of deeper spice, consider adding a pinch more nutmeg or allspice to your pumpkin layer. The possibilities are genuinely endless, and I encourage you to play around with these ideas to make this trifle a signature dish in your home. It’s the kind of dessert that quickly becomes a cherished tradition, eagerly anticipated year after year because it consistently delivers on flavor, beauty, and pure indulgence.
So, my friends, I truly hope you feel inspired to give this recipe a try. It’s more than just a dessert; it’s an experience, a moment of sweet joy waiting to be created and shared. Gather your ingredients, put on some festive music, and enjoy the process of assembling this magnificent treat. And please, please, once you’ve whipped up your own masterpiece, don’t keep it a secret! I would absolutely love to hear about your experience. Share your photos, your variations, and your triumphs in the comments below or tag me on social media. Your feedback and creations inspire me just as much as I hope this recipe inspires you. Happy layering, and happy indulging!
Frequently Asked Questions (FAQs)
Can I make this Pumpkin Pie Cheesecake Trifle ahead of time?
Absolutely! In fact, this trifle is ideally suited for making ahead. Preparing it at least 4-6 hours in advance allows all the flavors to meld beautifully and the layers to set properly, ensuring perfect slices (or spoonfuls!). You can even assemble it the day before you plan to serve it. Just make sure to keep it covered loosely with plastic wrap in the refrigerator.
How long does this trifle last in the refrigerator?
When properly covered and refrigerated, your trifle should stay fresh and delicious for 3 to 4 days. The graham cracker layer might soften a bit over time, but it will still be incredibly tasty. Beyond 4 days, the textures might start to diminish, but it would still be safe to eat for a little longer if stored correctly.
Can I substitute the graham crackers with other cookies?
Yes, definitely! This is one of the best ways to personalize your trifle. Gingersnap cookies would add a fantastic spicy kick, shortbread cookies offer a buttery crumb, or even vanilla wafers would work beautifully for a milder flavor. Feel free to experiment with your favorite crunchy cookie to find your perfect combination.
Is it possible to make this recipe dairy-free or vegan?
With a few simple substitutions, you can certainly adapt this recipe! For a dairy-free version, use dairy-free cream cheese, non-dairy whipped topping (like coconut cream or a store-bought vegan whipped topping), and your favorite dairy-free graham crackers or cookies. Ensure your pumpkin puree is plain and unsweetened. For a fully vegan version, verify all ingredients meet vegan standards.
What kind of bowl should I use for a trifle?
A clear glass trifle bowl is ideal because it allows you to showcase the beautiful layers of this dessert, making for a truly stunning presentation. If you don’t have a trifle bowl, a large glass salad bowl, a deep glass serving dish, or even individual parfait glasses or mason jars work perfectly well. The key is clear sides so everyone can admire your work!
Can I freeze the Pumpkin Pie Cheesecake Trifle?
While you technically could freeze a trifle, I don’t highly recommend it for this particular recipe. Freezing and thawing can significantly alter the texture of the cheesecake filling and whipped cream, often resulting in a watery or grainy consistency. The graham cracker layer would also become very soggy. This dessert is best enjoyed fresh from the refrigerator.
Pumpkin Pie Cheesecake Trifle
Pumpkin Pie Cheesecake Trifle is an unforgettable, layered masterpiece that promises to elevate any seasonal gathering. Merging the nostalgic warmth of traditional pumpkin pie with the luxurious creaminess of a cheesecake, all presented in the elegant, layered fashion of a classic trifle.
Ingredients
-
15 oz (1 ¾ cups) pure pumpkin puree
-
24 oz full-fat cream cheese, softened (8 oz for pumpkin mousse, 16 oz for vanilla cheesecake)
-
¾ cup granulated sugar (divided: ½ cup for pumpkin mousse, ¼ cup for crumble)
-
¼ cup packed light brown sugar
-
2 tsp pumpkin pie spice
-
1 tsp ground cinnamon (divided: ½ tsp for pumpkin mousse, ½ tsp for crumble)
-
2 ½ tsp pure vanilla extract (divided: ½ tsp for pumpkin mousse, 1 tsp for vanilla cheesecake, 1 tsp for topping)
-
3 ½ cups heavy cream, chilled (divided: ½ cup for pumpkin mousse, 1 ½ cups for vanilla cheesecake, 1 ½ cups for topping)
-
1 cup powdered sugar, sifted (for vanilla cheesecake layer)
-
Pinch of salt
-
1 ½ cups gingersnap cookies, crushed
-
1 cup graham cracker crumbs
-
¼ cup (4 tbsp) unsalted butter, melted
-
¼ cup powdered sugar (for topping)
-
Optional: ¼ tsp ground ginger or pinch of ground cloves
-
Optional garnishes: Ground cinnamon, gingersnap crumbs, candied pecans
Instructions
-
Step 1
Crush 1 ½ cups gingersnap cookies and 1 cup graham crackers into fine crumbs. In a medium bowl, combine crumbs with ¼ cup granulated sugar and ½ tsp ground cinnamon. Stir in ¼ cup melted unsalted butter until moistened. For deeper flavor (optional), spread on a baking sheet, bake at 350°F (175°C) for 8-10 minutes until golden. Cool completely before assembly. -
Step 2
In a large bowl, beat 8 oz softened cream cheese until fluffy. Beat in ½ cup granulated sugar and ¼ cup light brown sugar until smooth. Mix in 15 oz pure pumpkin puree, 2 tsp pumpkin pie spice, ½ tsp ground cinnamon, and ½ tsp pure vanilla extract until combined. In a separate chilled bowl, whip ½ cup heavy cream to soft peaks. Gently fold whipped cream into the pumpkin mixture until light and airy. Chill briefly. -
Step 3
In another large bowl, beat 16 oz softened cream cheese until very smooth and fluffy. Gradually beat in 1 cup sifted powdered sugar, then 1 tsp pure vanilla extract and a pinch of salt until creamy. In a separate chilled bowl, whip 1 ½ cups heavy cream to stiff peaks. Gently fold whipped cream into the cream cheese mixture until light and luscious. -
Step 4
Gather all cooled components. In a large, clear glass trifle bowl (3-4 quart capacity), layer: ⅓ of the cooled gingersnap & graham cracker crumble, then ½ of the Spiced Pumpkin Cheesecake Mousse, spread evenly, followed by ½ of the Luxurious No-Bake Vanilla Cheesecake Layer, spread evenly. Repeat the layers with another ⅓ of crumble, remaining pumpkin mousse, and remaining vanilla cheesecake layer. Cover loosely and refrigerate for at least 4 hours, or ideally overnight, for setting and flavor melding. -
Step 5
Just before serving, whip 1 ½ cups heavy cream, ¼ cup powdered sugar, and 1 tsp pure vanilla extract until stiff peaks form. Spread or pipe whipped cream over the top layer of your chilled trifle. Sprinkle the remaining ⅓ of the spiced gingersnap & graham cracker crumble over the whipped cream. Garnish with ground cinnamon or candied pecans if desired. Serve generous portions. Store any leftovers, covered, in the refrigerator for up to 3-4 days.
Important Information
Nutrition Facts (Per Serving)
It is important to consider this information as approximate and not to use it as definitive health advice.
Allergy Information
Please check ingredients for potential allergens and consult a health professional if in doubt.
Leave a Comment