
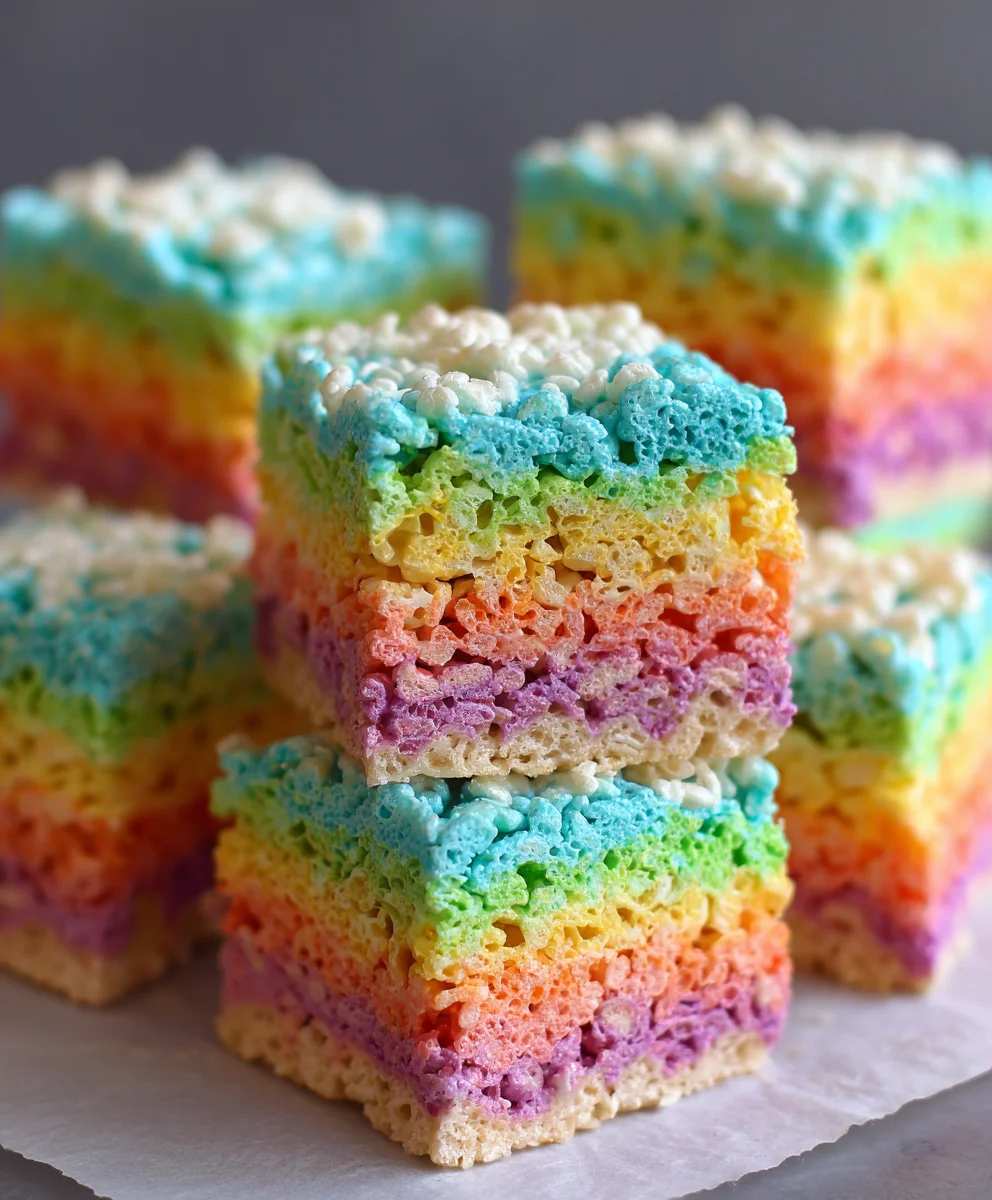
Easy Rainbow Rice Krispie Treats are more than just a dessert; they are a delightful explosion of color and classic comfort, perfect for brightening any day. I remember the pure joy these simple, yet utterly delicious, squares brought to every school bake sale and birthday party I attended as a child. While the original Rice Krispie Treat recipe has been a beloved American staple since its creation by Kellogg’s employees in the late 1930s, our vibrant rainbow rendition takes this nostalgic classic to an entirely new level of fun.
What makes these treats so universally adored? Is it the satisfyingly crisp texture combined with that irresistible gooey marshmallow sweetness? Or perhaps the incredible convenience of a no-bake dessert that comes together in mere minutes? I believe it’s a magnificent blend of all these elements, especially when presented with such eye-catching, festive hues. This recipe for Easy Rainbow Rice Krispie Treats truly embodies the spirit of effortless celebration, making it a go-to favorite for busy parents, party hosts, and anyone craving a touch of whimsical sweetness.
Ingredients:
- Unsalted Butter: 3 tablespoons, divided into 1 tablespoon portions for each color batch. I always recommend unsalted butter so you can control the saltiness of the final product, but if all you have is salted, just omit the extra pinch of salt later. Fresh butter makes a difference!
- Mini Marshmallows: 1 (16-ounce) bag, approximately 8 cups. While large marshmallows can work, mini marshmallows melt much more quickly and evenly, which is crucial for achieving that smooth, vibrant base for our Easy Rainbow Rice Krispie Treats. Make sure they are fresh – stale marshmallows won’t melt as well.
- Rice Krispies Cereal: 6 cups, divided into 1 cup portions for each color batch. The classic snap, crackle, and pop cereal is essential for the texture. Ensure your cereal is fresh and crispy!
- Gel Food Coloring: In vibrant rainbow colors such as red, orange, yellow, green, blue, and purple. Gel food coloring provides much more concentrated color than liquid drops, meaning you’ll need less to achieve brilliant hues without altering the texture or flavor of your treats.
- Vanilla Extract (Optional): 1/2 teaspoon. A tiny splash of vanilla extract can truly elevate the flavor profile, adding a subtle warmth that complements the sweetness of the marshmallows.
- Pinch of Salt (Optional): Just a small pinch. A tiny bit of salt helps to balance the sweetness of the marshmallows and butter, enhancing all the flavors.
Equipment You’ll Need:
- 9×13 inch baking pan
- Parchment paper
- Large non-stick pot or Dutch oven
- Rubber spatula or wooden spoon (preferably silicone for less sticking)
- Measuring cups and spoons
- 6 small heatproof bowls for dividing colored marshmallow mixture
- Plastic wrap or wax paper (for pressing)
- Sharp, non-serrated knife
Gathering Your Supplies and Prep Work
Before we dive into the fun and colorful part of making these Easy Rainbow Rice Krispie Treats, it’s absolutely essential to get all your ducks in a row. Trust me, these treats come together quite quickly once the heat is on, so having everything prepped and ready will make the process smooth and enjoyable, not frantic!
- Prepare Your Baking Pan: First things first, grab your 9×13 inch baking pan. I always line mine with parchment paper, leaving a slight overhang on the longer sides. This creates “handles” that will make it incredibly easy to lift the entire slab of treats out of the pan once they’re set, making cutting a breeze. If you don’t have parchment paper, a thorough greasing with butter or non-stick cooking spray will work, but parchment truly is my secret for effortless removal and cleanup.
- Measure and Divide Your Cereal: Measure out the 6 cups of Rice Krispies cereal. Now, here’s where the rainbow magic begins: divide this total amount equally into six separate, small bowls. So, you’ll have 1 cup of Rice Krispies in each of your six bowls. Set these aside near your stovetop, as you’ll be adding them to the marshmallow mixture one color at a time. Having these pre-measured is a huge time-saver.
- Prepare Marshmallows and Butter: If your marshmallows are not mini, quickly snip them into smaller pieces with kitchen shears. Measure out your 3 tablespoons of unsalted butter and divide it into three 1-tablespoon portions. We will be making two colors per melt batch, so having the butter ready for each individual color’s melt is crucial.
- Set Up Your Coloring Station: Arrange your gel food colorings in the order you plan to use them (red, orange, yellow, green, blue, purple is a classic rainbow!). Have your rubber spatula or wooden spoon handy, along with a few extra small bowls if you plan to transfer the colored marshmallow mixture before adding cereal.
- Clear Your Workspace: Making these treats involves quick mixing and pouring, so ensure your countertop is clear and clean. You’ll want enough space to move easily between melting, mixing, and layering. This simple step helps keep stress levels low and creativity high!
Creating the Vibrant Marshmallow Base
This is where our Easy Rainbow Rice Krispie Treats truly come to life with a burst of color! We’ll be working in batches to ensure each color is distinct and vibrant. It’s a bit of a dance between melting, coloring, and mixing, but completely manageable with a little focus.
- Start with the First Butter Batch: Place your large non-stick pot over low heat. Add 1 tablespoon of unsalted butter. Allow the butter to melt slowly and completely. Low heat is key here; we want to melt the butter, not brown it. Browning the butter can add a nutty flavor, which is lovely for traditional Rice Krispie treats, but for our rainbow version, we want clean, clear colors and flavors.
- Melt the First Marshmallow Batch: Once the butter is melted, add approximately 1.5 cups of mini marshmallows (about 1/4 of your 16-ounce bag) to the pot. Stir constantly with your rubber spatula until the marshmallows are completely melted and smooth. This typically takes about 2-4 minutes. Do not walk away! Marshmallows can scorch quickly if left unattended. You’re looking for a smooth, glossy consistency, without any lumps. If you’re using vanilla extract or salt, add a tiny splash/pinch now and stir it in.
- Coloring the First Layer (e.g., Red): Immediately remove the pot from the heat. This is important to stop the cooking process and prevent the marshmallows from becoming too firm. Add a generous amount of red gel food coloring to the melted marshmallow mixture. Start with a small squeeze and add more until you achieve your desired vibrant red hue. Remember, gel colors are potent, so add incrementally. Stir vigorously until the color is evenly distributed throughout the marshmallow mixture.
- Mix in the First Cereal Batch: Quickly add 1 cup of the pre-measured Rice Krispies cereal to the red marshmallow mixture. Fold gently but swiftly with your spatula until the cereal is completely coated in the red marshmallow. The goal is to coat every piece without crushing the cereal.
- Layer into the Pan: Immediately transfer the red Rice Krispies mixture to your prepared 9×13 inch pan. Using a piece of parchment paper or wax paper, or even lightly buttered hands, gently but firmly press the mixture evenly into the bottom of the pan to form your first layer. Avoid compacting it too much; you want a firm layer but still airy, not brick-like. Set the pan aside.
- Repeat for Each Color:
- Second Layer (Orange): Wipe out your pot quickly (or use a fresh one if you prefer). Add another 1 tablespoon of unsalted butter and melt it over low heat. Add another 1.5 cups of mini marshmallows and melt, stirring constantly. Remove from heat, add orange gel food coloring, and stir until vibrant. Add another 1 cup of Rice Krispies cereal and mix until coated. Gently spread this orange layer evenly over the red layer in the pan. Press lightly to adhere.
- Third Layer (Yellow): Repeat the process: butter, marshmallows, yellow food coloring, cereal. Spread gently over the orange layer.
- Fourth Layer (Green): Repeat the process: butter, marshmallows, green food coloring, cereal. Spread gently over the yellow layer.
- Fifth Layer (Blue): Repeat the process: butter, marshmallows, blue food coloring, cereal. Spread gently over the green layer.
- Sixth Layer (Purple): For the final layer, repeat the process: butter, marshmallows, purple food coloring, cereal. Spread gently over the blue layer. This will be your top layer. Make sure to press it down gently and evenly across the entire surface.
Hot Tip for Layering: Each time you add a new colored layer, try to work quickly. The warmer the previous layer is, the better the new layer will adhere, creating a cohesive treat. However, don’t worry too much about perfection; the rustic charm of homemade treats is part of their appeal!
- Final Pressing: Once all six colorful layers are in the pan, take a moment to gently press down on the entire surface with your parchment paper-covered hands or another piece of wax paper. This helps to ensure all the layers are well-adhered and creates a relatively flat, even top. Don’t press too hard, as that can make the treats too dense.
Setting, Slicing, and Storing Your Easy Rainbow Rice Krispie Treats
You’ve done the hard work of layering those beautiful colors! Now comes the crucial step of letting them set properly and then, of course, the best part – enjoying your delightful creation.
- Allow to Set Completely: Once your masterpiece is assembled in the pan, it’s tempting to dive right in, but patience is a virtue here. Allow the Easy Rainbow Rice Krispie Treats to cool and set completely at room temperature for at least 1-2 hours. You can even pop them into the refrigerator for about 30-45 minutes to speed up the process, especially if your kitchen is warm. The goal is for them to be firm enough to cut cleanly without sticking or falling apart.
- Prepare for Slicing: Once fully set, use the parchment paper overhangs to carefully lift the entire block of treats out of the baking pan and onto a clean cutting board. This makes slicing much easier and prevents scratching your pan.
- Slicing Techniques:
- Use a Sharp, Non-Serrated Knife: For clean cuts that won’t tear the treats, a large, sharp, non-serrated chef’s knife is your best friend.
- Grease Your Knife (Optional but Recommended): For even less sticking, you can lightly grease your knife with a thin layer of butter or non-stick cooking spray between cuts. This makes a noticeable difference.
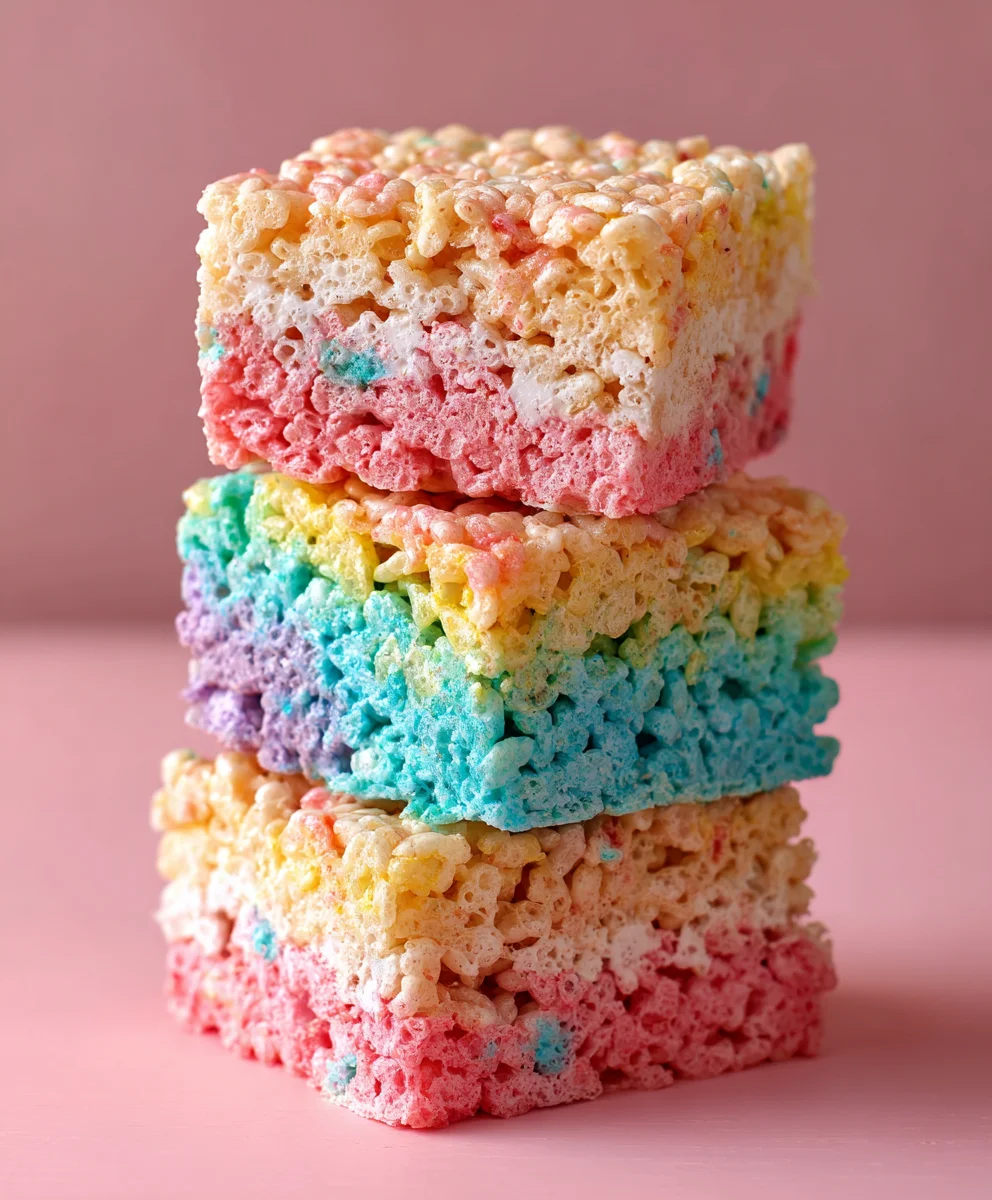
- Cut into Desired Shapes: You can cut them into traditional squares (e.g., 12-16 pieces), rectangles, or get creative with cookie cutters for fun shapes once the slab is out. For the prettiest display of the rainbow, cut straight down. I usually go for 4 rows by 4 rows, yielding 16 generous squares, but you can adjust based on your serving needs.
- Clean Cuts: Press down firmly and evenly when cutting. For extra clean slices, wipe your knife clean after every few cuts to remove any sticky residue.
- Serving Your Treats: Arrange your beautifully sliced Easy Rainbow Rice Krispie Treats on a platter and watch them disappear! They are perfect for parties, lunchboxes, or just a fun afternoon snack. The vibrant colors make them an instant hit, especially with kids.
- Storage: To keep your Easy Rainbow Rice Krispie Treats fresh and chewy, store them in an airtight container at room temperature. They will stay delicious for up to 2-3 days. Beyond that, they tend to start firming up and losing their chewiness. Avoid storing them in the refrigerator for extended periods, as this can make them hard and dry out the texture, unless you enjoy a much firmer treat. If you must refrigerate, bring them back to room temperature before serving for the best texture.
Pro Tips for Perfect Easy Rainbow Rice Krispie Treats
While making these Easy Rainbow Rice Krispie Treats is generally straightforward, a few expert tips can elevate your dessert from good to absolutely fantastic. These nuggets of wisdom come from years of making countless batches and learning what truly makes them special.
- Freshness is Key: I cannot stress this enough: always use fresh marshmallows and fresh Rice Krispies cereal. Stale marshmallows won’t melt as smoothly, leading to a lumpy base, and stale cereal will lack that satisfying crunch. Check the dates on your packages!
- Low and Slow with the Heat: When melting butter and marshmallows, always keep your stove on low heat. Overheating marshmallows is the most common mistake. High heat can cause the marshmallows to become hard and brittle once cooled, resulting in rock-hard treats instead of delightfully chewy ones. Patience pays off here.
- Work Quickly, But Don’t Rush: Once the marshmallows are melted and colored, you need to work relatively fast to mix in the cereal and press it into the pan. The marshmallow mixture starts to set quite quickly as it cools. However, don’t rush so much that you’re sloppy or uneven. Find a good rhythm.
- Don’t Over-Compact: When pressing the mixture into the pan, be firm but gentle. If you press too hard, you’ll crush the cereal and create overly dense, hard treats. You want them to be set and cohesive, but still light and airy. Use the flat bottom of a glass or a piece of parchment paper to help press evenly without over-compressing.
- Experiment with Colors and Flavors: While the classic rainbow is fantastic, don’t be afraid to customize! You could do a monochromatic theme (e.g., shades of blue and purple), or try different extract flavors like almond, lemon, or even a hint of mint in certain layers. A tiny amount of citrus zest in the yellow or orange layers could be a delightful surprise.
- Add-Ins for Extra Fun: Want to take your Easy Rainbow Rice Krispie Treats to the next level? Before the final layer cools completely, you can sprinkle some rainbow sprinkles on top for an extra festive touch. You could also carefully fold in small, colorful candies or white chocolate chips into some of the cereal batches for an added textural element, just be mindful that heavy additions might alter the structure.
- Make It a Family Activity: This recipe is incredibly fun to make with kids! They can help with measuring cereal, adding food coloring (with supervision for sticky hands!), and even pressing the layers. It’s a fantastic way to teach them about colors and simple cooking techniques.
- Clean-Up Hack: Dealing with sticky marshmallow residue on your pot and spatula? Fill the pot with hot water and let it sit for a few minutes. The hot water will dissolve the stuck-on marshmallow, making cleanup a breeze.
Conclusion:
I genuinely believe that these vibrant, chewy, and utterly delightful treats are an absolute must-try for anyone looking to add a splash of joy and a burst of flavor to their day. What makes this particular recipe stand out from the crowd? It’s the perfect blend of simplicity and spectacular presentation. We’re talking about a classic comfort food elevated to an art form, without any of the fuss. The process itself is wonderfully straightforward, making it an ideal project for bakers of all skill levels, even those who might consider themselves kitchen novices. You’ll be amazed at how quickly you can transform simple ingredients into something truly extraordinary, something that not only tastes incredible but also looks like a celebration on a plate. This isn’t just another dessert; it’s an experience, a guaranteed mood-lifter that brings smiles to faces young and old. The visual appeal alone is enough to captivate, with its striking layers of color, making it an undeniable showstopper at any gathering, from birthday parties to casual get-togethers. And let’s not forget the core appeal: that perfectly gooey, crisp texture that defines a truly great Rice Krispie Treat. My recipe ensures you achieve that ideal balance every single time, making these treats addictively delicious. When you bite into one, you’ll immediately understand why I rave about them so much. They’re soft, they’re chewy, they’re crunchy, and they’re undeniably sweet – everything you could possibly want in a nostalgic treat. This recipe for Easy Rainbow Rice Krispie Treats takes all the best parts of our childhood favorites and amplifies them with a stunning visual twist that is surprisingly easy to achieve.
Once you’ve mastered the basic recipe, which I promise you will in no time, the fun doesn’t have to stop there! There are so many exciting ways to serve these beauties or to put your own creative spin on them. For a simple yet elegant presentation, arrange them artfully on a white platter, letting the vibrant colors truly pop. You could even stack them pyramid-style for a dramatic effect. Imagine serving a warm, gooey square alongside a scoop of cold vanilla bean ice cream, perhaps with a delicate drizzle of melted white chocolate or a dark chocolate ganache. The contrast of temperatures and textures is simply divine! For parties, individually wrapping each treat in clear cellophane bags tied with a colorful ribbon makes for charming party favors or an easy grab-and-go dessert. Think about school lunchboxes or picnics; these treats travel incredibly well and are always a welcome sight.
Endless Possibilities for Customization!
Don’t be afraid to experiment with variations either. You could switch up the colors to match specific holiday themes – think festive red and green for Christmas, or spooky orange and black for Halloween. Want to add an extra layer of flavor? Try folding in a handful of mini chocolate chips, M&M’s, or even chopped nuts for a different textural dimension. A tiny splash of pure vanilla extract, almond extract, or even a citrus zest like lemon or orange can elevate the flavor profile unexpectedly. For a truly unique twist, consider using different flavored marshmallows if you can find them – strawberry or blue raspberry could add an exciting new dimension. You can also play with cutting shapes using cookie cutters – stars, hearts, or even intricate seasonal designs. For an indulgent touch, a thin layer of melted peanut butter or Nutella spread between two layers of treats, or even swirled into the marshmallow mixture before setting, could be absolutely divine. These treats are incredibly versatile, practically begging for your personal touch. Feel free to make them thicker for a substantial bite or thinner for a more delicate treat. The kitchen is your canvas, and these treats are your vibrant medium!
So, I implore you, don’t just admire these pictures; roll up your sleeves and get ready to create some magic in your own kitchen! I promise you, the joy of making these treats is only surpassed by the joy of eating them and, perhaps even more so, by the delight they bring to others. Imagine the smiles on your kids’ faces, the impressed nods from your friends, or the simple satisfaction of treating yourself to something truly special. This recipe is more than just instructions; it’s an invitation to experience culinary fun and shared happiness.
It’s time to bring these vibrant, delicious treats to life!
I am genuinely excited for you to embark on this delicious adventure. Once you’ve whipped up your own batch, I would absolutely love to hear about your experience! Did you stick to the classic rainbow, or did you venture into your own unique color combinations? What creative serving suggestions did you come up with? Did you add any special ingredients or put your own personal twist on the recipe? Please, don’t hesitate to share your thoughts, your successes, and even your “lessons learned” in the comments below. Better yet, snap a photo of your magnificent creations and share them with the world! Seeing your beautiful treats truly makes my day and inspires our whole community of fellow food enthusiasts. Your feedback and creativity are what make this entire cooking journey so much richer and more enjoyable for everyone. Let’s spread some colorful, delicious joy together!
Easy Rainbow Rice Krispie Treats
Easy Rainbow Rice Krispie Treats are a delightful explosion of color and classic comfort. This no-bake dessert combines crisp cereal with gooey marshmallow sweetness, presented in vibrant, eye-catching layers, making it a go-to favorite for effortless celebrations.
Ingredients
-
3 tbsp unsalted butter, divided
-
1 (16 oz) bag mini marshmallows (approx. 8 cups), divided
-
6 cups Rice Krispies cereal, divided into 1 cup portions
-
Rainbow gel food coloring (red, orange, yellow, green, blue, purple)
-
1/2 tsp vanilla extract (optional)
-
Pinch of salt (optional)
Instructions
-
Step 1
Line a 9×13 inch baking pan with parchment paper, leaving an overhang. Divide 6 cups of Rice Krispies cereal into 6 separate bowls (1 cup each). Have butter, marshmallows, and gel food colorings ready. -
Step 2
In a large non-stick pot over low heat, melt 1/2 tablespoon unsalted butter. Add 1 1/3 cups mini marshmallows and stir until completely melted and smooth. Optionally, stir in a tiny splash of vanilla extract or pinch of salt. Remove from heat. Add red gel food coloring and stir until vibrant. Quickly add 1 cup of the divided Rice Krispies cereal and fold until coated. Immediately transfer to the prepared pan and gently press evenly to form the first layer. -
Step 3
Clean pot or use a fresh one. Repeat the process: melt 1/2 tablespoon butter, melt 1 1/3 cups marshmallows. Remove from heat, add orange gel food coloring, stir. Add 1 cup Rice Krispies and fold. Transfer and gently press over the red layer. -
Step 4
Clean pot or use a fresh one. Repeat the process: melt 1/2 tablespoon butter, melt 1 1/3 cups marshmallows. Remove from heat, add yellow gel food coloring, stir. Add 1 cup Rice Krispies and fold. Transfer and gently press over the orange layer. -
Step 5
Clean pot or use a fresh one. Repeat the process: melt 1/2 tablespoon butter, melt 1 1/3 cups marshmallows. Remove from heat, add green gel food coloring, stir. Add 1 cup Rice Krispies and fold. Transfer and gently press over the yellow layer. -
Step 6
Clean pot or use a fresh one. Repeat the process: melt 1/2 tablespoon butter, melt 1 1/3 cups marshmallows. Remove from heat, add blue gel food coloring, stir. Add 1 cup Rice Krispies and fold. Transfer and gently press over the green layer. -
Step 7
Clean pot or use a fresh one. Repeat the process for the final layer: melt 1/2 tablespoon butter, melt 1 1/3 cups marshmallows. Remove from heat, add purple gel food coloring, stir. Add 1 cup Rice Krispies and fold. Transfer and gently press over the blue layer, ensuring an even top surface. -
Step 8
Once all layers are complete, gently press down on the entire surface with parchment paper-covered hands. Let treats cool and set at room temperature for 1-2 hours, or refrigerate for 30-45 minutes. Lift the treats from the pan using the parchment paper overhangs onto a cutting board. Using a lightly buttered, sharp non-serrated knife, cut into 16 squares. Store in an airtight container at room temperature for up to 2-3 days.
Important Information
Nutrition Facts (Per Serving)
It is important to consider this information as approximate and not to use it as definitive health advice.
Allergy Information
Please check ingredients for potential allergens and consult a health professional if in doubt.


Leave a Comment