
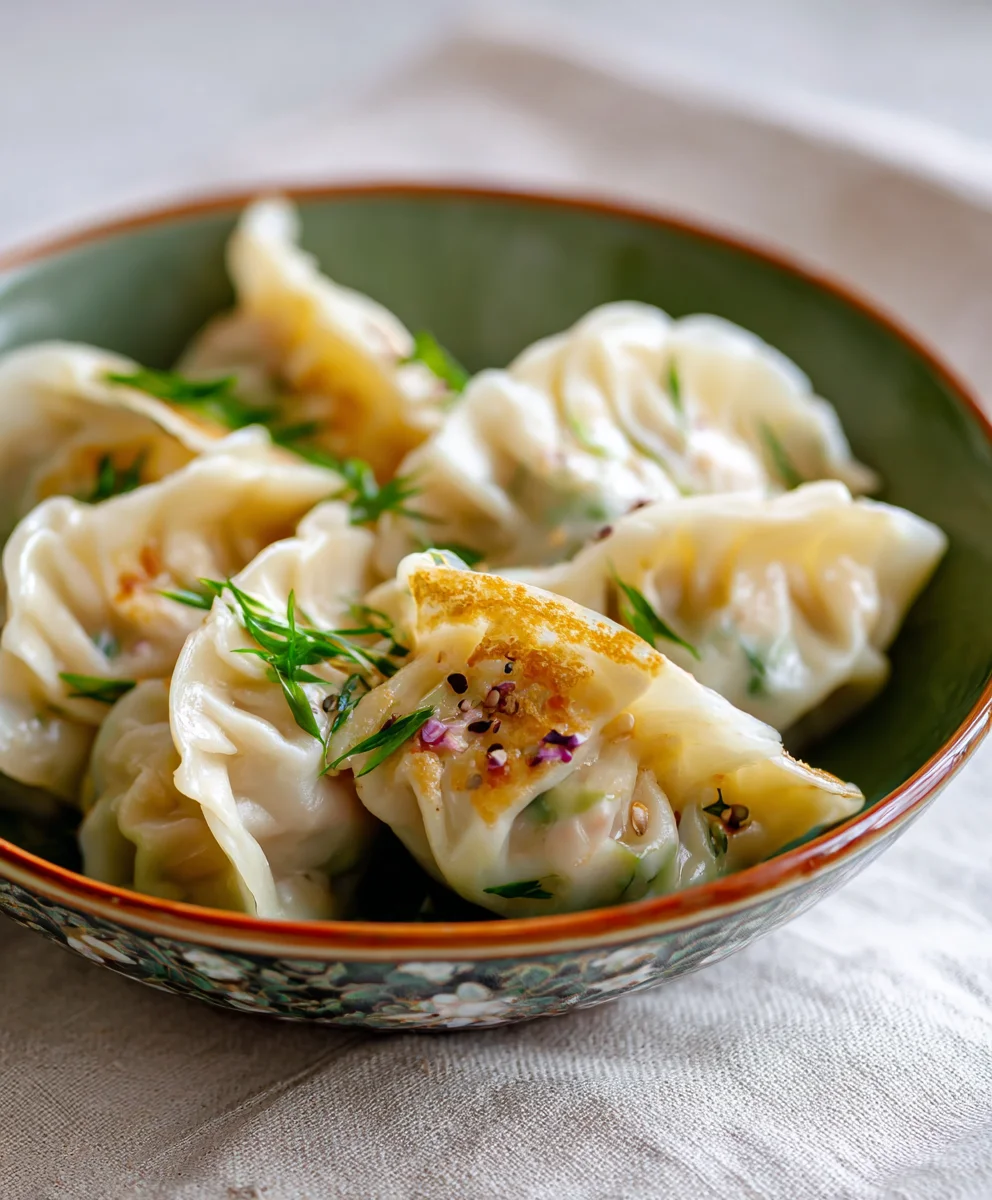
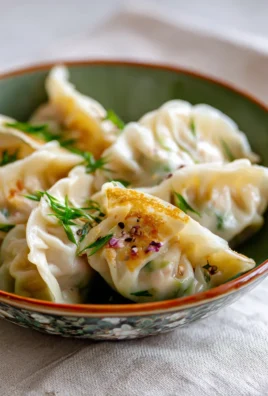
Shrimp And Chive Dumplings are a culinary masterpiece, encapsulating a vibrant symphony of flavors and textures in every delicate bite. There’s a profound joy in preparing and savoring these exquisite parcels, a tradition that spans centuries and continents. Originating from ancient China, dumplings have long been more than just food; they are symbols of prosperity, reunion, and family celebration, evolving into a beloved staple across various Asian cuisines and gaining immense popularity worldwide.
What makes these particular Shrimp And Chive Dumplings so utterly irresistible? It’s the harmonious balance of ingredients: the inherent sweetness and tender snap of fresh shrimp, beautifully complemented by the subtle, aromatic zest of freshly chopped chives. Encased within a tender, thin wrapper, each dumpling promises a juicy, flavorful filling that delivers a truly memorable taste experience. Whether you prefer them steamed to a delicate translucence, offering a silky smooth texture, or pan-fried to achieve a delightfully crispy bottom and chewy top, this dish is a testament to simple ingredients coming together to create something extraordinary. I am genuinely excited to guide you through creating this delightful dish, ensuring your kitchen is filled with tantalizing aromas and your table with happy faces.
Ingredients:
-
For the Homemade Dumpling Wrappers (yields about 50-60 wrappers):
- 3 cups (360g) all-purpose flour, plus extra for dusting
- 1 cup (240ml) very hot water (not boiling, but hot to the touch, around 180-190°F / 82-88°C)
- ½ teaspoon salt
-
For the Irresistible Shrimp and Chive Filling:
- 1.5 lbs (680g) fresh medium shrimp, peeled, deveined, and patted very dry
- 1 large bunch (about 6-8 oz or 170-225g) fresh Chinese garlic chives (also known as gow choy), washed and thoroughly dried
- 2 tablespoons fresh ginger, finely minced
- 2 tablespoons soy sauce (light or regular)
- 1 tablespoon Shaoxing wine (or dry sherry)
- 1 tablespoon sesame oil (toasted)
- 1 tablespoon cornstarch
- ½ teaspoon ground white pepper
- ½ teaspoon sugar
- Pinch of salt (adjust to taste, as soy sauce is salty)
-
For the Zesty Dipping Sauce:
- ¼ cup soy sauce
- 2 tablespoons rice vinegar
- 1 teaspoon sesame oil
- 1 teaspoon fresh ginger, finely minced
- 1 small garlic clove, finely minced (optional)
- Pinch of red pepper flakes (optional, for a kick)
-
For Cooking the Shrimp And Chive Dumplings:
- 2 tablespoons neutral oil (such as vegetable, canola, or grapeseed oil) for pan-frying
- ½ cup water or chicken broth for steaming
- Sesame seeds and extra chopped chives for garnish (optional)
Preparing the Homemade Dumpling Wrappers:
Making your own dumpling wrappers for these delightful Shrimp And Chive Dumplings is a truly rewarding experience, and it allows you to control the thickness and texture perfectly. While store-bought wrappers are convenient, I promise you, homemade makes all the difference! This process will take a bit of time, but it’s worth every minute.
- Combine Flour and Salt: In a large mixing bowl, I like to combine the all-purpose flour and salt. Give it a quick whisk to ensure the salt is evenly distributed. This tiny bit of salt enhances the flavor and elasticity of the dough.
- Add Hot Water: Next, I slowly pour in the very hot water, stirring constantly with a pair of chopsticks or a wooden spoon. The hot water helps to “gelatinize” the starches in the flour, resulting in a softer, more pliable dough that’s easier to roll and less prone to shrinking. It also gives the finished wrappers a wonderful chewy texture. Keep stirring until the flour is mostly hydrated and forms shaggy clumps.
- Initial Kneading: Once the mixture is cool enough to handle, I transfer it to a clean work surface. I then start kneading it by hand. At first, it might seem a bit crumbly, but persistence is key! I knead for about 5-7 minutes, until the dough comes together into a rough ball. Don’t worry if it’s not perfectly smooth yet.
- Rest the Dough: This is a crucial step for achieving tender wrappers. I cover the dough ball with a damp cloth or plastic wrap and let it rest for at least 30 minutes at room temperature. This resting period allows the gluten to relax, making the dough much easier to work with and preventing it from tearing when you roll it out. For even better results, I sometimes let it rest for an hour.
- Second Kneading: After resting, I knead the dough again for another 5-10 minutes. This time, you’ll notice a significant change – the dough will become incredibly smooth, elastic, and supple. It should feel soft but firm to the touch, and when you poke it, it should slowly spring back. This perfectly kneaded dough is the foundation for outstanding Shrimp And Chive Dumplings.
- Portioning the Dough: I divide the dough into four equal pieces. I keep the pieces I’m not working with covered to prevent them from drying out.
- Forming the Dough Ropes: Taking one piece, I roll it into a long, even rope, about ¾ to 1 inch (2-2.5 cm) in diameter. I aim for consistency here, as it will help in making uniform wrappers.
- Cutting the Dough: Using a sharp knife or a dough scraper, I cut the rope into small, coin-sized pieces, each about ½ inch (1.25 cm) thick. Each piece will become one dumpling wrapper. I should get about 12-15 pieces from each rope, totaling around 50-60 wrappers.
- Flattening and Dusting: I lightly dust my work surface with flour. I take each small piece of dough and flatten it slightly with the palm of my hand. Then, I dip both sides of the flattened dough piece in flour, shaking off any excess. This dusting is important to prevent sticking.
- Rolling the Wrappers: Now for the fun part – rolling! I use a small, thin rolling pin (a Chinese dumpling rolling pin is ideal, but a small French rolling pin works too). I place a flattened dough piece on the lightly floured surface. Using quick, even strokes, I roll from the center outwards, rotating the dough a quarter turn after each roll. The goal is to create a thin, round wrapper with slightly thicker edges. The thicker edges help hold the filling and create a nice chew. I aim for wrappers about 3-3.5 inches (7.5-9 cm) in diameter, and thin enough that you can almost see through them, but not so thin they tear easily.
- Stacking and Storing: As I roll each wrapper, I stack them with a light dusting of flour in between to prevent sticking. I cover the stack with a damp cloth or plastic wrap immediately to keep them from drying out while I finish the rest.
Crafting the Flavorful Shrimp and Chive Filling:
The filling is truly the heart of these incredible Shrimp And Chive Dumplings. The combination of succulent shrimp and aromatic chives is simply divine. Getting the texture and seasoning right is key to a truly memorable dumpling experience.
- Prepare the Shrimp: First, I ensure my shrimp are perfectly prepared. After peeling and deveining them, I pat them extremely dry with paper towels. Excess moisture can make the filling watery and harder to work with. For a better texture, I like to rough chop about two-thirds of the shrimp into small, ½-inch pieces. The remaining one-third, I finely mince or chop into a paste. This mix of textures provides a satisfying bite and a smooth base. I then transfer the prepared shrimp to a large mixing bowl.
- Chop the Chives: Next, I wash the Chinese garlic chives thoroughly and, most importantly, dry them very well. Watery chives will dilute the flavor and make the filling too wet. I finely chop the chives into small, even pieces, about ¼ inch long. The fresh, pungent aroma of these chives is essential for the authentic taste of Shrimp And Chive Dumplings. I add the chopped chives to the bowl with the shrimp.
- Mince the Ginger: I meticulously mince the fresh ginger. Finely minced ginger will distribute its warm, spicy notes throughout the filling without encountering large chunks. I add this to the shrimp and chives.
- Add Seasonings: Now it’s time to bring all the flavors together! I add the soy sauce, Shaoxing wine (or dry sherry), sesame oil, cornstarch, white pepper, and sugar to the bowl. The cornstarch acts as a binder, helping the filling hold its shape and preventing it from becoming too loose. The Shaoxing wine adds a wonderful depth of flavor, typical in many Chinese dishes.
- Mix Thoroughly: This step is critical. Using my hand (wearing a food-safe glove, if preferred) or a sturdy spoon, I mix the filling vigorously in one direction (clockwise or counter-clockwise) for about 3-5 minutes. This continuous mixing helps to develop a sticky, cohesive paste by activating the proteins in the shrimp and the starch. You’ll notice the mixture becoming much firmer and slightly bouncy. A well-mixed filling will hold together perfectly inside the wrapper and provide a delightful texture after cooking. I taste a tiny bit (cooked quickly in the microwave for safety, of course) and adjust salt or other seasonings if needed.
- Chill the Filling: Once mixed, I cover the bowl with plastic wrap and refrigerate the filling for at least 30 minutes. Chilling the filling makes it firmer and much easier to handle when you’re ready to assemble the dumplings. This also allows the flavors to meld beautifully, ensuring every bite of your Shrimp And Chive Dumplings is packed with flavor.
Assembling Your Shrimp And Chive Dumplings:
This is where the magic happens – transforming the delicious filling and delicate wrappers into perfect little parcels. Assembling dumplings is an art, but don’t be intimidated; practice makes perfect, and even imperfectly folded dumplings taste amazing!
- Set Up Your Workstation: I always ensure my workstation is clean and organized. I have my stack of prepared dumpling wrappers, a small bowl of water, a teaspoon or small spatula for the filling, and a baking sheet lined with parchment paper or dusted with flour to place the finished dumplings. It’s helpful to keep the wrappers covered with a damp cloth to prevent them from drying out as you work.
- Place the Wrapper: I take one wrapper and hold it in the palm of my non-dominant hand. If you prefer to work on a flat surface, that’s perfectly fine too.
- Add the Filling: Using a teaspoon or a small spatula, I place about 1 heaping teaspoon (or a little less, depending on the size of your wrappers) of the chilled shrimp and chive filling into the center of the wrapper. Important Tip: Do not overfill! Overfilling makes it very difficult to seal the dumpling properly and increases the chance of it bursting during cooking. I leave at least a ½-inch border around the edge of the wrapper.
- Moisten the Edges: I dip my finger in the small bowl of water and lightly moisten half of the edge of the wrapper, all around the circumference. This water acts as “glue” to seal the dumpling securely.
- Basic Half-Moon Fold:
- I fold the wrapper in half to create a half-moon shape, gently pressing out any air around the filling.
- I firmly pinch the very center of the top edge together to seal it.
- Then, working from the center outwards towards one end, I create small pleats on the front-facing side of the wrapper, pressing each pleat firmly against the back-facing side. I usually aim for 3-4 pleats on each side.
- I repeat this process for the other half, working from the center to the opposite end. This creates the classic crescent-shaped, pleated dumpling.
- Alternative (Simpler) Fold: If pleating seems daunting, a simpler fold works just as well and tastes just as delicious:
- Fold the wrapper in half over the filling, creating a half-moon.
- Press the edges firmly together, ensuring there are no air bubbles.
- Then, I gently crimp the edges with a fork all the way around to create a decorative, sealed edge. This is a great beginner-friendly method for making Shrimp And Chive Dumplings.
- Another Classic Pleat (Potsticker Style):
- Place the filling in the center. Fold the wrapper in half to form a half-moon.
- Pinch the center of the top edge to seal it.
- Starting from one end, I create pleats on only one side of the wrapper, pushing each pleat forward with my thumb and pressing it firmly against the unpleated side. I work my way to the other end. This creates a beautifully pleated top with a flat bottom, perfect for pan-frying.
- Place Finished Dumplings: As I finish each dumpling, I carefully place it on the prepared parchment-lined baking sheet, making sure they don’t touch each other. If they touch, they might stick together.
- Cover and Store: Once all the dumplings are assembled, I cover the baking sheet loosely with plastic wrap or a damp cloth to prevent the wrappers from drying out. At this point, I can cook them immediately, or refrigerate them for up to a few hours, or even freeze them for later. If freezing, I place the sheet in the freezer until the dumplings are solid (about 1-2 hours), then transfer them to a freezer-safe bag or container. They can be cooked directly from frozen, usually requiring a few extra minutes of cooking time.
Preparing the Zesty Dipping Sauce:
No plate of Shrimp And Chive Dumplings is complete without a flavorful dipping sauce. This simple yet balanced sauce complements the delicate flavors of the filling perfectly. It’s quick to whip up and can be customized to your liking.
- Combine Ingredients: In a small bowl, I simply combine the soy sauce, rice vinegar, and sesame oil.
- Add Aromatics: Then, I stir in the finely minced fresh ginger and the optional minced garlic. The fresh ginger adds a bright, zesty kick, while the garlic brings a subtle pungency.
- Optional Spice: If I’m feeling a bit adventurous and want some heat, I’ll add a pinch of red pepper flakes.
- Mix and Rest: I give everything a good stir to ensure all the ingredients are well combined. I often make this sauce ahead of time, allowing it to rest for at least 15-20 minutes, or even longer in the refrigerator, so the flavors can fully meld and deepen. This simple step elevates the dipping experience for your homemade Shrimp And Chive Dumplings.
Cooking Your Delicious Shrimp And Chive Dumplings:
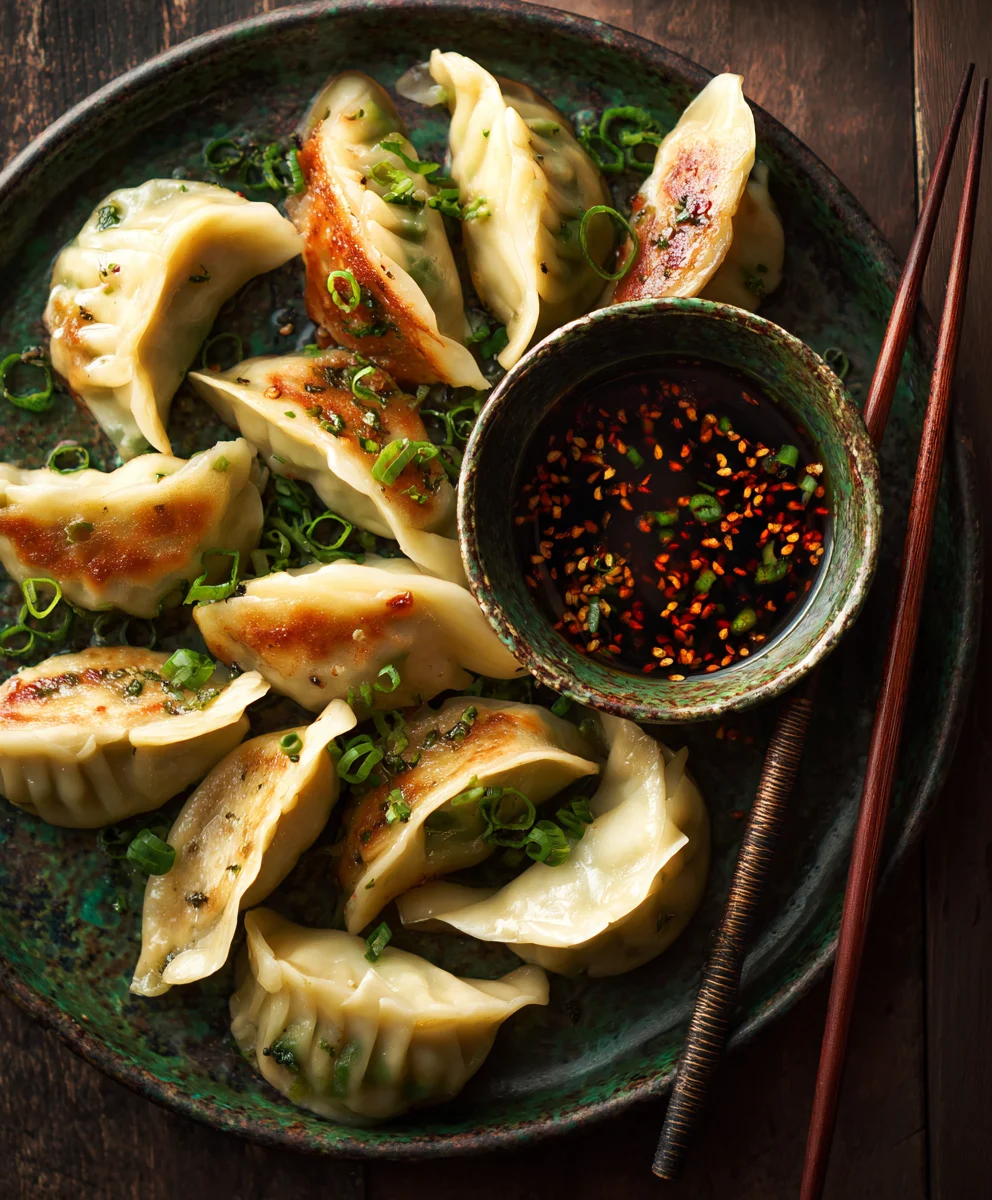
There are several wonderful ways to cook Shrimp And Chive Dumplings, each offering a slightly different texture experience. My favorite method is pan-frying for that irresistible crispy bottom, but steaming is also fantastic for a softer, chewier dumpling.
Method 1: Pan-Frying (Potsticker Style for a Crispy Bottom)
This method yields beautifully browned, crispy bottoms and tender, steamed tops – the best of both worlds!
- Heat the Pan: I heat a large, non-stick skillet or a well-seasoned cast-iron pan over medium-high heat. Once hot, I add about 1-2 tablespoons of neutral oil, swirling to coat the bottom evenly.
- Arrange Dumplings: Carefully, I place the assembled Shrimp And Chive Dumplings in a single layer in the hot pan, leaving a little space between each one. I don’t overcrowd the pan; I cook them in batches if necessary.
- Sear the Bottoms: I let the dumplings fry undisturbed for about 2-3 minutes, or until their bottoms are beautifully golden brown and crispy. This is where that satisfying crunch comes from.
- Add Water and Steam: Once the bottoms are crispy, I carefully pour about ½ cup of water (or chicken broth for extra flavor) into the pan. Be cautious, as the hot oil will splatter.
- Cover and Cook: Immediately, I cover the pan tightly with a lid. This traps the steam, which cooks the rest of the dumpling filling thoroughly. I reduce the heat to medium-low and let them steam for about 8-10 minutes for fresh dumplings, or 10-12 minutes for frozen ones, or until the water has almost completely evaporated and the wrappers are translucent and tender.
- Remove Lid and Finish: I remove the lid and let any remaining water evaporate completely. I continue to cook for another 1-2 minutes if needed, allowing the bottoms to crisp up again if they’ve softened from the steam. The oil should be sizzling, and the bottoms should be nicely golden and firm.
- Serve Immediately: I use a spatula to carefully remove the pan-fried Shrimp And Chive Dumplings from the pan and arrange them on a serving platter.
Method 2: Steaming (For a Tender, Chewy Texture)
Steaming offers a wonderfully soft and tender dumpling, allowing the delicate flavors of the shrimp and chives to truly shine through.
- Prepare Steamer: I line my bamboo steamer basket (or a metal steamer insert) with parchment paper that has holes poked in it, or with individual cabbage or lettuce leaves to prevent sticking. This also helps with easy cleanup.
- Boil Water: I fill a pot or wok with about 1-2 inches of water and bring it to a rolling boil over high heat.
- Arrange Dumplings: Carefully, I place the Shrimp And Chive Dumplings in the lined steamer basket, ensuring they are in a single layer and not touching each other. Again, I work in batches if my steamer isn’t large enough.
- Steam: I place the steamer basket over the boiling water, making sure the bottom of the basket does not touch the water. I cover it tightly with the lid.
- Cook Through: I steam the dumplings for 8-10 minutes for fresh dumplings, or 10-12 minutes for frozen ones. The wrappers should become translucent and slightly puffy, and the filling should be cooked through. You’ll know they’re done when the shrimp turns pink and opaque.
- Serve Hot: I carefully remove the steamer basket and transfer the hot Shrimp And Chive Dumplings to a serving plate.
Serving Suggestions and Enjoying Your Homemade Dumplings:
Whether pan-fried or steamed, your homemade Shrimp And Chive Dumplings are now ready to be enjoyed! I love to garnish them with a sprinkle of toasted sesame seeds and a bit more fresh chopped chives for an extra touch of freshness and visual appeal. They are best served piping hot, straight from the pan or steamer.
I always serve them alongside that vibrant dipping sauce we made earlier. Encourage everyone to dip their dumplings generously. The tangy, savory sauce perfectly cuts through the richness of the shrimp and complements the aromatic chives, creating a harmonious burst of flavor with every bite.
These dumplings make a fantastic appetizer for a larger meal, a light lunch, or even a fun, interactive dinner project for the whole family. They pair wonderfully with a simple green salad, some stir-fried vegetables, or a bowl of clear broth. You’ve put so much love and effort into making these from scratch, so take a moment to savor every single, delicious piece of your labor!
Leftovers and Reheating: If by some miracle you have any leftover Shrimp And Chive Dumplings, store them in an airtight container in the refrigerator for up to 2-3 days. To reheat, you can steam them again until hot, or pan-fry them with a little oil until crispy and warmed through. Reheating in an air fryer also works wonderfully for pan-fried dumplings, restoring their crispness.
I hope you thoroughly enjoy the process and the truly delicious outcome of making these homemade Shrimp And Chive Dumplings. It’s a culinary journey that always brings so much joy to my kitchen and my table!
Conclusion:
If there’s one recipe I genuinely hope you welcome into your kitchen, it’s this one for homemade dumplings. More than just a meal, these are an experience – a journey into fresh flavors, delightful textures, and the immense satisfaction of creating something truly special with your own hands. I promise you, once you taste the succulent filling nestled within a perfectly tender wrapper, you’ll understand why these are an absolute game-changer. There’s a certain magic that happens when fresh, sweet shrimp mingles with the subtle, oniony zest of chives, all encased in a delicate dough. It’s not just food; it’s a celebration of simple, wholesome ingredients coming together in perfect harmony.
The beauty of these dumplings lies not only in their incredible taste but also in the joy of the process. Don’t be intimidated by the idea of making them from scratch; it’s a wonderfully therapeutic activity, and the rewards far outweigh any perceived effort. Imagine the aroma filling your kitchen as they steam, or the satisfying sizzle as they pan-fry to a golden crisp. These Shrimp And Chive Dumplings aren’t just a delicious appetizer; they’re a versatile culinary masterpiece that can elevate any occasion. From a cozy weeknight dinner to an impressive centerpiece at your next gathering, they always steal the show. The delicate balance of flavors – the natural sweetness of the shrimp, the gentle bite of the chives, and the savory notes from the seasonings – creates a profile that is both comforting and incredibly sophisticated. It’s a taste that lingers pleasantly, urging you to reach for just one more. I’ve made these countless times for family and friends, and they consistently receive rave reviews and requests for the recipe. It’s a testament to their universal appeal and undeniable deliciousness.
Serving Suggestions & Creative Variations:
Once you’ve mastered the basic recipe, the possibilities for customization and serving are endless! Of course, a classic dipping sauce is essential. I love a simple concoction of soy sauce, a splash of rice vinegar, a tiny hint of sesame oil, and a pinch of fresh ginger. For those who enjoy a little kick, a dash of chili oil or sriracha adds a fantastic layer of warmth. Don’t forget a sprinkle of toasted sesame seeds or a few extra finely chopped chives on top for an extra burst of flavor and visual appeal. For a truly indulgent experience, consider pan-frying a batch until the bottoms are wonderfully crispy and golden, while steaming another for that melt-in-your-mouth tenderness. Offering both textures provides a delightful contrast that everyone will love.
Feeling adventurous? While the shrimp and chive combination is divine on its own, you can certainly experiment with the filling. Try adding a small amount of finely shredded Napa cabbage for extra crunch, or a few rehydrated and minced shiitake mushrooms for an earthy depth. A touch of finely grated water chestnut can also provide a delightful textural surprise. For those who prefer a richer flavor, a small quantity of finely ground pork or chicken can be mixed with the shrimp, creating a different, yet equally delicious, profile. These dumplings are also incredibly versatile as a meal component. Serve them alongside a light noodle salad, a vibrant stir-fry, or a simple bowl of clear broth for a complete and satisfying meal. They even make a fantastic addition to a dim sum spread or as elegant canapés for a cocktail party. No matter how you choose to serve or adapt them, these dumplings are guaranteed to impress.
So, what are you waiting for? Dive into your kitchen this week and give this recipe a try. I promise you, the effort is truly worth the reward. There’s a special kind of pride that comes with serving homemade dumplings, especially ones that taste this incredible. I encourage you to embrace the process, savor the aromas, and most importantly, enjoy the delicious results. Please, share your dumpling-making adventures with me! I’d love to hear how they turned out, what dipping sauces you concocted, or any creative variations you came up with. Your feedback and experiences are incredibly valuable, and they inspire me to keep sharing more culinary delights. Happy cooking, and get ready to fall in love with your new favorite homemade dish!
Frequently Asked Questions About Dumplings
These are some common questions people often ask when making and enjoying homemade dumplings:
What is the best way to prevent dumplings from sticking to the steamer or pan?
For steaming, ensure your steamer basket is lined with parchment paper (pierced for steam circulation), cabbage leaves, or a light coating of oil. For pan-frying, use a good quality non-stick pan and a sufficient amount of oil. Don’t overcrowd the pan, as this can lower the temperature and cause sticking.
Can I prepare the dumpling filling ahead of time?
Absolutely! The filling can be mixed and stored in an airtight container in the refrigerator for up to 24 hours. This makes the assembly process much quicker on the day you plan to cook them. Just give it a good stir before you start wrapping.
Are these dumplings suitable for freezing?
Yes, homemade dumplings freeze beautifully! Place the uncooked, assembled dumplings in a single layer on a parchment-lined baking sheet and freeze until solid (about 1-2 hours). Once frozen, transfer them to a freezer-safe bag or container. They can be stored for up to 2-3 months. Cook directly from frozen, adding a few extra minutes to the cooking time.
What are some good dipping sauces for shrimp and chive dumplings?
Beyond the classic soy-ginger-vinegar mix, try a spicy chili oil with garlic, a sweet and sour sauce, or even a creamy peanut dipping sauce for an interesting twist. A simple combination of black vinegar and a touch of sugar can also be wonderfully refreshing.
Can I use frozen shrimp for the filling?
Yes, frozen shrimp works perfectly! Just ensure they are fully thawed and patted very dry with paper towels before mincing. Excess moisture can make your filling watery and harder to work with.
What if I don’t have fresh chives? What’s a good substitute?
While fresh chives offer the best flavor, you can substitute with the green parts of spring onions (scallions), finely minced. Leeks (white and light green parts, very finely minced) can also work, though they have a slightly stronger flavor profile.
How do I know when the dumplings are cooked through?
For steamed dumplings, they are cooked when the wrappers appear translucent and plump, and the filling is firm to the touch (usually 8-10 minutes for fresh, 10-12 for frozen). For pan-fried, they’re done when the bottoms are golden and crispy, and the filling is cooked through (steam-fry method typically takes 8-12 minutes total).
Are homemade shrimp and chive dumplings healthy?
Compared to many fried appetizers, steamed or lightly pan-fried Shrimp And Chive Dumplings can be a relatively healthy option. They are packed with lean protein from the shrimp and fresh vegetables. You can further enhance their healthiness by using whole wheat wrappers or adding more finely diced vegetables to the filling.
Shrimp & Chive Dumplings
These homemade Shrimp and Chive Dumplings offer a vibrant symphony of flavors and textures in every delicate bite. Featuring tender shrimp and aromatic chives encased in a thin wrapper, they can be steamed for a silky texture or pan-fried for a delightfully crispy bottom. A truly memorable taste experience, perfect as an appetizer or light meal.
Ingredients
-
3 cups (360g) all-purpose flour
-
1 cup (240ml) hot water
-
½ tsp salt
-
1.5 lbs (680g) shrimp, peeled, deveined, patted dry
-
6-8 oz (170-225g) Chinese garlic chives, washed, dried, chopped
-
2 tbsp fresh ginger, minced
-
2 tbsp soy sauce
-
1 tbsp non-alcoholic cooking wine (e.g., dry sherry alternative or chicken broth)
-
1 tbsp sesame oil
-
1 tbsp cornstarch
-
½ tsp ground white pepper
-
½ tsp sugar
-
Pinch of salt
-
¼ cup soy sauce (for dipping sauce)
-
2 tbsp rice vinegar (for dipping sauce)
-
1 tsp sesame oil (for dipping sauce)
-
1 tsp fresh ginger, minced (for dipping sauce)
-
1 small garlic clove, minced (optional, for dipping sauce)
-
Pinch of red pepper flakes (optional, for dipping sauce)
-
2 tbsp neutral oil (for cooking)
-
½ cup water or chicken broth (for steaming)
-
Sesame seeds & chopped chives (for garnish, optional)
Instructions
-
Step 1
Combine flour and ½ tsp salt. Slowly add hot water, stirring until shaggy clumps form. Knead dough for 5-7 min, then cover and rest for 30-60 min. Knead again for 5-10 min until smooth and elastic. Divide dough into 4 pieces, keeping unused portions covered. Roll one piece into a ¾-1 inch rope, cut into ½ inch pieces. Flatten each piece, dust with flour, and roll into thin 3-3.5 inch round wrappers with slightly thicker edges. Stack and cover. -
Step 2
Pat shrimp very dry. Rough chop ⅔ of shrimp, finely mince ⅓ into a paste. Place in a bowl. Finely chop washed and dried Chinese garlic chives (¼ inch pieces) and mince ginger; add to shrimp. Add 2 tbsp soy sauce, non-alcoholic cooking wine, 1 tbsp sesame oil, cornstarch, white pepper, and sugar. Mix vigorously in one direction for 3-5 min until sticky. Add a pinch of salt to taste. Cover and refrigerate for at least 30 min. -
Step 3
{‘@type’: ‘HowToStep’, ‘name’: ‘Assemble Dumplings’, ‘text’: “Set up a clean workstation with wrappers (covered), a small bowl of water, and a parchment-lined baking sheet. Place 1 heaping tsp of chilled filling in the center of a wrapper, leaving a ½-inch border. Lightly moisten half of the wrapper’s edge with water. Fold wrapper in half to create a half-moon. Pinch the center firmly. Create 3-4 small pleats on the front-facing side, pressing against the back. Repeat for the other half, or crimp edges with a fork for a simpler seal, or pleat one side for potsticker style. Place finished dumplings on the baking sheet without touching. Cover loosely. Cook immediately, refrigerate, or freeze.”} -
Step 4
Combine ¼ cup soy sauce, 2 tbsp rice vinegar, 1 tsp sesame oil, 1 tsp minced fresh ginger, and optional minced garlic and red pepper flakes in a small bowl. Stir well and let rest for 15-20 min for flavors to meld. -
Step 5
Heat a large non-stick skillet over medium-high heat with 1-2 tbsp neutral oil. Place dumplings in a single layer. Fry for 2-3 min until bottoms are golden and crispy. Carefully pour in ½ cup water or chicken broth. Immediately cover tightly. Reduce heat to medium-low and steam for 8-10 min (fresh) or 10-12 min (frozen), until water evaporates and wrappers are translucent. Remove lid and cook 1-2 more min if needed to re-crisp bottoms. Serve immediately. -
Step 6
Line a steamer basket with parchment paper (with holes) or cabbage leaves. Bring 1-2 inches of water to a rolling boil in a pot. Place dumplings in a single layer in the steamer, not touching. Place steamer over boiling water (not touching water) and cover tightly. Steam for 8-10 min (fresh) or 10-12 min (frozen), until wrappers are translucent and filling is cooked (shrimp pink/opaque). Transfer hot dumplings to a serving plate. -
Step 7
Garnish hot dumplings with sesame seeds and chopped chives (optional). Serve immediately with the prepared dipping sauce. Store any leftovers in an airtight container in the refrigerator for 2-3 days; reheat by steaming, pan-frying, or air frying.
Important Information
Nutrition Facts (Per Serving)
It is important to consider this information as approximate and not to use it as definitive health advice.
Allergy Information
Please check ingredients for potential allergens and consult a health professional if in doubt.
Leave a Comment