
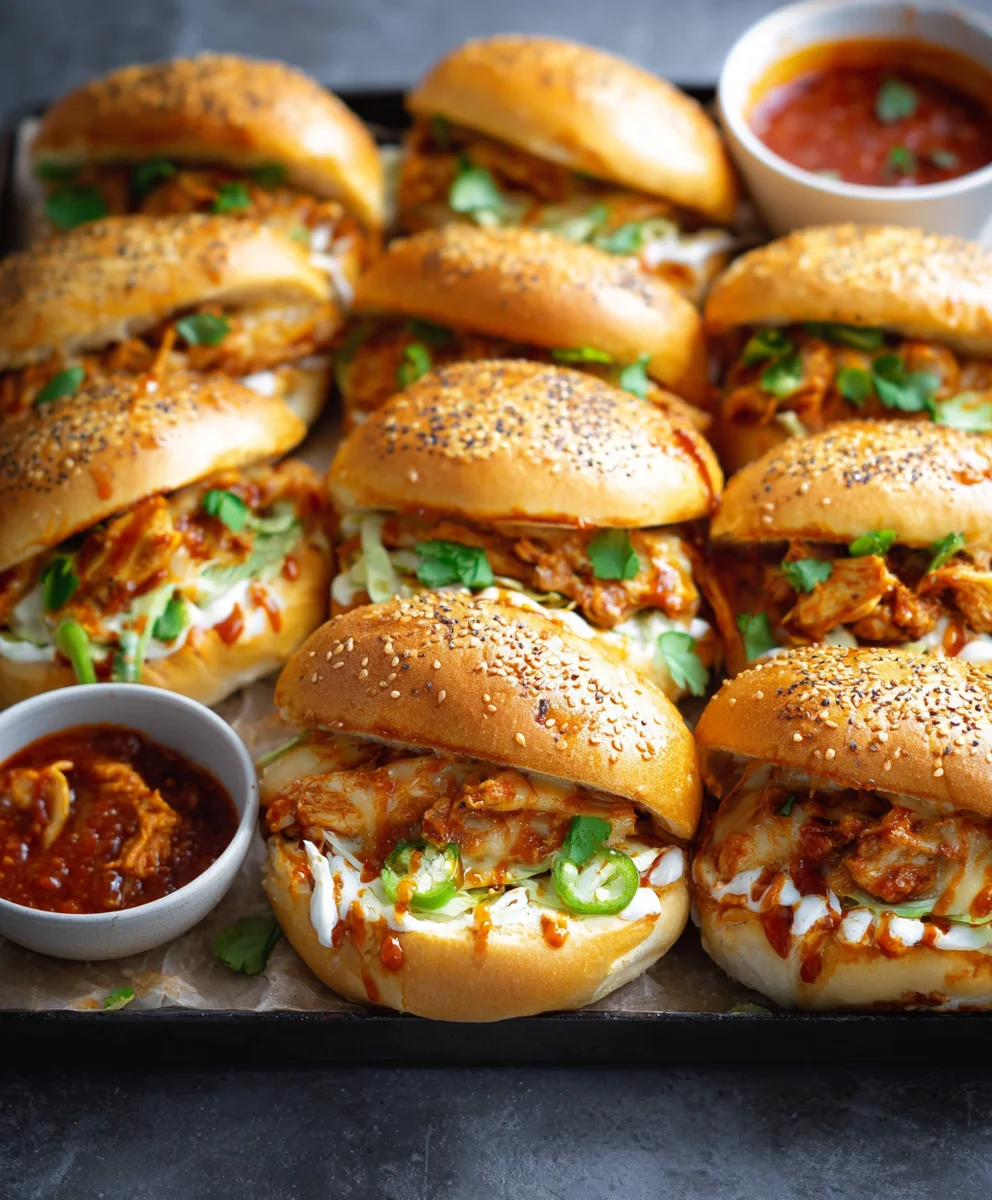
Cheesy Dynamite Chicken Buns – prepare to embark on a culinary journey that promises an explosion of flavor in every single bite! I’ve always been fascinated by dishes that perfectly balance comfort with an exhilarating kick, and this recipe delivers precisely that. Imagine sinking your teeth into a soft, pillowy bun, only to discover a tantalizing filling of succulent, spicy chicken enrobed in gooey, melted cheese. It’s a symphony of textures and tastes that truly captivates from the very first moment.
While the exact origins of these delightful buns are a modern fusion marvel, blending the irresistible allure of spicy Korean-inspired chicken with the comforting embrace of Asian-style steamed or baked buns, their widespread popularity is undeniable. People absolutely adore this dish because it masterfully combines the addictive heat of ‘dynamite’ chicken with the soothing richness of cheese, all encased in a convenient, handheld package. Whether you’re seeking a hearty snack, a unique party appetizer, or a comforting weeknight meal, these Cheesy Dynamite Chicken Buns are incredibly versatile. I assure you, once you try them, they’ll quickly become a cherished favorite in your kitchen repertoire.
Ingredients:
-
For the Soft, Fluffy Bun Dough:
- All-Purpose Flour: 3 ½ cups (approximately 420g), plus extra for dusting
- Instant Dry Yeast: 2 ¼ teaspoons (one standard packet)
- Granulated Sugar: ¼ cup (50g), divided
- Fine Sea Salt: 1 teaspoon
- Warm Whole Milk: 1 cup (240ml), between 105-115°F (40-46°C)
- Large Egg: 1, at room temperature, plus 1 for egg wash
- Unsalted Butter: ¼ cup (57g), melted and slightly cooled
-
For the Irresistible Dynamite Chicken Filling:
- Boneless, Skinless Chicken Breast or Thighs: 1 ½ pounds (about 680g), finely diced or shredded
- Olive Oil or Vegetable Oil: 2 tablespoons
- Yellow Onion: 1 medium, finely minced
- Garlic: 4 cloves, minced
- Fresh Ginger: 1 tablespoon, grated
- Red Chili Flakes: 1 teaspoon, or to taste (for that dynamite kick!)
- Soy Sauce: 2 tablespoons
- Oyster Sauce: 1 tablespoon
- Granulated Sugar: 1 teaspoon
- Black Pepper: ½ teaspoon
- Cream Cheese: 4 ounces (about 113g), softened, cut into small cubes
- Shredded Mozzarella Cheese: ½ cup (optional, but highly recommended for extra gooeyness)
- Fresh Cilantro or Green Onions: 2 tablespoons, chopped (for garnish, optional)
-
For the Signature Cheesy Dynamite Topping:
- Mayonnaise: ½ cup (120g)
- Sriracha or Gochujang (Korean Chili Paste): 2-3 tablespoons, or to taste (adjust for desired heat level)
- Cream Cheese: 2 ounces (about 57g), softened
- Shredded Sharp Cheddar Cheese: ½ cup
- Shredded Mozzarella Cheese: ¼ cup
- Granulated Sugar: ½ teaspoon (to balance the flavors)
- Green Onions: 2 tablespoons, thinly sliced (for color and freshness)
- Toasted Sesame Seeds: 1 teaspoon (for garnish)
-
For the Egg Wash:
- Large Egg: 1, beaten
- Milk: 1 tablespoon
Preparing the Soft, Fluffy Bun Dough
- Activate the Yeast: In a large mixing bowl or the bowl of a stand mixer, combine the warm milk and 1 tablespoon of the granulated sugar. Sprinkle the instant dry yeast over the top. Stir gently and let it sit for 5-10 minutes. You’re looking for the mixture to become foamy and bubbly, indicating that the yeast is active and ready to bring life to our wonderful “Cheesy Dynamite Chicken Buns.” If it doesn’t foam, your yeast might be old or the milk too hot/cold, and it’s best to start over.
- Combine Dry Ingredients: In a separate bowl, whisk together the remaining ¼ cup minus 1 tablespoon of granulated sugar, all of the all-purpose flour, and the fine sea salt. This ensures all the dry ingredients are evenly distributed, which is crucial for a consistent bun texture.
- Mix Wet Ingredients: To the activated yeast mixture, add the melted and cooled butter and the room-temperature large egg. Whisk these ingredients together until they are well combined. Room temperature ingredients are important as they mix more easily and contribute to a better dough structure.
- Form the Dough: Gradually add the dry flour mixture to the wet ingredients, mixing on low speed with the dough hook attachment of your stand mixer (or with a sturdy spoon if kneading by hand). Once the dough starts to come together, increase the speed to medium-low and continue mixing for about 8-10 minutes. If kneading by hand, turn the dough out onto a lightly floured surface and knead for 10-12 minutes. The dough should be smooth, elastic, and pass the “windowpane test” – meaning you can stretch a small piece thin enough to see light through it without tearing. Add only a tiny bit more flour if the dough is excessively sticky, but resist the urge to add too much, as this will result in dry buns.
- First Proof: Lightly grease a large bowl with a little oil. Transfer the dough to the bowl, turning it once to coat the entire surface. Cover the bowl tightly with plastic wrap or a clean kitchen towel. Place it in a warm, draft-free spot (like a turned-off oven with the light on) and let it rise for 1 to 1 ½ hours, or until it has doubled in size. Patience is key here for developing that beautiful airy texture for your “Cheesy Dynamite Chicken Buns.”
Crafting the Dynamite Chicken Filling
- Prepare the Chicken: If using chicken breast, finely dice it into small cubes (about ¼ inch). If using chicken thighs, you can dice them or cook them whole and then shred them. Finely dicing ensures an even distribution of chicken in each bun.
- Sauté Aromatics: Heat the olive oil in a large skillet or frying pan over medium heat. Add the minced yellow onion and cook, stirring occasionally, until softened and translucent, about 5-7 minutes. Then, add the minced garlic, grated ginger, and red chili flakes. Cook for another 1-2 minutes until fragrant, being careful not to burn the garlic. The aroma at this stage is already starting to build the anticipation for these incredible “Cheesy Dynamite Chicken Buns.”
- Cook the Chicken: Add the diced chicken to the skillet. Cook, breaking it apart with a spoon, until it is no longer pink and is mostly cooked through, about 5-7 minutes.
- Season the Filling: Pour in the soy sauce and oyster sauce, sprinkle in the granulated sugar and black pepper. Stir well to coat the chicken evenly. Continue to cook for another 3-5 minutes, allowing the sauces to reduce slightly and the flavors to meld beautifully. Taste and adjust seasoning if needed – perhaps a little more chili for an extra dynamite punch!
- Cool and Incorporate Cheese: Remove the skillet from the heat. Let the chicken filling cool down completely. This step is crucial; adding hot filling to the dough can kill the yeast or melt the butter prematurely, compromising the bun’s texture. Once cooled, stir in the softened cream cheese cubes and the optional shredded mozzarella cheese. Mix gently until the cheeses are somewhat incorporated but still have small pockets, which will create delightful creamy bursts within your “Cheesy Dynamite Chicken Buns.”
Assembling the Cheesy Dynamite Chicken Buns
- Punch Down and Divide Dough: Once the dough has doubled in size, gently punch it down to release the air. Transfer the dough to a lightly floured surface. Divide the dough into 12 equal pieces. For best results and uniform bun size, you can weigh each piece to be about 60-65g. Roll each piece into a smooth ball.
- Shape and Fill: Take one dough ball and, using a rolling pin, flatten it into a disc about 4-5 inches in diameter. Try to make the edges slightly thinner than the center. Place about 2-3 tablespoons of the cooled chicken filling in the center of the dough disc. Do not overfill, as this can make sealing difficult.
- Seal the Buns: Carefully gather the edges of the dough around the filling, bringing them up to meet in the center. Pinch the seams tightly to seal the bun securely. You want to make sure there are no gaps for the delicious filling to escape during baking. Roll the sealed bun gently between your palms to ensure it’s a smooth, round shape, with the seam facing downwards. This technique is vital for perfect “Cheesy Dynamite Chicken Buns.”
- Second Proof: Line two baking sheets with parchment paper. Arrange the filled buns on the prepared baking sheets, leaving about 2 inches of space between each bun to allow for expansion. Cover the buns loosely with plastic wrap or a clean kitchen towel. Let them rise in a warm, draft-free place for another 30-45 minutes, or until visibly puffed up. They should look noticeably larger and feel light.
Making the Irresistible Cheesy Dynamite Topping
- Combine Topping Ingredients: While your buns are on their second proof, prepare the “Cheesy Dynamite Topping.” In a small bowl, combine the mayonnaise, sriracha (or gochujang), softened cream cheese, shredded sharp cheddar cheese, shredded mozzarella cheese, and granulated sugar. Mix everything together thoroughly until it’s smooth and well combined. The sugar helps to balance the heat and tang, creating a truly addictive topping for your “Cheesy Dynamite Chicken Buns.”
- Prepare for Piping (Optional): If you want a neat, professional look, transfer the topping mixture to a piping bag fitted with a wide, round nozzle (or simply snip off the corner of a sturdy freezer bag). Otherwise, a spoon will work just fine for spreading.
Baking Your Cheesy Dynamite Chicken Buns
- Preheat Oven: Towards the end of the second proofing time, preheat your oven to 375°F (190°C).
- Prepare Egg Wash: In a small bowl, whisk together the remaining large egg with 1 tablespoon of milk to create an egg wash.
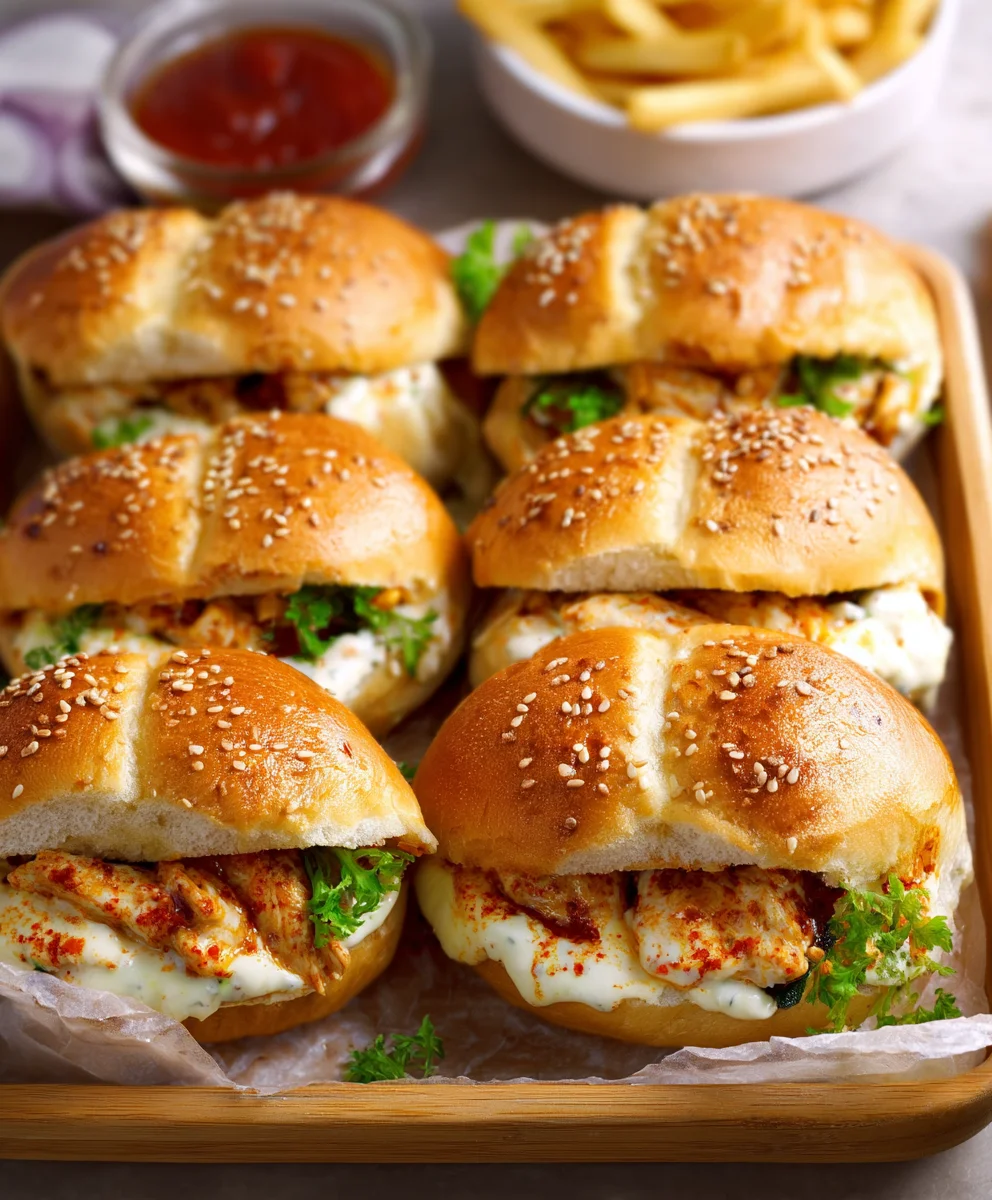
- Egg Wash and Top: Gently brush the tops of the proofed buns with the egg wash. This will give them a beautiful golden-brown shine. Then, pipe or carefully spread a generous layer of the “Cheesy Dynamite Topping” over the center of each bun. You want a good amount so that every bite is bursting with flavor. Sprinkle a few green onions and toasted sesame seeds over the topping for added visual appeal and a nutty crunch.
- Bake to Golden Perfection: Place the baking sheets in the preheated oven. Bake for 18-22 minutes, or until the buns are puffed up, golden brown on the sides, and the topping is bubbly and lightly browned. The exact baking time may vary slightly depending on your oven, so keep an eye on them. The aroma filling your kitchen will be absolutely incredible, a true testament to the deliciousness of these “Cheesy Dynamite Chicken Buns.”
- Cool and Serve: Once baked, remove the buns from the oven and let them cool on the baking sheets for a few minutes before transferring them to a wire rack to cool slightly more. While they are delightful served warm, allowing them to cool for about 10-15 minutes helps the filling and topping to set properly, preventing them from being too messy. Garnish with a little extra fresh cilantro or green onions, if desired, just before serving.
- Enjoy Your Creation: Serve these warm, delightful “Cheesy Dynamite Chicken Buns” as a satisfying snack, a unique appetizer, or even as a light meal. They are truly an explosion of flavor and texture that everyone will love!
Conclusion:
So, after this culinary journey through the steps of creating something truly special, you might be asking yourself, “Is this recipe really as incredible as it sounds?” My answer, with absolute certainty and a big smile, is a resounding yes! This isn’t just another dish to add to your repertoire; it’s an experience waiting to happen in your kitchen. Imagine the anticipation as the enticing aroma fills your home, followed by that glorious moment when you sink your teeth into a warm, golden-brown bun. First, you get the comforting softness of the bread, then the delightful kick of the “dynamite” spice, perfectly mellowed by the rich, gooey embrace of melted cheese, and finally, the tender, savory chicken filling. It’s a symphony of textures and flavors that truly dances on your palate, offering a unique blend of comfort and excitement in every single bite. This recipe for Cheesy Dynamite Chicken Buns is truly the ultimate comfort food with an exhilarating twist, a dish that promises to impress without demanding hours of your precious time.
What truly elevates these buns and sets them apart from anything else you’ve tried is their impeccable balance. The spice level is perfectly calibrated to awaken your taste buds and add a thrilling edge, but it never overwhelms, allowing the nuanced flavors of the chicken and the luxurious creaminess of the cheese to shine through. The softness of the bun provides that perfect counterpoint, making each bite utterly satisfying and deeply enjoyable. I’ve witnessed countless smiles and heard delighted exclamations from friends and family after their first taste, and that, for me, is the greatest testament to their appeal. It’s a fantastic conversation starter, a guaranteed crowd-pleaser for any gathering, and honestly, a brilliant way to add a spark of joy and flavor to any meal. You’re not just preparing food; you’re creating memorable moments and delightful sensations.
Serving Suggestions and Creative Variations to Make It Your Own!
Now, let’s talk about how to best enjoy these incredible creations. While they are absolutely phenomenal on their own – perfect for a quick, satisfying snack, a delightful packed lunch that will make your colleagues envious, or an appetizer that effortlessly steals the show at any party – they also pair beautifully with a variety of accompaniments. For a refreshing contrast, consider serving them alongside a crisp, cool coleslaw to balance the heat, or a simple green salad dressed with a zesty vinaigrette. If you’re looking for a heartier meal, they are excellent with a creamy tomato soup, a comforting lentil soup, or even a side of roasted sweet potato fries. These buns are incredibly versatile! Envision them as the star of your next game night, a sophisticated yet accessible appetizer for a casual get-together, or even a fun, interactive dinner for the family where everyone can grab their own delicious, handheld treat.
The true beauty of this recipe also lies in its wonderful adaptability, inviting you to unleash your inner chef and customize it to your heart’s content. Feeling extra adventurous and craving more heat? Amp up the spice level even further with an extra dash of your favorite hot sauce, a sprinkle of cayenne pepper, or some finely chopped habanero mixed into the filling. If you’re not a fan of intense heat, simply scale back on the chili flakes or opt for a milder pepper. Don’t hesitate to experiment with different cheeses too – perhaps a sharp cheddar for a more assertive flavor, a smoked gouda for an added layer of depth, or even a Monterey Jack for an even smoother, meltier embrace. If you want to sneak in some extra nutrition, finely diced bell peppers, corn kernels, or even a handful of chopped spinach can be mixed into the chicken filling for added color and wholesome goodness. You could even try using shredded pork, ground turkey, or a plant-based chicken substitute for a different textural or dietary twist. The core essence of the Cheesy Dynamite Chicken Buns lies in that irresistible combination of savory, spicy, and cheesy, but the precise flavors and ingredients are yours to command. Don’t hesitate to make this recipe truly your own, reflecting your personal taste, dietary needs, and creative culinary spirit.
I genuinely can’t wait for you to experience the magic of these buns firsthand. There’s something so incredibly rewarding and joyful about pulling a fresh batch of these golden, fragrant delights from the oven, knowing you’ve created something truly delicious. So, go ahead, gather your ingredients, set aside some time this week, and embark on this incredibly rewarding culinary adventure. When you do, please don’t keep the experience to yourself! I absolutely love hearing from you and seeing your wonderful creations. Share your cooking journey, your successes, any fun variations you discovered, or even just a photo of your magnificent Cheesy Dynamite Chicken Buns. You can tag me on social media or simply drop a comment below this article. Your feedback, stories, and enthusiasm are what truly make this culinary community thrive and inspire me to keep sharing. Until next time, happy baking, and prepare to fall head over heels in love with your very own batch of these sensational, satisfying, and utterly unforgettable Cheesy Dynamite Chicken Buns!
Cheesy Dynamite Chicken Buns
Prepare to embark on a culinary journey that promises an explosion of flavor in every single bite! Imagine sinking your teeth into a soft, pillowy bun, only to discover a tantalizing filling of succulent, spicy chicken enrobed in gooey, melted cheese. It’s a symphony of textures and tastes that truly captivates from the very first moment.
Ingredients
-
— For the Soft, Fluffy Bun Dough —
-
3 ½ cups (420g) All-Purpose Flour
-
2 ¼ tsp Instant Dry Yeast
-
¼ cup (50g) Granulated Sugar (divided)
-
1 tsp Fine Sea Salt
-
1 cup (240ml) Warm Whole Milk (105-115°F)
-
1 Large Egg (at room temperature)
-
¼ cup (57g) Unsalted Butter, melted and cooled
-
— For the Irresistible Dynamite Chicken Filling —
-
1 ½ lbs (680g) Boneless, Skinless Chicken Breast or Thighs, finely diced/shredded
-
2 tbsp Olive Oil or Vegetable Oil
-
1 medium Yellow Onion, finely minced
-
4 cloves Garlic, minced
-
1 tbsp Fresh Ginger, grated
-
1 tsp Red Chili Flakes (or to taste)
-
2 tbsp Soy Sauce
-
1 tbsp Oyster Sauce
-
1 tsp Granulated Sugar
-
½ tsp Black Pepper
-
4 oz (113g) Cream Cheese, softened, cubed
-
½ cup Shredded Mozzarella Cheese (optional)
-
2 tbsp Fresh Cilantro or Green Onions, chopped (optional garnish)
-
— For the Signature Cheesy Dynamite Topping —
-
½ cup (120g) Mayonnaise
-
2-3 tbsp Sriracha or Gochujang (to taste)
-
2 oz (57g) Cream Cheese, softened
-
½ cup Shredded Sharp Cheddar Cheese
-
¼ cup Shredded Mozzarella Cheese
-
½ tsp Granulated Sugar
-
2 tbsp Green Onions, thinly sliced
-
1 tsp Toasted Sesame Seeds
-
— For the Egg Wash —
-
1 Large Egg, beaten
-
1 tbsp Milk
Instructions
-
Step 1
In a large bowl, combine warm milk and 1 tbsp granulated sugar. Sprinkle yeast over top; stir gently. Let sit 5-10 minutes until foamy. -
Step 2
In a separate bowl, whisk remaining granulated sugar, flour, and salt. To the activated yeast, add melted butter and room-temperature egg. Whisk until combined. -
Step 3
Gradually add dry flour mixture to wet ingredients. Mix with a stand mixer (dough hook) on low-medium speed for 8-10 minutes, or knead by hand for 10-12 minutes, until dough is smooth and elastic. -
Step 4
Lightly grease a large bowl. Transfer dough, turn to coat, cover, and let rise in a warm, draft-free spot for 1 to 1 ½ hours, or until doubled in size. -
Step 5
Finely dice chicken. Heat oil in a skillet over medium heat. Sauté minced onion for 5-7 minutes. Add minced garlic, grated ginger, and red chili flakes; cook 1-2 minutes until fragrant. Add diced chicken and cook 5-7 minutes until no longer pink. -
Step 6
Stir in soy sauce, oyster sauce, 1 tsp granulated sugar, and black pepper. Cook 3-5 minutes, allowing sauces to reduce. Remove from heat and let the chicken filling cool completely. -
Step 7
Once cooled, stir softened cream cheese cubes and optional shredded mozzarella cheese into the chicken filling until somewhat incorporated. -
Step 8
Punch down dough and transfer to a lightly floured surface. Divide into 12 equal pieces (approx. 60-65g each). Roll each piece into a smooth ball. Flatten one dough ball into a 4-5 inch disc, making edges slightly thinner. -
Step 9
Place 2-3 tablespoons of cooled chicken filling in the center of the dough disc. Gather edges of dough to the center and pinch seams tightly to seal. Roll gently between palms to form a smooth, round bun with the seam facing downwards. -
Step 10
Arrange filled buns on parchment-lined baking sheets, leaving about 2 inches between them. Cover loosely and let rise in a warm place for 30-45 minutes, or until visibly puffed up. -
Step 11
In a small bowl, combine mayonnaise, sriracha (or gochujang), softened cream cheese, shredded sharp cheddar, shredded mozzarella, and ½ tsp granulated sugar. Mix thoroughly until smooth. (Optional: Transfer to a piping bag). -
Step 12
Preheat oven to 375°F (190°C). Whisk 1 large egg with 1 tablespoon milk for the egg wash. Gently brush tops of proofed buns with egg wash. -
Step 13
Pipe or spread a generous layer of the Cheesy Dynamite Topping over the center of each bun. Sprinkle with green onions and toasted sesame seeds. Bake for 18-22 minutes, or until golden brown and the topping is bubbly. -
Step 14
Remove from oven and let cool on baking sheets for a few minutes before transferring to a wire rack to cool slightly more. Serve warm. Garnish with extra fresh cilantro or green onions if desired.
Important Information
Nutrition Facts (Per Serving)
It is important to consider this information as approximate and not to use it as definitive health advice.
Allergy Information
Please check ingredients for potential allergens and consult a health professional if in doubt.

Leave a Comment