
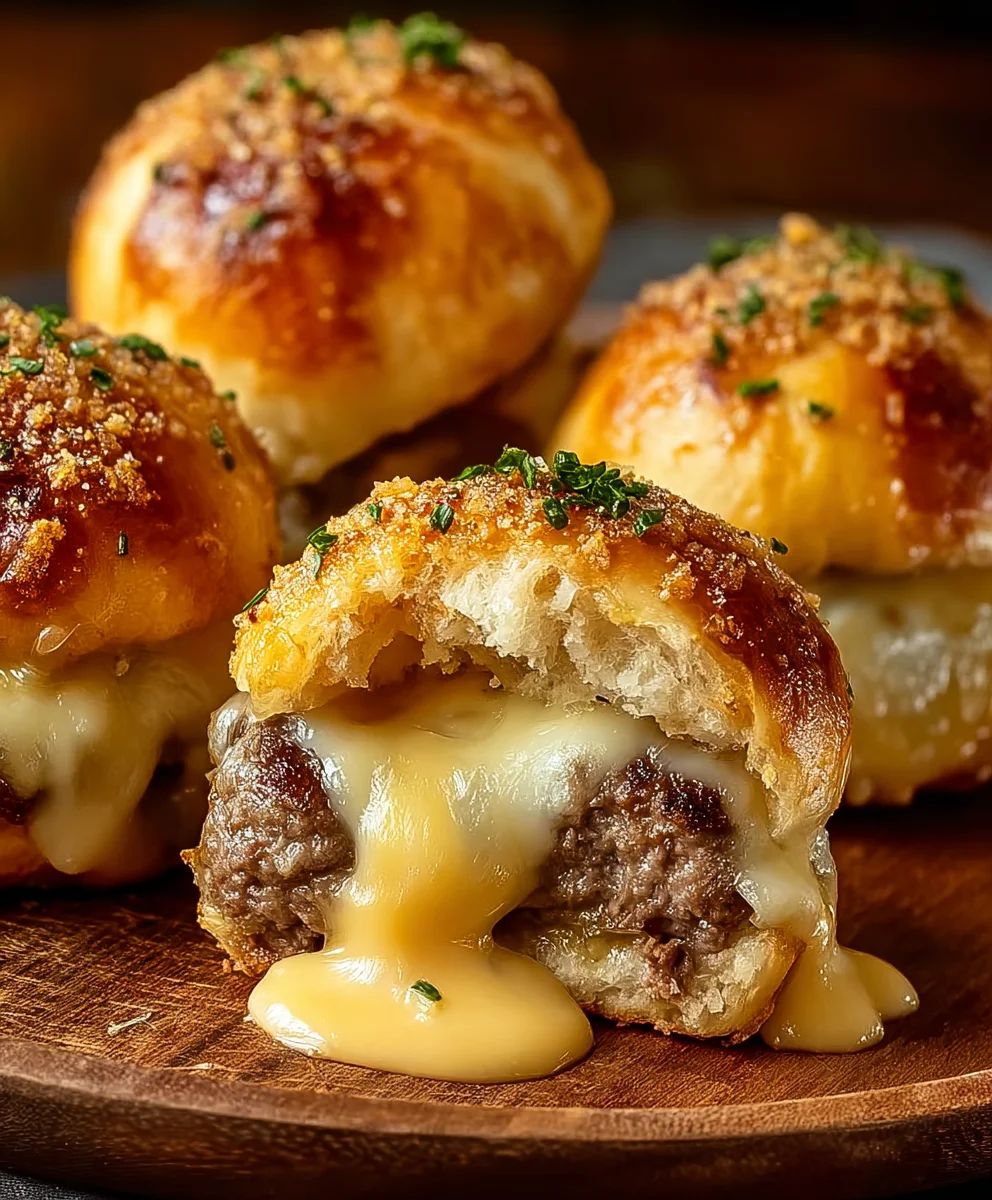
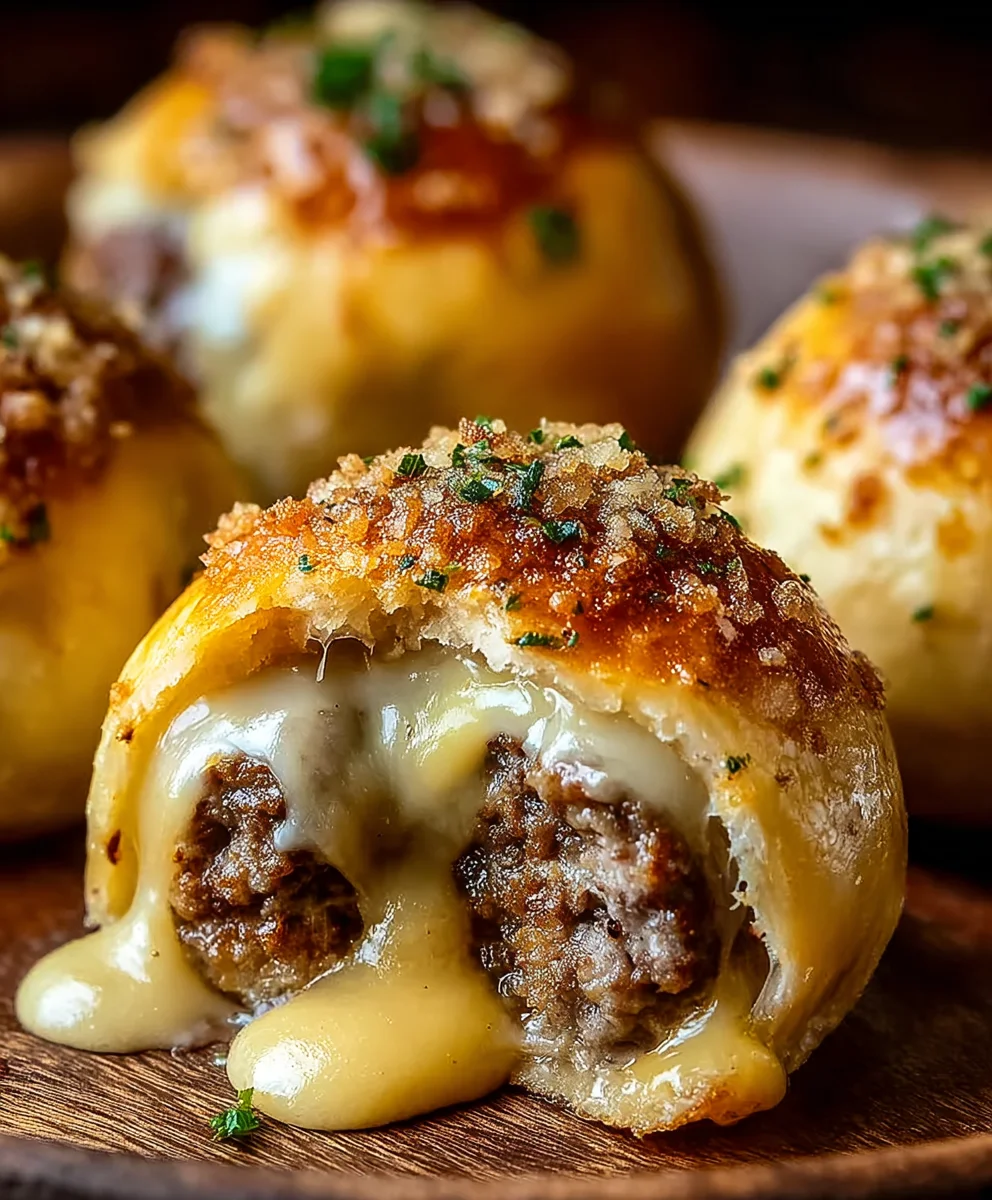
Garlic Parmesan Cheeseburger Bombs are about to revolutionize your snack game, weeknight dinner, or party appetizer spread. Imagine biting into a warm, golden-brown puff of dough, giving way to a savory explosion of seasoned ground beef, rich melted cheese, and the irresistible aroma of garlic and Parmesan. This isn’t just another take on a classic; it’s an innovative culinary creation that takes the beloved comfort of a cheeseburger and transforms it into an incredibly convenient, bite-sized delight. While the concept of a ‘cheeseburger’ boasts a rich American heritage as a true culinary icon, these ‘bombs’ represent a playful, modern evolution, perfect for sharing and easy enjoyment.
Why You’ll Fall in Love with Garlic Parmesan Cheeseburger Bombs
People adore this dish for its remarkable fusion of flavors and textures – the garlicky, cheesy crust provides the perfect counterpoint to the juicy, seasoned beef and gooey cheddar within. It’s the ultimate grab-and-go treat, minimizing mess while maximizing flavor. Whether you’re hosting a game day, need a quick family meal, or simply craving something extraordinary, these Garlic Parmesan Cheeseburger Bombs deliver pure satisfaction. Prepare for cheers and requests for the recipe; they truly are that good!
Ingredients:
-
For the Dough:
- 1 cup warm milk (about 105-115°F / 40-46°C) – I always ensure it’s just right, not too hot to kill the yeast, not too cold to inhibit it.
- 2 ¼ teaspoons active dry yeast (one standard packet) – The heart of our fluffy dough!
- 1 tablespoon granulated sugar – A little sweetness for the yeast to munch on.
- ½ teaspoon salt – For balancing flavors.
- ¼ cup unsalted butter, melted – Adds richness and tenderness to the dough.
- 1 large egg, lightly beaten – For structure and a beautiful golden crust.
- 3 to 3 ½ cups all-purpose flour, plus more for dusting – I start with 3 cups and add gradually.
-
For the Garlic Parmesan Cheeseburger Bomb Filling:
- 1 pound lean ground beef (80/20 or 90/10 works best) – Our delicious base for these incredible Garlic Parmesan Cheeseburger Bombs.
- ½ cup finely chopped yellow onion – For a touch of aromatic sweetness.
- 3-4 cloves garlic, minced – Essential for that irresistible garlic flavor in our Garlic Parmesan Cheeseburger Bombs.
- ½ teaspoon salt, or to taste – Seasoning for our beef.
- ¼ teaspoon black pepper, or to taste – A little kick!
- ½ cup shredded cheddar cheese – Melty goodness!
- ½ cup shredded mozzarella cheese – For extra stretch and creaminess inside the Garlic Parmesan Cheeseburger Bombs.
- ¼ cup grated Parmesan cheese – Adding that crucial savory, nutty punch to our Garlic Parmesan Cheeseburger Bombs.
- 2 tablespoons ketchup – A classic burger flavor.
- 1 tablespoon Dijon mustard – Adds a tangy depth.
- 1 teaspoon Worcestershire sauce – Enhances the savory beef flavor.
-
For the Garlic Parmesan Topping:
- ¼ cup unsalted butter, melted – For brushing that golden crust.
- 2-3 cloves garlic, minced – Can you ever have too much garlic? I think not, especially for Garlic Parmesan Cheeseburger Bombs!
- ¼ cup grated Parmesan cheese – Our crowning glory.
- 1 tablespoon fresh parsley, finely chopped (optional, for garnish) – For a pop of color and freshness.
Preparing the Dough
-
Activate the Yeast: In a large mixing bowl, I combine the warm milk, granulated sugar, and active dry yeast. I gently stir them together and then let this mixture sit for about 5-10 minutes. This is a crucial step! You’ll know the yeast is active when it becomes foamy and bubbly on top; this tells me it’s alive and ready to make our dough beautifully airy. If it doesn’t foam, your milk might have been too hot or too cold, or your yeast might be old. I’d recommend starting over with fresh yeast if that happens.
-
Combine Wet Ingredients: Once my yeast mixture is wonderfully frothy, I add the melted butter, the lightly beaten egg, and the ½ teaspoon of salt to the bowl. I whisk everything together thoroughly until it’s well combined. This ensures all the liquids are evenly distributed before we introduce the flour, which is key for a consistent dough texture for our Garlic Parmesan Cheeseburger Bombs.
-
Gradually Add Flour: Now, I start adding the all-purpose flour, about a cup at a time. I use a sturdy wooden spoon or a stand mixer with a dough hook for this. After each addition, I mix until the flour is just incorporated before adding the next. Initially, the dough will be quite sticky, which is perfectly normal. I continue adding flour until the dough comes together in a shaggy ball and begins to pull away from the sides of the bowl. I always aim for a dough that is soft and slightly tacky, but not overly sticky. Avoid adding too much flour too quickly, as this can result in tough Garlic Parmesan Cheeseburger Bombs.
-
Knead the Dough: If using a stand mixer, I continue to knead the dough on medium-low speed with the dough hook for about 7-8 minutes. If I’m kneading by hand, I turn the dough out onto a lightly floured surface and knead it for about 10-12 minutes. The goal is to develop the gluten, which gives our dough its elasticity and structure. I know it’s ready when the dough is smooth, elastic, and springs back slowly when I gently poke it with my finger. This diligent kneading ensures a wonderfully soft and chewy crust for our Garlic Parmesan Cheeseburger Bombs.
-
First Rise: I lightly grease a clean large bowl with a little olive oil or cooking spray. I place the kneaded dough into the bowl, turning it once to coat the entire surface with oil. Then, I cover the bowl tightly with plastic wrap or a clean kitchen towel. I let the dough rise in a warm, draft-free place for about 1 to 1 ½ hours, or until it has doubled in size. Patience is a virtue here! A good rise means incredibly light and airy Garlic Parmesan Cheeseburger Bombs.
Crafting the Filling for Your Garlic Parmesan Cheeseburger Bombs
-
Cook the Ground Beef: While the dough is on its first rise, I get to work on our savory filling. In a large skillet, I brown the ground beef over medium-high heat. I use a wooden spoon to break up the meat into small, even crumbles. Once the beef is fully cooked and no pink remains, I drain off any excess grease. This step is important for preventing soggy cheeseburger bombs. A lean ground beef helps minimize the grease, but even then, I always drain it thoroughly.
-
Sauté Aromatics: To the cooked and drained ground beef, I add the finely chopped yellow onion and the minced garlic. I cook these, stirring occasionally, for about 5-7 minutes, or until the onion has softened and turned translucent, and the garlic is fragrant. Oh, that smell is just incredible! It really starts to build the aromatic foundation for our Garlic Parmesan Cheeseburger Bombs.
-
Season the Filling: Next, I stir in the salt, black pepper, ketchup, Dijon mustard, and Worcestershire sauce. I mix everything together thoroughly, making sure the seasonings and sauces are evenly distributed throughout the beef and onion mixture. I let it simmer for another 2-3 minutes, allowing the flavors to meld and deepen. At this point, I often do a quick taste test and adjust the seasoning if needed. This forms the incredibly flavorful core of our Garlic Parmesan Cheeseburger Bombs.
-
Add the Cheeses: I remove the skillet from the heat and stir in the shredded cheddar cheese, shredded mozzarella cheese, and the grated Parmesan cheese. The residual heat from the beef mixture will start to melt the cheeses, creating a wonderfully gooey and cheesy filling. I give it a good stir until the cheeses are mostly melted and well incorporated. This cheesy goodness is what truly makes these Garlic Parmesan Cheeseburger Bombs live up to their name! I then set the filling aside to cool slightly while I prepare the dough.
Assembling Your Garlic Parmesan Cheeseburger Bombs
-
Preheat Oven and Prep Pan: I preheat my oven to 375°F (190°C). While it’s heating, I lightly grease a 9×13 inch baking dish or line a large baking sheet with parchment paper. This will prevent our delicious Garlic Parmesan Cheeseburger Bombs from sticking and ensure easy cleanup.
-
Punch Down Dough and Divide: Once the dough has doubled in size, I gently punch it down to release the air. Then, I turn the dough out onto a lightly floured surface. I typically divide the dough into 12 equal pieces. For accuracy, sometimes I even use a kitchen scale to ensure each piece is roughly the same weight, which helps in even baking. Each piece will become one of our perfect Garlic Parmesan Cheeseburger Bombs.
-
Shape the Dough: I take one piece of dough and flatten it into a circle, about 4-5 inches in diameter. I aim for the edges to be slightly thinner than the center. You want enough surface area to enclose the filling without having too much dough at the seams. It’s like preparing a little blanket for our savory filling.
-
Fill the Bombs: I place about 1 ½ to 2 tablespoons of the cooled cheeseburger filling in the center of each flattened dough circle. Don’t overfill! It can be tempting to pack in as much as possible, but too much filling makes it difficult to seal the bombs properly, risking leaks during baking. I make sure the filling is somewhat mounded in the center.
-
Seal the Bombs: Now for the fun part – forming our Garlic Parmesan Cheeseburger Bombs! I gather the edges of the dough up and over the filling, pinching them tightly together at the top to create a sealed ball. I make sure there are no gaps or holes where the filling could escape. Once sealed, I gently roll the bomb in my hands to create a smooth, round shape. This technique ensures a beautifully uniform final product. I repeat this process for all remaining dough pieces and filling.
-
Second Rise (Optional but Recommended): I arrange the sealed Garlic Parmesan Cheeseburger Bombs in my prepared baking dish or on the baking sheet, leaving a little space between each one. I usually cover them loosely with plastic wrap or a kitchen towel and let them rise for another 15-20 minutes while the oven finishes preheating. This short second rise helps them become even fluffier.
Baking Perfection
-
Prepare Garlic Parmesan Topping: While the Garlic Parmesan Cheeseburger Bombs are having their final little rest or baking, I prepare our delectable topping. In a small microwave-safe bowl, I melt the ¼ cup of unsalted butter. To this melted butter, I add the 2-3 cloves of minced garlic. I stir them together and set aside. This fragrant butter is going to take our Garlic Parmesan Cheeseburger Bombs to the next level.
-
Initial Bake: Once the oven is preheated and the bombs have had their optional second rise, I place the baking dish or sheet into the oven. I bake them for about 15-20 minutes, or until they are lightly golden brown on top. I keep an eye on them to prevent over-browning too early.
-
Apply Garlic Parmesan Topping: After the initial baking time, I carefully remove the Garlic Parmesan Cheeseburger Bombs from the oven. Using a pastry brush, I generously brush the tops of each bomb with the melted garlic butter mixture. This is where that signature garlic parmesan flavor really comes into play! Then, I sprinkle the ¼ cup of grated Parmesan cheese evenly over all the brushed bombs. The warmth of the dough and butter helps the cheese adhere beautifully.
-
Final Bake: I return the Garlic Parmesan Cheeseburger Bombs to the oven and continue baking for another 5-10 minutes, or until they are deeply golden brown, the cheese is bubbly and slightly crisped, and the internal temperature of the dough (if you were to check with a thermometer) reaches around 200°F (93°C). Every oven is different, so I always trust my eyes for that perfect golden hue. The aroma filling my kitchen at this stage is absolutely heavenly!
The Finishing Touch and Serving
-
Rest and Garnish: Once our incredible Garlic Parmesan Cheeseburger Bombs are baked to perfection, I carefully remove them from the oven. I like to let them rest in the baking dish for about 5 minutes before transferring them to a wire rack. This brief resting period allows the filling to set a bit and prevents them from falling apart when handled. If I’m feeling fancy, I’ll sprinkle them with a little fresh, finely chopped parsley for a pop of color and freshness. This really brightens up the presentation and adds another layer of subtle flavor to our already spectacular Garlic Parmesan Cheeseburger Bombs.
-
Serve Warm: These Garlic Parmesan Cheeseburger Bombs are absolutely best served warm, straight out of the oven. The dough is tender, the cheese is melty and gooey, and the garlic parmesan topping is at its most fragrant. They make an amazing appetizer, a fun party snack, or even a delightful main course served with a simple salad. I often serve them with extra ketchup, a tangy BBQ sauce, or even a zesty ranch dip on the side for dipping. Warning: they disappear fast! I always find myself wanting just one more because they are so incredibly satisfying and flavorful. Enjoy every single bite of these homemade Garlic Parmesan Cheeseburger Bombs!
Conclusion:
So, there you have it! We’ve journeyed through the simple, yet utterly delicious, process of creating what I believe will become a new favorite in your culinary repertoire. After making these time and time again for family gatherings, impromptu potlucks, and even just a cozy night in, I can confidently say that this recipe isn’t just another dish; it’s an experience. These Garlic Parmesan Cheeseburger Bombs are genuinely a must-try for anyone looking to impress with minimal effort, or simply to treat themselves to an explosion of savory goodness. What makes them truly special is that perfect harmony of juicy, seasoned beef and melted cheese, all encased in a tender, flaky dough, infused with the irresistible aroma and flavor of garlic and salty Parmesan. It’s comfort food elevated, offering that satisfying crunch and then a burst of flavor in every single bite. I’ve seen faces light up, and heard exclamations of delight, proving that this isn’t just my opinion – it’s a crowd-pleaser guaranteed to disappear quickly from any serving platter. They’re incredibly versatile, fitting perfectly into so many different occasions, from a casual weeknight dinner to the star appetizer at your next big game day party.
The beauty of these ‘bombs’ lies not only in their incredible taste but also in their playful, hand-held nature. They eliminate the need for utensils and make for a fun, interactive eating experience. Imagine the rich, savory notes of a classic cheeseburger, perfectly seasoned, combined with the pungent warmth of roasted garlic and the nutty, sharp bite of Parmesan cheese, all baked into a golden-brown, buttery shell. It’s a symphony of textures and tastes that truly sets this recipe apart. Plus, they’re surprisingly easy to assemble, making them ideal for even novice cooks who want to achieve professional-level deliciousness without the fuss. I truly believe that once you experience the ease of preparation and the incredible reward of that first bite, you’ll be adding these to your regular rotation. They manage to hit all the right notes: satisfyingly hearty, delightfully flavorful, and wonderfully convenient. Forget the traditional burger; this is a whole new, exciting way to enjoy those classic flavors, packed into a convenient and utterly irresistible package.
Serving Suggestions & Creative Variations:
When it comes to serving, these delightful bites are incredibly adaptable. Of course, they’re fantastic straight out of the oven, perhaps with a simple side of ketchup and mustard for dipping, embracing their cheeseburger roots. But why stop there? I often serve them with a warm marinara sauce for an Italian-American twist, or a cool, creamy ranch dressing which offers a lovely contrast to the rich beef. For an extra kick, a spicy sriracha mayo or a tangy barbecue sauce can elevate the experience even further. As for side dishes, consider pairing them with a fresh, crisp garden salad to balance the richness, or some homemade sweet potato fries for a more substantial meal. They also make an excellent addition to a soup and sandwich night, acting as a hearty “dipper” for a creamy tomato or broccoli cheddar soup. Think about them as the ultimate party appetizer – easy to pick up, no mess, and universally loved. For a brunch spread, they could even be a savory surprise!
And if you’re feeling adventurous, these Garlic Parmesan Cheeseburger Bombs are ripe for customization! Don’t hesitate to experiment with the fillings. For a leaner option, try ground turkey or chicken, perhaps even ground lamb for a more adventurous flavor profile. If you’re catering to vegetarians, plant-based ground crumbles work wonderfully, absorbing all the delicious seasonings. Swap out the cheeses – sharp cheddar, spicy pepper jack, creamy provolone, or even a blend of Monterey Jack and Colby would all be fantastic. You could also mix in some finely diced sautéed onions, jalapeños for a spicy kick, crispy bacon bits, or even some finely chopped mushrooms to the beef mixture before baking. A sprinkle of fresh herbs like parsley or chives into the beef can also add another layer of freshness. For those who enjoy a bit of sweetness, a touch of caramelized onions inside can be magical. The possibilities are truly endless, allowing you to tailor this recipe perfectly to your personal taste or whatever ingredients you have on hand. Don’t be afraid to make them your own signature creation!
Share Your Culinary Adventure!
Now that you’re armed with all the tips and tricks, I truly hope you’ll give these fantastic Garlic Parmesan Cheeseburger Bombs a try in your own kitchen. I promise you won’t regret it! They are so much more than just a recipe; they’re an invitation to create joy and share deliciousness. Don’t be shy about experimenting with the variations I’ve suggested, or even coming up with your own unique twists. That’s the real fun of cooking, isn’t it? Once you’ve whipped up your batch, I would absolutely love to hear about your experience. Did you add something new? What was your favorite dipping sauce? How did your family or friends react? Please share your thoughts, your photos, and any brilliant modifications you discover in the comments below. Your feedback and creativity not only inspire me but also help our wonderful community of home cooks. Happy baking, and I can’t wait to see what deliciousness you create!
Garlic Parmesan Cheeseburger Bombs
Garlic Parmesan Cheeseburger Bombs are savory, bite-sized delights with seasoned ground beef, melted cheese, and garlic Parmesan, wrapped in a golden-brown dough. Perfect for snacks, dinners, or party appetizers, offering a convenient and flavorful twist on a classic cheeseburger.
Ingredients
-
1 cup warm milk (105-115°F)
-
2 ¼ teaspoons active dry yeast
-
1 tablespoon granulated sugar
-
½ teaspoon salt
-
¼ cup unsalted butter, melted
-
1 large egg, lightly beaten
-
3 to 3 ½ cups all-purpose flour
-
1 pound lean ground beef
-
½ cup finely chopped yellow onion
-
3-4 cloves garlic, minced
-
½ teaspoon salt
-
¼ teaspoon black pepper
-
½ cup shredded cheddar cheese
-
½ cup shredded mozzarella cheese
-
¼ cup grated Parmesan cheese
-
2 tablespoons ketchup
-
1 tablespoon Dijon mustard
-
1 teaspoon Worcestershire sauce
-
¼ cup unsalted butter, melted (for topping)
-
2-3 cloves garlic, minced (for topping)
-
¼ cup grated Parmesan cheese (for topping)
-
1 tablespoon fresh parsley, finely chopped (optional)
Instructions
-
Step 1
In a large bowl, combine warm milk, sugar, and yeast; let sit 5-10 minutes until foamy. Whisk in melted butter, egg, and ½ tsp salt. Gradually add 3-3½ cups flour, mixing until a shaggy ball forms. Knead for 7-12 minutes until smooth and elastic. Lightly grease a bowl, place dough, cover, and let rise in a warm, draft-free place for 1-1½ hours until doubled in size. -
Step 2
While dough rises, brown 1 pound ground beef in a large skillet, breaking it up; drain excess grease. Add onion and 3-4 cloves minced garlic; cook 5-7 minutes until softened and fragrant. Stir in ½ tsp salt, ¼ tsp black pepper, ketchup, Dijon mustard, and Worcestershire sauce; simmer for 2-3 minutes. Remove from heat; stir in cheddar, mozzarella, and ¼ cup Parmesan cheese until mostly melted. Set aside to cool slightly. -
Step 3
Preheat oven to 375°F (190°C). Lightly grease a 9×13 inch baking dish or line a baking sheet. Punch down risen dough and divide into 12 equal pieces. Flatten each piece into a 4-5 inch circle. Place 1½-2 tablespoons of cooled filling in the center of each. Gather dough edges over the filling, pinch tightly to seal, and gently roll into a smooth ball. Arrange bombs in the prepared dish, leaving space. Optionally, cover loosely and let rise for another 15-20 minutes. -
Step 4
In a small microwave-safe bowl, melt ¼ cup unsalted butter and stir in 2-3 cloves minced garlic. Place bombs in the preheated oven and bake for 15-20 minutes, until lightly golden. Carefully remove from oven, generously brush tops with garlic butter, and sprinkle evenly with ¼ cup grated Parmesan cheese. Return to oven; bake for another 5-10 minutes, until deeply golden brown and cheese is bubbly and slightly crisped. -
Step 5
Carefully remove Garlic Parmesan Cheeseburger Bombs from the oven and let them rest in the baking dish for about 5 minutes. Optionally, sprinkle with fresh, finely chopped parsley for garnish. Serve warm with extra ketchup, BBQ sauce, or ranch dip on the side for dipping. Enjoy!
Important Information
Nutrition Facts (Per Serving)
It is important to consider this information as approximate and not to use it as definitive health advice.
Allergy Information
Please check ingredients for potential allergens and consult a health professional if in doubt.


Leave a Comment