
?p=8353 marks the beginning of an extraordinary culinary journey, one that promises to fill your home with the intoxicating aroma of freshly baked bread and your palate with unparalleled delight. Have you ever dreamed of pulling a crusty, golden loaf from your oven, its interior a marvel of airy, open crumb, just like those artisanal creations from the finest bakeries? Today, that dream becomes a delectable reality. This isn’t merely a recipe; it’s an invitation to connect with a timeless tradition, transforming simple ingredients into something truly magical.
The Enduring Appeal of Artisan Sourdough
The history of sourdough bread stretches back thousands of years, an ancient testament to human ingenuity and our innate desire for wholesome, satisfying food. Civilizations across the globe, from ancient Egypt to modern-day San Francisco, have cherished this living bread, appreciating its complex flavor profile and the natural fermentation process that makes it so unique. It’s more than just a staple; it’s a craft, a science, and an art form all rolled into one irresistible package. People adore this dish for its incredible depth of flavor, its satisfyingly chewy texture, and the glorious crust that shatters with each bite. Furthermore, the natural fermentation makes it easier to digest for many, adding a healthy dimension to its irresistible taste. Mastering ?p=8353, our definitive guide to crafting the perfect artisan sourdough, means you’re not just baking; you’re creating an experience, a connection to culinary heritage that enriches every meal.

Ingredients:
-
For the Rich Meat Sauce (Ragu):
- 2 tablespoons olive oil, divided
- 1 pound ground beef (80/20 lean, for flavor)
- 1/2 pound ground pork (optional, but highly recommended for depth)
- 1 large yellow onion, finely diced (about 1.5 cups)
- 2 medium carrots, peeled and finely diced (about 1 cup)
- 2 stalks celery, finely diced (about 1 cup)
- 4 cloves garlic, minced
- 1/2 cup dry red wine (such as Merlot or Chianti), optional but excellent for deglazing
- 2 (28-ounce) cans crushed tomatoes
- 1 (6-ounce) can tomato paste
- 1/2 cup beef broth or water
- 2 bay leaves
- 1 teaspoon dried oregano
- 1/2 teaspoon dried basil
- 1/4 teaspoon red pepper flakes (optional, for a hint of warmth)
- 1 teaspoon granulated sugar (to balance acidity)
- Salt and freshly ground black pepper, to taste
- 1/4 cup fresh parsley, chopped (for garnish, optional)
-
For the Velvety Béchamel Sauce:
- 1/2 cup (1 stick) unsalted butter
- 1/2 cup all-purpose flour
- 4 cups whole milk, warmed (important for a smooth sauce!)
- 1 teaspoon salt
- 1/4 teaspoon freshly ground black pepper
- 1/4 teaspoon freshly grated nutmeg (crucial for authentic béchamel)
-
For the Lasagna Assembly:
- 1 (12-ounce) package lasagna noodles (oven-ready/no-boil or traditional, prepared according to package directions)
- 15 ounces whole milk ricotta cheese
- 1 large egg, lightly beaten
- 1/2 cup grated Parmesan cheese, plus more for topping
- 1 pound low-moisture, whole-milk mozzarella cheese, shredded (divided)
- Salt and freshly ground black pepper, to taste (for the ricotta mixture)
Preparing the Rich Meat Sauce (Ragu)
This meat sauce, or ragu, is the heart and soul of our lasagna. Taking your time with this step will truly pay off in flavor.
-
Brown the Meats: Heat 1 tablespoon of olive oil in a large, heavy-bottomed pot or Dutch oven over medium-high heat. Add the ground beef and ground pork (if using). Break up the meat with a spoon and cook until it’s beautifully browned and no pink remains, about 8-10 minutes. This browning creates a fond, or flavorful caramelized bits at the bottom of the pan, which we’ll scrape up later. Drain off any excess grease, leaving just a tablespoon or two in the pot. Transfer the browned meat to a separate bowl and set aside.
-
Sauté the Aromatics: Reduce the heat to medium. Add the remaining 1 tablespoon of olive oil to the same pot. Add the diced onion, carrots, and celery. Cook, stirring occasionally, until the vegetables have softened and the onion is translucent, about 8-10 minutes. This slow sautéing allows the vegetables to release their natural sweetness and develop a deep, aromatic base for our sauce. We call this a “soffritto,” and it’s essential for Italian cooking!
-
Garlic and Tomato Paste: Add the minced garlic to the softened vegetables and cook for another minute until fragrant. Be careful not to burn the garlic! Next, stir in the tomato paste. Cook the tomato paste for 2-3 minutes, stirring constantly. Cooking the tomato paste separately helps to deepen its flavor and remove any raw, metallic taste, concentrating its sweetness.
-
Deglaze (Optional but Recommended): Pour in the red wine (if using) and scrape the bottom of the pot with a wooden spoon to loosen any browned bits from the meat and vegetables. Let the wine simmer and reduce by about half, which should take 3-5 minutes. This step adds incredible depth and complexity to the sauce, layering another level of flavor.
-
Combine and Simmer: Return the browned meat to the pot. Stir in the crushed tomatoes, beef broth (or water), bay leaves, dried oregano, dried basil, red pepper flakes (if using), and granulated sugar. Bring the sauce to a gentle simmer. Once simmering, reduce the heat to low, cover the pot partially, and let it cook for at least 1.5 to 2 hours, or even longer for a richer flavor. Stir occasionally to prevent sticking. A slow, long simmer is the secret to a truly outstanding ragu, allowing all the flavors to meld and deepen.
-
Season and Finish: After simmering, remove the bay leaves. Taste the sauce and adjust seasoning with salt and freshly ground black pepper as needed. Remember, a good sauce needs proper seasoning! If the sauce seems too thick, you can add a little more broth or water until it reaches your desired consistency. The sauce should be robust but still spreadable.
Crafting the Velvety Béchamel Sauce
Béchamel adds a creamy, luxurious counterpoint to the rich meat sauce. Don’t skip it; it makes all the difference!
-
Prepare the Roux: In a medium saucepan, melt the unsalted butter over medium heat. Once the butter is fully melted and shimmering, gradually whisk in the all-purpose flour. Continue to whisk constantly for 2-3 minutes, creating a smooth paste known as a roux. The roux should cook slightly, losing its raw flour taste, but it shouldn’t brown too much – we’re aiming for a “white roux” here.
-
Gradually Add Milk: Slowly, and I mean slowly, pour the warm milk into the roux, whisking continuously. Adding warm milk rather than cold milk helps prevent lumps and ensures a smooth, silky sauce. Start with a small amount, whisk until fully incorporated and smooth, then add more. Continue this process until all the milk has been added.
-
Thicken the Sauce: Bring the sauce to a gentle boil over medium heat, continuing to whisk. Once it reaches a boil, reduce the heat to low and simmer for 5-7 minutes, still whisking occasionally, until the sauce thickens to a consistency that coats the back of a spoon. It should be thick enough to cling to the noodles but still pourable. Patience is key here; don’t rush the thickening process.
-
Season the Béchamel: Remove the béchamel from the heat. Stir in the salt, freshly ground black pepper, and, most importantly, the freshly grated nutmeg. Nutmeg is the classic spice for béchamel and adds a wonderful subtle warmth and aroma that truly elevates the sauce. Taste and adjust seasoning if necessary. Keep the béchamel warm, or cover it directly with plastic wrap to prevent a skin from forming if you need to set it aside for a few minutes.
Prepping the Lasagna Noodles and Cheese
A little prep work now makes assembly much smoother.
-
Prepare Lasagna Noodles: If using traditional lasagna noodles, cook them according to package directions until al dente. Drain them well and immediately toss them gently with a tiny bit of olive oil to prevent them from sticking together. Lay them flat on parchment paper or a clean kitchen towel to cool slightly. If you’re using oven-ready/no-boil noodles, you can skip this step entirely – that’s one of their great conveniences!
-
Prepare Ricotta Mixture: In a medium bowl, combine the ricotta cheese, beaten egg, and 1/2 cup of grated Parmesan cheese. Season with a pinch of salt and freshly ground black pepper. Mix thoroughly until well combined. The egg acts as a binder, helping the ricotta hold its shape when baked.
-
Shred Mozzarella: If your mozzarella isn’t pre-shredded, now is the time to shred it. Freshly shredded mozzarella often melts more smoothly and beautifully than pre-shredded varieties which can contain anti-caking agents.
Assembling Our Magnificent Lasagna
Now comes the fun part – layering! Preheat your oven to 375°F (190°C).
-
Grease Dish and First Sauce Layer: Lightly grease a 9×13-inch baking dish. Spread about 1 to 1.5 cups of the meat sauce evenly over the bottom of the dish. This prevents the noodles from sticking and provides a flavorful base.
-
First Noodle Layer: Arrange a single layer of lasagna noodles over the meat sauce. Depending on your noodles and dish, you may need to overlap them slightly or break some to fit. Aim for as full a coverage as possible.
-
Ricotta Layer: Dollop about half of the ricotta cheese mixture evenly over the noodles. Use the back of a spoon to gently spread it out, leaving a small border around the edges. It doesn’t have to be perfectly smooth.
-
Meat Sauce Layer: Spoon about 1.5 to 2 cups of the meat sauce over the ricotta layer, spreading it gently but thoroughly to cover the ricotta. This ensures every bite has that rich, savory flavor.
-
Béchamel and Mozzarella Layer: Drizzle about 1 cup of the béchamel sauce over the meat sauce. Then, sprinkle generously with about one-third of the shredded mozzarella cheese. These layers of contrasting sauces and cheeses create incredible texture and flavor.
-
Repeat Layers: Place another layer of noodles on top. Follow with the remaining half of the ricotta mixture, spreading it out. Then, another 1.5 to 2 cups of meat sauce. Follow with another cup of béchamel and another one-third of the shredded mozzarella.
-
Final Layers: Add the final layer of noodles. Spread the remaining meat sauce over these noodles. Drizzle with the remaining béchamel sauce, ensuring good coverage. Finally, top generously with the remaining shredded mozzarella cheese and a final sprinkle of grated Parmesan cheese.
Baking and Resting for Perfection
We’re almost there! The aromas filling your kitchen will be incredible.
-
Cover and Bake: Cover the baking dish tightly with aluminum foil. To prevent the cheese from sticking to the foil, you can lightly spray the underside of the foil with cooking spray or tent it slightly so it doesn’t touch the cheese. Place the lasagna on a baking sheet (to catch any potential spills) and bake for 25 minutes.
-
Uncover and Brown: Remove the foil. Increase the oven temperature to 400°F (200°C) if your cheese isn’t browning nicely, though 375°F is usually sufficient. Continue to bake for another 25-35 minutes, or until the cheese is bubbling, golden brown, and the edges are slightly crispy. If the top is browning too quickly, you can loosely tent it with foil again.
-
The Crucial Resting Period: This step is often overlooked but is absolutely essential for a perfect lasagna. Once removed from the oven, let the lasagna rest for at least 15-20 minutes, or even up to 30 minutes, before slicing and serving. Why? Resting allows the layers to set, the sauces to redistribute, and the cheese to firm up slightly. If you cut into it too soon, it will be a messy, runny pile, no matter how delicious it tastes. Patience here will be greatly rewarded with clean, beautiful slices.
-
Serve and Enjoy: Once rested, slice into generous portions and serve hot. A sprinkle of fresh chopped parsley can add a lovely touch of color and freshness. This lasagna is wonderful on its own, or you could serve it with a simple green salad and some crusty bread to soak up any extra sauce. It’s a dish that truly embodies comfort and tradition, perfect for sharing with loved ones.
Conclusion:
So, there we have it! We’ve journeyed through the steps of creating what I genuinely believe is more than just a dish; it’s an experience. This recipe isn’t simply about combining ingredients; it’s about crafting moments, about bringing people together around a table, and about rediscovering the sheer joy of home cooking. What makes this particular culinary creation a resounding must-try, in my humble opinion, boils down to a few irresistible factors. First and foremost, the flavor profile we’ve explored is nothing short of extraordinary. It hits all the right notes: a perfect balance of savory depth, a touch of comforting warmth, and that delightful hint of freshness that leaves you craving just one more bite. It’s complex enough to feel gourmet, yet accessible enough that even novice cooks can achieve show-stopping results. I’ve personally seen faces light up after the first taste, and that, for me, is the ultimate testament to its brilliance. It’s also incredibly versatile, adapting effortlessly to different palates and occasions, making it a reliable star in your cooking repertoire. Beyond taste, its simplicity is a true blessing. We’ve managed to pack so much flavor and sophistication into a preparation that won’t have you slaving away in the kitchen for hours. In today’s busy world, finding a recipe that delivers maximum impact with minimal fuss is like striking gold, and this one, my friends, is pure culinary gold.
But the magic doesn’t end once it’s cooked and plated. One of the many reasons I adore this recipe is its incredible adaptability when it comes to serving. For a cozy weeknight dinner, I love pairing it with a simple side of fluffy basmati rice, allowing the sauce to truly shine, or perhaps some crusty artisan bread to sop up every last drop. If you’re aiming for something a bit lighter, a vibrant mixed green salad with a light vinaigrette makes for a refreshing counterpoint. For a more elevated presentation, perfect for entertaining guests, consider serving it alongside creamy mashed potatoes or a delicate quinoa pilaf infused with herbs. It really is a chameleon, fitting seamlessly into whatever dining occasion you have in mind, from a casual family meal to a more formal gathering. The possibilities are truly endless, and that’s what makes this recipe so incredibly rewarding.
And let’s talk variations! This recipe is a fantastic canvas for your own creativity. Feeling adventurous? Try incorporating some sautéed mushrooms or roasted bell peppers for added texture and earthy notes. If you’re leaning into a different flavor profile, a sprinkle of fresh cilantro or a squeeze of lime juice at the end can transport it to a whole new dimension. For those who prefer a touch of spice, a pinch of red pepper flakes during the cooking process will introduce a delightful kick. Looking for a vegetarian alternative? You can easily adapt the core flavors to embrace hearty chickpeas or tender roasted cauliflower, maintaining the essence while catering to diverse dietary needs. Don’t be afraid to experiment with different herbs – a sprig of fresh thyme or rosemary can dramatically alter the aroma and taste. It’s a recipe that invites you to make it truly your own, a culinary playground where imagination knows no bounds. Embrace your inner chef and put your personal stamp on this delightful creation.
So, I implore you, don’t just read about this incredible dish; roll up your sleeves and experience it for yourself! I promise, you won’t be disappointed. There’s an immense satisfaction that comes from creating something so delicious from scratch, and I truly believe this recipe will bring a smile to your face and to the faces of everyone you share it with. Once you’ve had the pleasure of preparing and tasting it, I would absolutely love to hear about your experience. Did you add your own unique twist? What was your favorite part? Sharing your culinary adventures inspires all of us in this wonderful community. Please feel free to leave a comment below with your thoughts, your photos, or any innovative variations you came up with. Or, if you prefer, share your creations on social media and tag us – we love seeing how you bring our recipes to life! Remember, when you’re looking for that go-to dish that truly impresses, just recall the magic of our recipe, uniquely identified by its post ID ?p=8353. It’s a true crowd-pleaser that deserves a spot in your weekly rotation. Go on, give it a try tonight! You won’t regret embarking on this delicious journey.
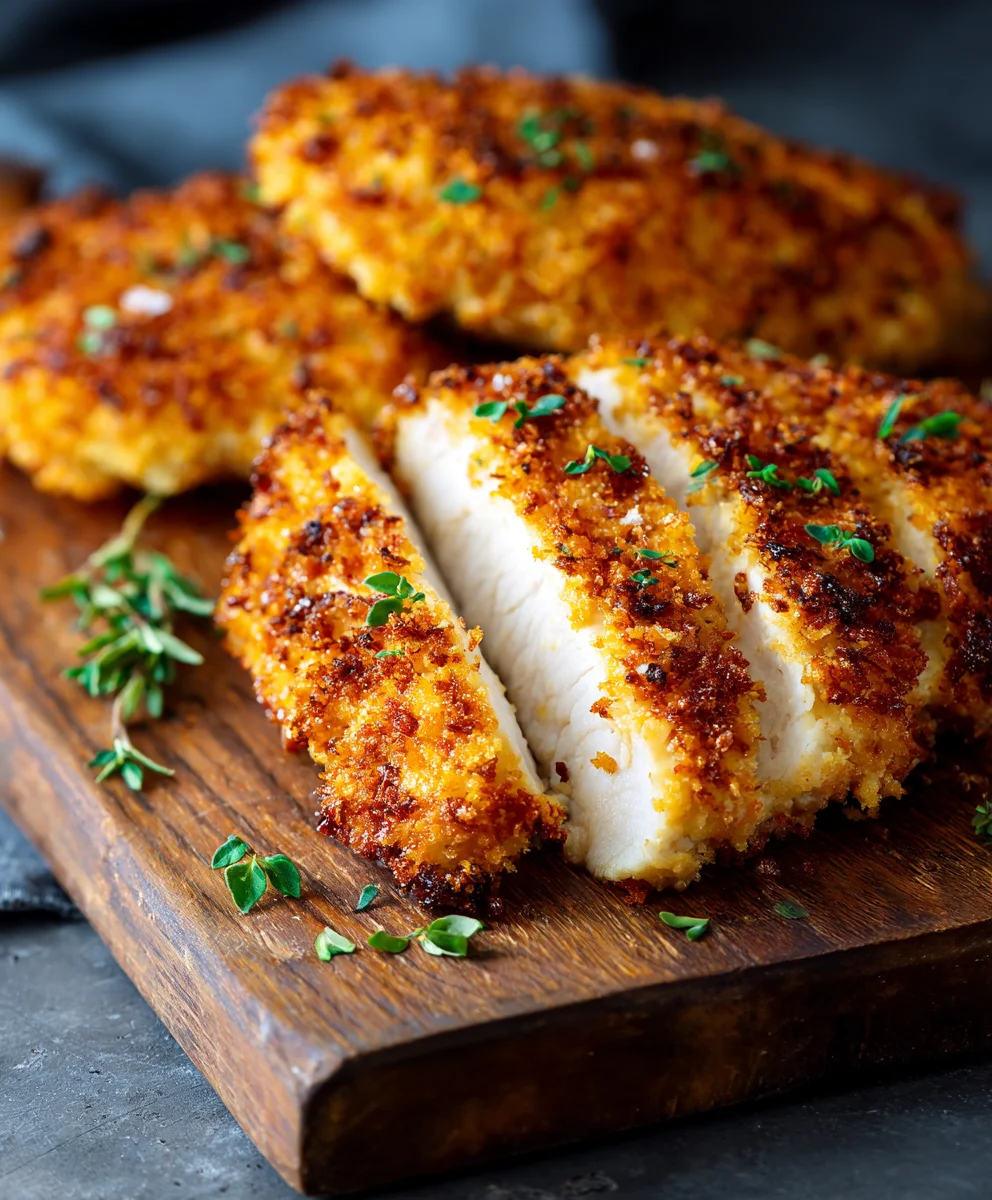
Crispy Baked Chicken Breasts
Simple and delicious crispy baked chicken breasts, seasoned with Italian herbs, garlic, and Parmesan, perfect on their own or as a base for a classic Chicken Parmesan dish.
Ingredients
-
4 boneless, skinless chicken breasts (approx. 1.5 lbs)
-
2 cloves fresh garlic, minced
-
1 cup freshly grated Parmesan cheese
-
1 cup panko breadcrumbs
-
2 tsp Italian seasoning
-
1 tsp salt
-
1/2 tsp pepper
-
Olive oil spray
Instructions
-
Step 1
Preheat oven to 400°F (200°C). Pat chicken breasts dry and pound to 1/2-inch thickness for even cooking. -
Step 2
In a shallow dish, combine the Parmesan cheese, panko breadcrumbs, Italian seasoning, salt, pepper, and minced garlic. -
Step 3
Lightly spray each chicken breast with olive oil. Dredge breasts thoroughly in the panko mixture, pressing to ensure a good coating on all sides. -
Step 4
Place coated chicken on a baking sheet. Lightly spray the tops with olive oil. Bake for 20-25 minutes, or until the internal temperature reaches 165°F (74°C) and the chicken is golden brown and crispy. Serve hot.
Important Information
Nutrition Facts (Per Serving)
It is important to consider this information as approximate and not to use it as definitive health advice.
Allergy Information
Please check ingredients for potential allergens and consult a health professional if in doubt.

Leave a Comment