
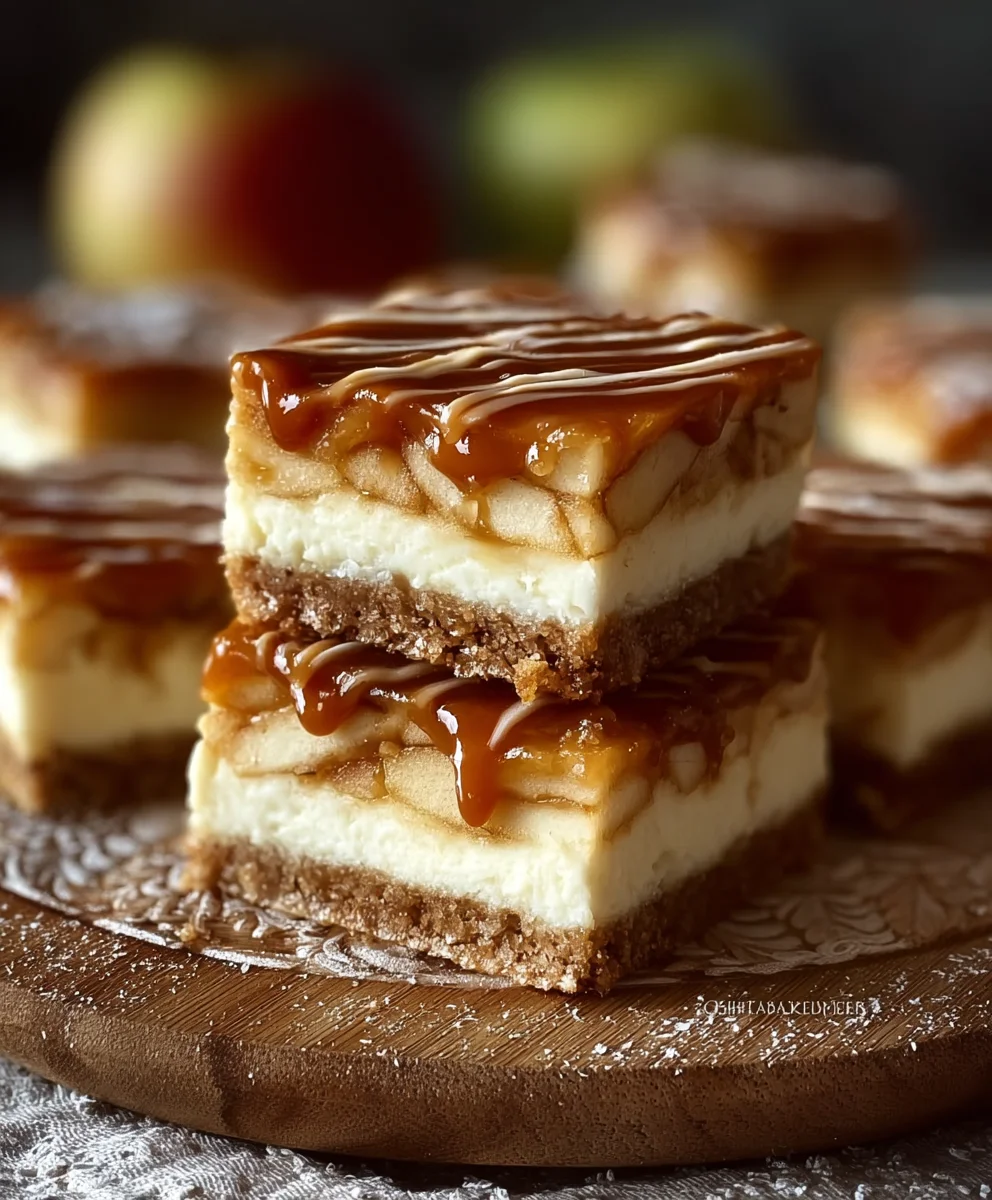
Salted Caramel Apple Cheesecake Squares – just the name evokes a delightful symphony of flavors, doesn’t it? As the leaves begin to turn and the air grows crisp, there’s nothing quite like a dessert that perfectly captures the essence of autumn. Imagine sinking your teeth into a treat where the comforting warmth of spiced apples meets the luxurious creaminess of a classic cheesecake, all brought to life with a captivating drizzle of sweet and salty caramel. I find this combination truly a celebration of seasonal bounty and modern culinary artistry.
While the precise combination of these exquisite Salted Caramel Apple Cheesecake Squares might be a contemporary masterpiece, each component boasts a rich heritage. Apples have been a beloved fruit for centuries, synonymous with harvest festivals and comforting pies, while cheesecake has roots stretching back to ancient Greece. The addition of salted caramel, a more recent but universally adored innovation, elevates this dish from simply delicious to absolutely irresistible. People adore this dish because it masterfully balances textures and tastes: the slight tartness of the apples, the silky-smooth, rich cream cheese filling, and that addictive sweet-savory contrast from the caramel that keeps you coming back for more. They’re also wonderfully convenient, baked in a pan and cut into perfect squares, making them an ideal dessert for sharing at gatherings or simply enjoying a decadent moment at home.
Ingredients:
- For the Graham Cracker Crust:
- 1 ½ cups (about 15-18 full sheets) finely ground graham cracker crumbs
- ¼ cup granulated sugar
- 6 tablespoons unsalted butter, melted
- Pinch of salt
- For the Creamy Cheesecake Filling:
- 3 (8-ounce) packages full-fat cream cheese, softened completely to room temperature
- 1 cup granulated sugar
- ½ cup full-fat sour cream, at room temperature
- 2 teaspoons pure vanilla extract
- ¼ teaspoon salt
- 3 large eggs, at room temperature
- For the Salted Caramel Apple Topping:
- 3 medium-sized apples (I love using a mix of Granny Smith for tartness and Honeycrisp for sweetness and texture), peeled, cored, and diced into ½-inch pieces
- 2 tablespoons unsalted butter
- ¼ cup packed light brown sugar
- ½ teaspoon ground cinnamon
- ¼ teaspoon ground nutmeg
- Pinch of salt
- 2 tablespoons apple cider or water
- For the Homemade Salted Caramel Sauce:
- 1 cup granulated sugar
- ¼ cup water
- 6 tablespoons unsalted butter, cut into 6 pieces, at room temperature
- ½ cup heavy cream, warmed slightly (you can microwave it for about 30 seconds)
- 1 teaspoon flaky sea salt (or ½ teaspoon fine sea salt), plus more for sprinkling
- Optional: 1 teaspoon pure vanilla extract (added after cooking)
Preparing the Graham Cracker Crust
- First things first, I always preheat my oven to 325°F (160°C). This ensures it’s perfectly ready when the crust is assembled. You’ll also want to lightly grease a 9×13-inch baking pan, then line it with parchment paper, leaving an overhang on the longer sides. This parchment “sling” will be your best friend later for easy removal of the baked Salted Caramel Apple Cheesecake Squares.
- Now, let’s get those graham crackers ready. In a medium bowl, combine your finely ground graham cracker crumbs with the granulated sugar and a pinch of salt. I find that a food processor makes quick work of turning full graham cracker sheets into fine crumbs, but a sturdy zip-top bag and a rolling pin work wonderfully too.
- Pour in the melted unsalted butter. Using a fork, stir everything together until the crumbs are evenly moistened and resemble wet sand. You want every crumb to have a buttery coating, which will help create a cohesive and sturdy base for our delicious cheesecake.
- Press the mixture firmly and evenly into the bottom of your prepared 9×13-inch baking pan. I like to use the flat bottom of a measuring cup or the back of a spoon to really compact the crust. The firmer you press, the less likely your crust is to crumble when you slice into your cheesecake squares.
- Pop the pan into your preheated oven and bake for 10-12 minutes, or until the edges are lightly golden and the crust smells wonderfully fragrant. This short bake time helps to set the crust, preventing it from becoming soggy once the cheesecake filling is added.
- Once baked, remove the crust from the oven and set it aside on a wire rack to cool completely while we prepare the other components. It’s crucial for it to be cool before adding the filling.
Crafting the Creamy Cheesecake Filling
- While your crust is cooling, let’s get started on that luscious cheesecake filling. Ensure your three blocks of full-fat cream cheese are truly at room temperature. This is perhaps the most critical step for a smooth, lump-free filling. If they’re cold, you’ll end up with lumps, no matter how much you mix.
- In a large mixing bowl, using an electric mixer (either a stand mixer with a paddle attachment or a hand mixer), beat the softened cream cheese on medium speed for about 2-3 minutes until it’s incredibly smooth and creamy. Scrape down the sides of the bowl frequently to ensure even mixing.
- Gradually add the granulated sugar, beating on medium-low speed until just combined. Continue to beat for another minute or two until the sugar is fully incorporated and the mixture looks light and fluffy. Avoid over-beating at this stage, as incorporating too much air can lead to cracks during baking.
- Next, gently mix in the room-temperature sour cream, pure vanilla extract, and ¼ teaspoon of salt. Beat on low speed until just combined and smooth. The sour cream adds a wonderful tang and extra creaminess to the cheesecake, making these Salted Caramel Apple Cheesecake Squares truly exceptional.
- Now, for the eggs. Add them one at a time, beating on the lowest speed possible just until each egg is incorporated before adding the next. I truly cannot emphasize this enough: do not overmix once the eggs are in! Overmixing introduces too much air, which expands during baking and then collapses, causing dreaded cracks in your beautiful cheesecake. Scrape down the bowl once after all eggs are added, and give it one final quick, gentle mix.
- Set your velvety smooth cheesecake filling aside while we prepare the tempting salted caramel apple topping.
Developing the Salted Caramel Apple Topping
- For the apple topping, I start by prepping my apples. Peel, core, and dice your apples into ½-inch pieces. I love using a mix of Granny Smith for that pleasant tartness that cuts through the richness of the cheesecake, and Honeycrisp for its sweet, crisp texture that holds up well during cooking.
- Melt the 2 tablespoons of unsalted butter in a large skillet over medium heat. Once melted and shimmering, add your diced apples. Stir to coat them evenly in the butter.
- Sprinkle the brown sugar, ground cinnamon, ground nutmeg, and a pinch of salt over the apples. Stir everything together until the apples are well coated with the spices and sugar.
- Cook the apples, stirring occasionally, for about 8-10 minutes. You want them to soften slightly but still retain a bit of a bite – we’re not making applesauce here! They should be tender-crisp.
- Pour in the 2 tablespoons of apple cider or water. This helps to create a lovely, light syrup and ensures the apples don’t dry out. Continue to cook for another 2-3 minutes, stirring, until the liquid has thickened slightly and glazed the apples.
- Remove the skillet from the heat and let the apple topping cool down a bit. It doesn’t need to be completely cold, but you don’t want to pour steaming hot apples onto your cheesecake filling.
Crafting the Homemade Salted Caramel Sauce
- This homemade salted caramel sauce is going to elevate our Salted Caramel Apple Cheesecake Squares to a whole new level! In a medium-heavy bottomed saucepan, combine the granulated sugar and water. Stir just until the sugar is moistened.
- Place the saucepan over medium-high heat. Without stirring, bring the mixture to a boil. Allow it to boil, watching carefully, until the syrup turns a beautiful amber color. This process usually takes about 8-12 minutes, depending on your stove. Do not stir during this stage! If you see sugar crystals forming on the sides of the pan, you can gently brush them down with a wet pastry brush.
- Once the caramel reaches your desired amber color (don’t let it get too dark, or it will taste burnt), immediately remove the pan from the heat. Carefully add the room temperature butter, one piece at a time, stirring constantly with a whisk. The mixture will bubble up quite vigorously, so be cautious! Continue whisking until all the butter is fully incorporated and the caramel is smooth.
- Next, slowly and carefully pour in the warmed heavy cream while whisking continuously. Again, the mixture will bubble up and seize a bit, but keep whisking until it smooths out and is fully incorporated. The warmth of the cream helps prevent the caramel from seizing too much.
- Stir in the flaky sea salt. If you’re using fine sea salt, you might want to start with ½ teaspoon and taste before adding more. This is “salted” caramel, after all, and that salt is key to balancing the sweetness. If you’re using vanilla extract, stir it in now.
- Allow the caramel sauce to cool in the saucepan for about 15-20 minutes, or until it has thickened slightly but is still pourable. As it cools, it will continue to thicken significantly. Transfer it to a heatproof jar or bowl. This sauce can be made ahead of time and stored in the refrigerator for up to 2 weeks. Reheat gently in the microwave or a saucepan over low heat until pourable before using.
Assembling and Baking Your Salted Caramel Apple Cheesecake Squares
- Preheat your oven to 325°F (160°C). Remember, we’re keeping the oven at a moderate temperature to encourage a slow, even bake, which helps prevent cracking in our cheesecake.
- Carefully pour the creamy cheesecake filling over the cooled graham cracker crust in your prepared 9×13-inch pan. Gently spread the filling evenly with an offset spatula or the back of a spoon.
- Now for the stars of the show! Spoon the cooled salted caramel apple topping evenly over the cheesecake filling. You can arrange it in rows, or simply spread it across the entire surface. I like to leave a small border around the edges so you can still see that beautiful creamy cheesecake peeking through.
- If you wish, drizzle about ¼ cup of your homemade salted caramel sauce over the apple topping at this stage. This will bake into the topping and create even more depth of flavor. Save the rest for garnishing later!
- Place the pan into your preheated oven. Bake for approximately 50-60 minutes. The cheesecake is done when the edges are set and lightly golden, but the center still has a slight jiggle to it when you gently shake the pan. Overbaking is a common cause of cracks, so resist the urge to bake until completely firm. It will continue to set as it cools.
- Once baked, turn off the oven, crack the oven door slightly, and allow the cheesecake to cool inside the oven for 1 hour. This slow cooling process also helps to prevent cracks caused by sudden temperature changes.
- After 1 hour in the oven, remove the pan and place it on a wire rack to cool completely at room temperature for another 2-3 hours. It must be completely cool to the touch before moving to the next step.
The Grand Finale: Chilling, Slicing, and Serving
- Once your Salted Caramel Apple Cheesecake Squares have completely cooled to room temperature, cover the pan loosely with plastic wrap. Transfer it to the refrigerator and chill for at least 6 hours, or ideally, overnight. This chilling step is absolutely crucial for the cheesecake to firm up properly and for the flavors to meld beautifully. Patience, my friend, will be rewarded!
- When you’re ready to serve, use the parchment paper overhang to carefully lift the entire cheesecake out of the pan and transfer it to a cutting board.
- For neat slices, I recommend using a long, sharp knife. Before each cut, dip the knife in hot water and wipe it clean. This will give you perfectly clean edges for each square. Slice the cheesecake into 12-16 squares, depending on your desired portion size.
- Generously drizzle the remaining homemade salted caramel sauce over each square just before serving. If your caramel has thickened too much, gently warm it in the microwave for a few seconds until it’s pourable again.
- For an extra touch of gourmet elegance, sprinkle a few extra flakes of sea salt over the caramel drizzle on each square. This really enhances the “salted caramel” aspect and makes these Salted Caramel Apple Cheesecake Squares truly unforgettable.
- Store any leftover cheesecake squares in an airtight container in the refrigerator for up to 4-5 days. Enjoy every single bite of these wonderfully rich, tangy, and sweet treats!
Conclusion:
And there you have it, my friends! We’ve journeyed through the creation of what I truly believe is one of the most magnificent desserts you’ll ever bake: these incredible Salted Caramel Apple Cheesecake Squares. This isn’t just another dessert recipe; it’s an experience, a symphony of flavors and textures that come together to create something truly magical. Why is this recipe a non-negotiable must-try for your kitchen? Because it masterfully blends the comforting warmth of spiced apples, the luxurious tang of creamy cheesecake, the satisfying crunch of a buttery graham cracker crust, and the undeniable allure of a rich, salty caramel finish. It’s the perfect marriage of autumnal goodness and classic dessert elegance, offering that ‘wow’ factor without being overly complicated. I’ve tried countless variations of apple desserts and cheesecakes, and I can tell you, hand on heart, that this particular combination hits every single note of perfection. Imagine the aroma filling your home as it bakes – a promise of pure, unadulterated bliss that your taste buds are about to confirm.
Elevate Your Dessert Experience: Serving Suggestions & Creative Twists
Now that you’ve poured your heart into creating these delectable Salted Caramel Apple Cheesecake Squares, let’s talk about how to present and enjoy them, and even a few ways to put your own creative spin on them. While they are absolutely divine enjoyed simply at room temperature, a slight chill from the refrigerator allows the cheesecake layer to firm up beautifully, offering a more defined bite. For an extra touch of indulgence, I love serving a square with a generous scoop of vanilla bean ice cream; the contrast between the cool creaminess and the slightly warmed square (if you heat it gently for a few seconds) is simply divine. A dollop of freshly whipped cream, perhaps infused with a hint of cinnamon or maple, would also be a spectacular accompaniment. And don’t forget a tiny sprinkle of flaky sea salt right before serving to really make that caramel sing!
Feeling adventurous? Consider these variations: For the crust, try substituting half of the graham crackers with crushed ginger snaps for a spicier, more aromatic base that complements the apples beautifully. When it comes to the apple layer, while Granny Smiths provide a wonderful tart balance, a mix of apples – say, Honeycrisp for sweetness and texture alongside a tart variety – can add even more depth. You could also fold in a handful of toasted pecans or walnuts into the apple mixture for an added layer of crunch and nutty flavor. For a truly decadent twist, consider drizzling a thin ribbon of melted dark chocolate over the top of the caramel layer once it’s set. This creates a chocolate-caramel-apple masterpiece that is truly unforgettable. Imagine serving these miniature versions at a holiday party by baking them in a muffin tin lined with paper cups; they become perfect, elegant individual desserts!
Your Culinary Adventure Awaits!
So, what are you waiting for? This is more than just a recipe; it’s an invitation to create something truly special, something that will bring smiles and sighs of contentment to everyone who tries it. I wholeheartedly encourage you to carve out some time this week, gather your ingredients, and embark on this delightful baking journey. Don’t be intimidated by the steps; each one builds towards an immensely rewarding final product. Trust me, the effort is well worth it, and you’ll be so proud of the masterpiece you pull from your oven. Once you’ve experienced the sheer delight of these Salted Caramel Apple Cheesecake Squares, I would absolutely love to hear about it! Did you try any of my serving suggestions? Did you come up with your own brilliant variation? What was the reaction of your family and friends? Please, share your baking triumphs and culinary adventures. Your feedback and experiences not only make my day but also inspire others in our wonderful community of home bakers. Happy baking, and enjoy every single incredible bite!
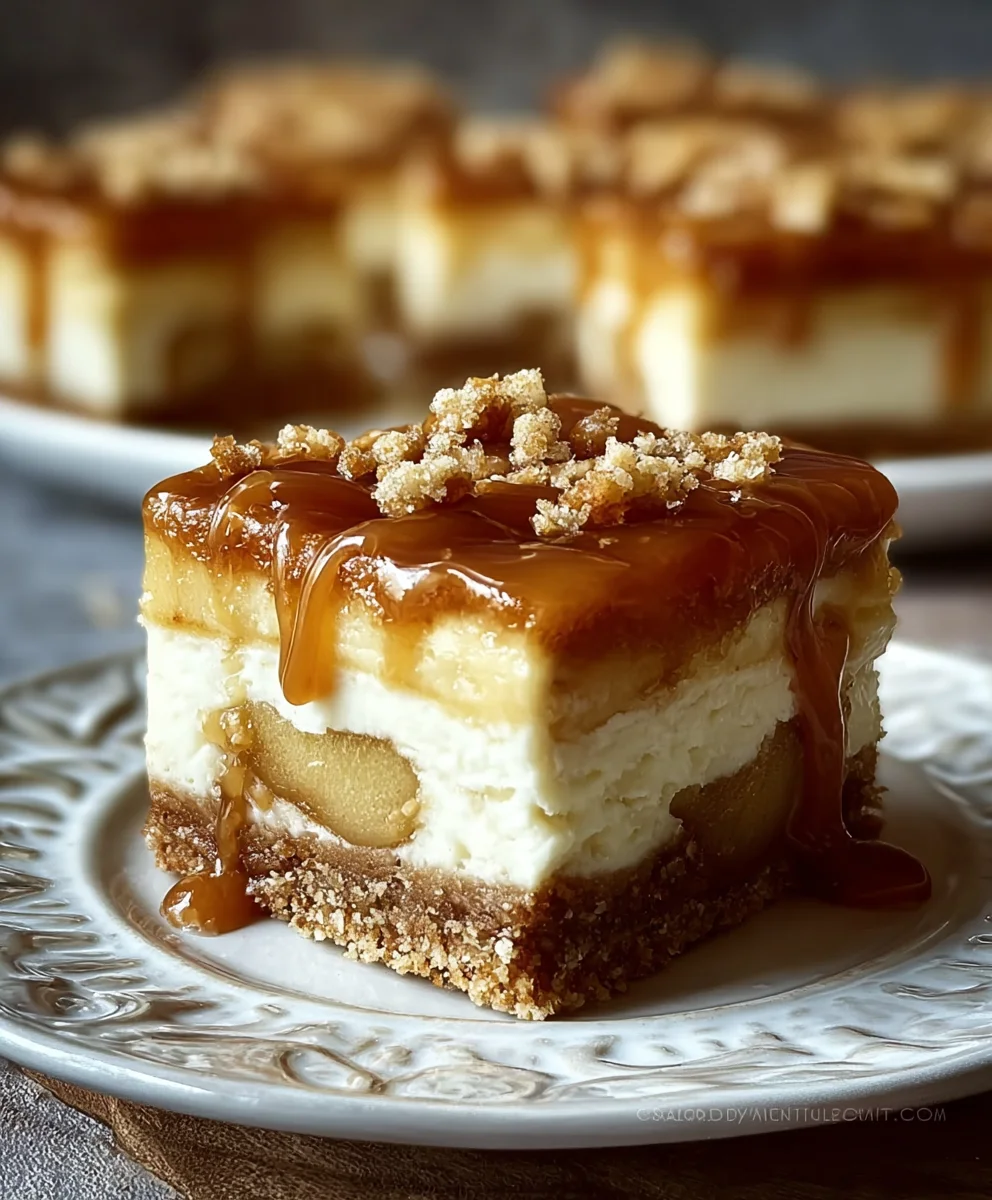
Salted Caramel Apple Cheesecake Squares
Salted Caramel Apple Cheesecake Squares combine the comforting warmth of spiced apples with creamy cheesecake, a graham cracker crust, and a sweet and salty caramel drizzle, perfect for autumn gatherings or a decadent treat at home.
Ingredients
-
1 ½ cups graham cracker crumbs
-
¼ cup granulated sugar (for crust)
-
6 tbsp unsalted butter, melted (for crust)
-
Pinch of salt (for crust)
-
3 (8-ounce) packages cream cheese, softened
-
1 cup granulated sugar (for filling)
-
½ cup sour cream, room temperature
-
2 tsp pure vanilla extract (for filling)
-
¼ tsp salt (for filling)
-
3 large eggs, room temperature
-
3 medium apples, peeled, cored, diced (e.g., Granny Smith, Honeycrisp)
-
2 tbsp unsalted butter (for apple topping)
-
¼ cup packed light brown sugar
-
½ tsp ground cinnamon
-
¼ tsp ground nutmeg
-
Pinch of salt (for apple topping)
-
2 tbsp apple cider (non-alcohol alternative) or water
-
1 cup granulated sugar (for caramel sauce)
-
¼ cup water (for caramel sauce)
-
6 tbsp unsalted butter, room temperature (for caramel sauce)
-
½ cup heavy cream, warmed
-
1 tsp flaky sea salt (or ½ tsp fine sea salt), plus more for sprinkling
-
1 tsp pure vanilla extract (optional, for caramel sauce)
Instructions
-
Step 1
Preheat oven to 325°F (160°C). Grease and line a 9×13-inch pan with parchment. Combine graham cracker crumbs, ¼ cup sugar, and a pinch of salt. Stir in 6 tbsp melted butter until moistened. Press crust firmly into the pan. Bake 10-12 minutes until golden. Cool completely. -
Step 2
Ensure cream cheese is at room temperature. In a large bowl, beat cream cheese for 2-3 minutes until smooth. Gradually add 1 cup sugar, beating until combined and fluffy. Mix in sour cream, 2 tsp vanilla extract, and ¼ tsp salt on low speed until smooth. Add 3 eggs one at a time on the lowest speed, mixing just until incorporated. Do not overmix. -
Step 3
Dice 3 apples (½-inch pieces). Melt 2 tbsp butter in a skillet. Add apples and stir. Sprinkle ¼ cup brown sugar, ½ tsp cinnamon, ¼ tsp nutmeg, and a pinch of salt over apples. Stir. Cook 8-10 minutes until tender-crisp. Add 2 tbsp apple cider (non-alcohol alternative) or water; cook 2-3 minutes until glazed. Remove from heat and cool slightly. -
Step 4
In a saucepan, combine 1 cup sugar and ¼ cup water. Cook over medium-high heat without stirring until amber (8-12 minutes). Remove from heat. Carefully whisk in 6 tbsp room temp butter, then slowly whisk in ½ cup warmed heavy cream until smooth. Stir in 1 tsp flaky sea salt (or ½ tsp fine sea salt) and optional 1 tsp vanilla extract. Cool for 15-20 minutes to thicken. -
Step 5
Preheat oven to 325°F (160°C). Pour cheesecake filling over the cooled crust and spread evenly. Spoon cooled apple topping over the filling. Drizzle with ¼ cup caramel sauce. Bake 50-60 minutes until edges are set but the center still jiggles slightly. Turn off oven, crack door, and cool in oven for 1 hour. Remove and cool completely at room temperature for 2-3 hours. -
Step 6
Cover and chill in refrigerator for at least 6 hours or overnight. Lift cheesecake from pan using parchment. Slice into 12-16 squares using a hot, clean knife. Drizzle remaining caramel sauce over each square before serving. Optionally, sprinkle with extra sea salt flakes. Store leftovers in an airtight container in the refrigerator for 4-5 days.
Important Information
Nutrition Facts (Per Serving)
It is important to consider this information as approximate and not to use it as definitive health advice.
Allergy Information
Please check ingredients for potential allergens and consult a health professional if in doubt.

Leave a Comment