
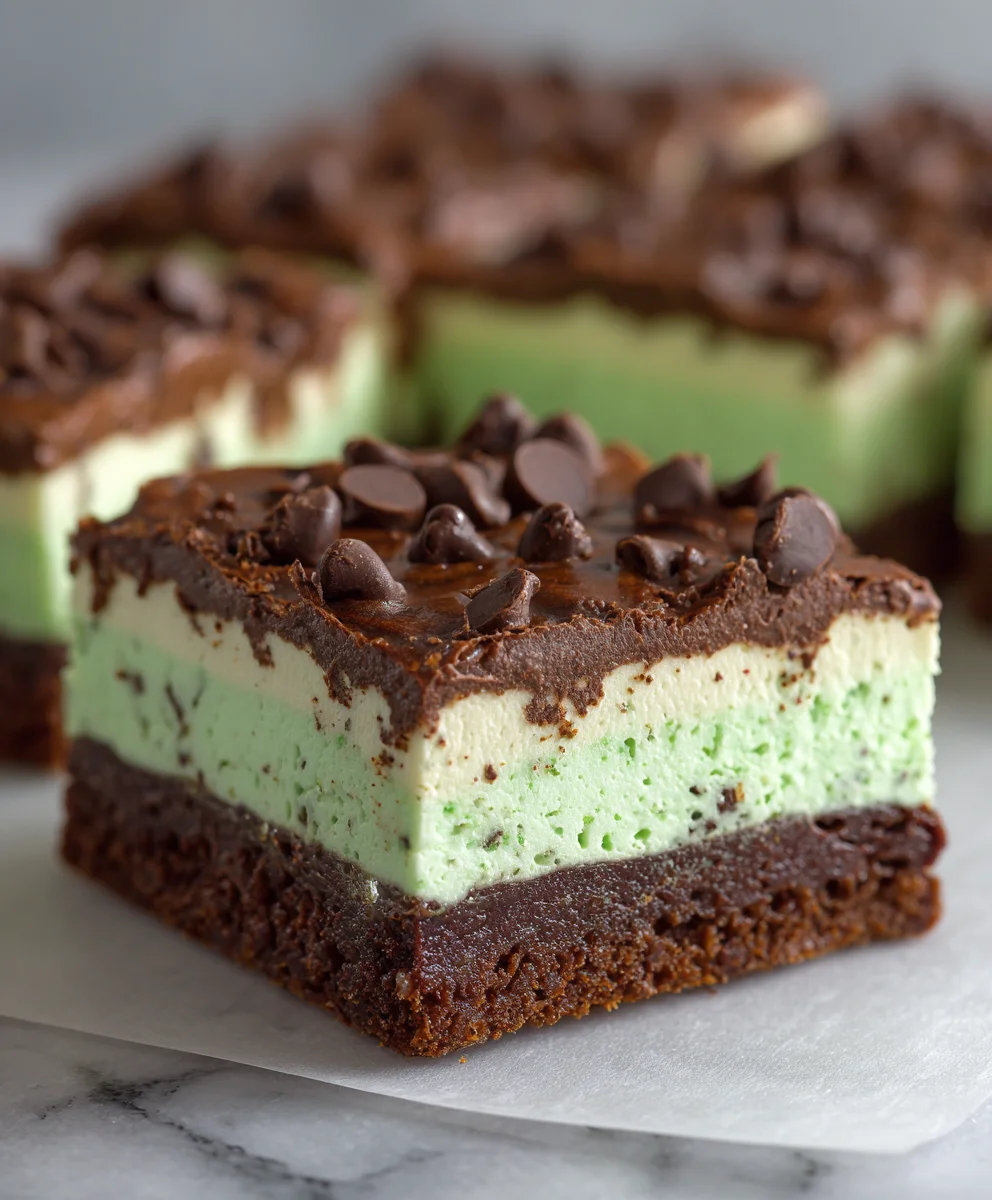
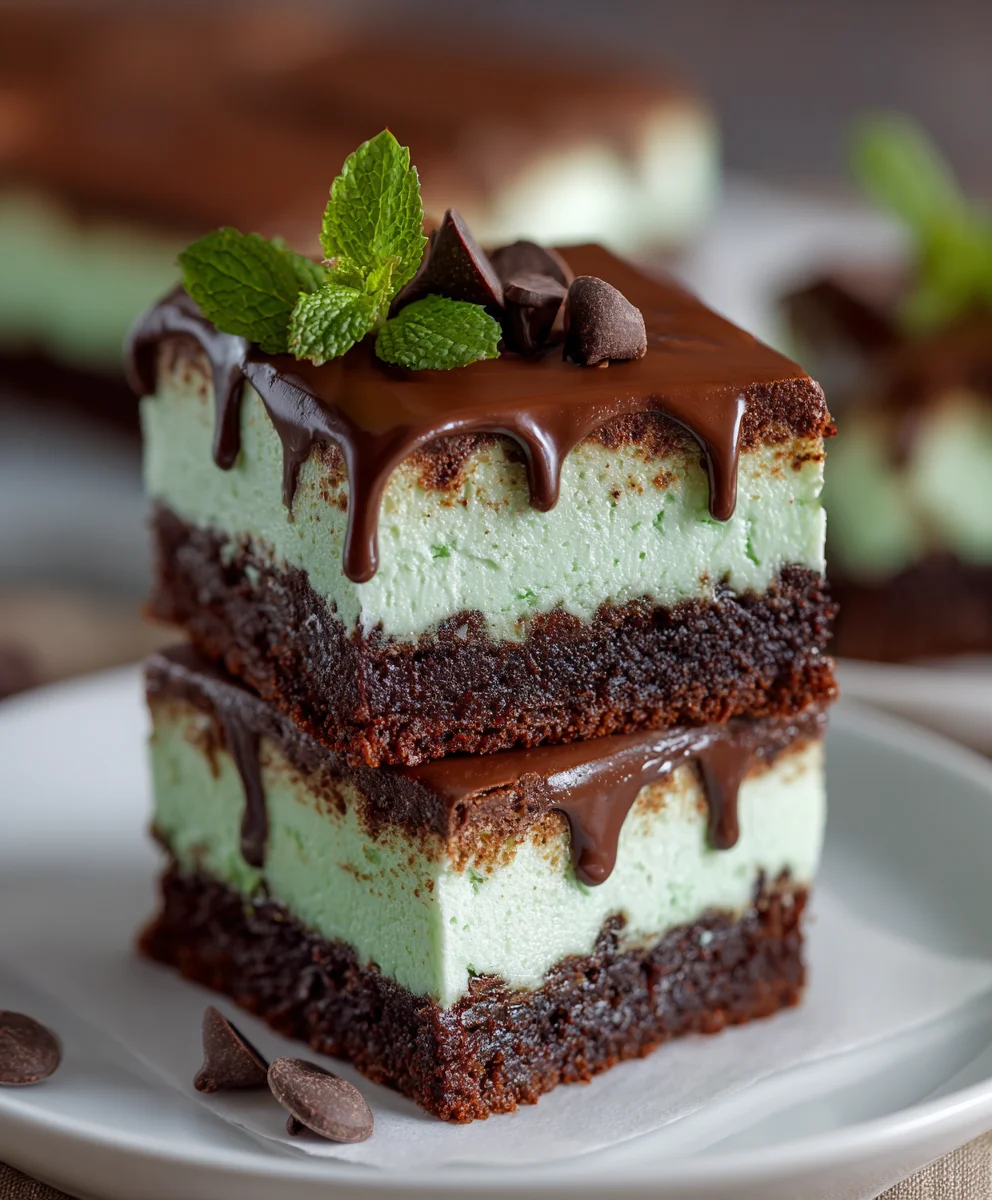
Mint Chocolate Chip Mousse Brownies are not merely a dessert; they represent a truly delightful culinary journey, meticulously crafted to enchant your palate with every exquisite bite. Imagine a supremely rich, intensely fudgy brownie base, providing the perfect dark chocolate foundation. Layered gracefully atop this indulgent canvas is a light, airy, and refreshingly cool mint chocolate chip mousse, generously studded with delicate dark chocolate chips that introduce a delightful textural contrast and an invigorating burst of flavor.
I find this particular dessert exceptionally captivating because it masterfully combines the comforting familiarity of a classic homemade brownie with the sophisticated, melt-in-your-mouth elegance of a mousse. While the vibrant mint chocolate chip flavor profile gained widespread popularity, particularly in ice cream across Western cultures, transforming it into this layered masterpiece truly elevates the experience. It’s an homage to beloved flavors presented in an entirely new, irresistible form.
People universally adore these Mint Chocolate Chip Mousse Brownies, not just for their striking visual appeal, but for the extraordinary symphony of textures and flavors they present. The deep cocoa notes, the invigorating coolness of mint, and the harmonious interplay of fudgy, airy, and crunchy elements create a balance that is both comforting and exhilarating. It’s a dessert that impresses effortlessly, yet remains surprisingly approachable to create, making it the perfect choice for both grand celebrations and simply elevating an ordinary evening into something truly extraordinary.
Ingredients:
For the Fudgy Brownie Base:
- 1 cup (2 sticks or 226g) unsalted butter
- 1 cup (170g) good quality semi-sweet chocolate chips or chopped baking chocolate
- 1 ½ cups (300g) granulated sugar
- ½ cup (100g) packed light brown sugar
- 4 large eggs, at room temperature
- 1 teaspoon vanilla extract
- 1 cup (125g) all-purpose flour
- ½ cup (45g) unsweetened cocoa powder (Dutch-processed for a darker, richer brownie)
- ½ teaspoon salt
For the Mint Chocolate Chip Mousse:
- 2 teaspoons unflavored gelatin powder (one standard packet)
- ¼ cup cold water
- 2 cups (480ml) heavy cream, divided
- ½ cup (100g) granulated sugar
- 2 large egg yolks
- 1 teaspoon pure peppermint extract (start with ¾ tsp and adjust to taste)
- A few drops of green food coloring (optional, but gives that classic mint look!)
- 1 cup (170g) mini semi-sweet chocolate chips
For the Chocolate Ganache Topping (Optional, but highly recommended!):
- ½ cup (120ml) heavy cream
- ½ cup (85g) semi-sweet chocolate chips or finely chopped chocolate
For Garnish (Optional):
- Additional mini chocolate chips
- Fresh mint leaves
Detailed Preparation Instructions:
Preparing the Fudgy Brownie Base:
This brownie layer is crucial for our amazing Mint Chocolate Chip Mousse Brownies. We want it rich, fudgy, and sturdy enough to hold that dreamy mousse. Trust me, it’s worth the effort!
- Preheat and Prep: Begin by preheating your oven to 350°F (175°C). Line a 9×13-inch baking pan with parchment paper, leaving an overhang on the longer sides. This overhang will act as a sling later, making it super easy to lift your brownies out of the pan. Lightly grease the exposed sides of the pan or spray the parchment with a little non-stick spray.
- Melt Chocolate and Butter: In a large, microwave-safe bowl or a heatproof bowl set over a saucepan of simmering water (a double boiler method), combine the unsalted butter and semi-sweet chocolate chips. If using a microwave, heat in 30-second intervals, stirring well after each, until both are completely melted and smooth. Be careful not to scorch the chocolate. If using a double boiler, stir until smooth. Once melted, remove from heat and let it cool slightly for about 5-10 minutes. This step is important to prevent the eggs from scrambling when added.
- Whisk in Sugars: To the slightly cooled chocolate mixture, add the granulated sugar and light brown sugar. Whisk vigorously for about 1-2 minutes until thoroughly combined and glossy. The sugar helps create that characteristic crinkly top on your brownies.
- Add Eggs and Vanilla: One at a time, crack in the large eggs, whisking well after each addition until fully incorporated. Don’t rush this part; ensuring each egg is fully mixed in contributes to the fudgy texture. Finally, stir in the vanilla extract. The mixture should be thick, smooth, and have a beautiful sheen.
- Combine Dry Ingredients: In a separate medium bowl, whisk together the all-purpose flour, unsweetened cocoa powder, and salt. Make sure there are no lumps of cocoa powder.
- Incorporate Dry into Wet: Gradually add the dry ingredient mixture to the wet chocolate mixture. Using a spatula, fold the ingredients together until just combined. Important: Be very careful not to overmix! Overmixing develops gluten in the flour, which can lead to tough, cakey brownies instead of the dense, fudgy texture we’re aiming for. A few streaks of flour are perfectly fine; they’ll disappear during baking.
- Bake the Brownie: Pour the brownie batter into your prepared 9×13-inch baking pan and spread it evenly with a spatula. Bake for 25-30 minutes, or until a toothpick inserted into the center comes out with moist crumbs attached, but not wet batter. The edges should look set. Remember, brownies continue to bake a little as they cool, so slightly under-baking them ensures maximum fudginess.
- Cool Completely: Once baked, remove the pan from the oven and let the brownie cool completely in the pan on a wire rack. This is crucial before adding the mousse. Attempting to add the mousse to a warm brownie will result in a melty mess. This could take 1-2 hours. Once cooled, you can lift the brownie out of the pan using the parchment paper overhang and place it on a flat surface or a serving platter, or simply leave it in the pan if you prefer to serve from there.
Crafting the Dreamy Mint Chocolate Chip Mousse:
This layer is what truly elevates these to “Mint Chocolate Chip Mousse Brownies.” It’s light, airy, and bursting with fresh mint flavor.
- Bloom the Gelatin: In a small bowl, sprinkle the unflavored gelatin powder over the cold water. Stir briefly and let it sit for about 5-10 minutes. The gelatin will “bloom” and thicken, resembling a pale, wobbly gel. This is essential for the mousse to set properly.
- Prepare the Custard Base: In a medium saucepan, combine 1 cup (240ml) of the heavy cream and the granulated sugar. Heat this mixture over medium heat, stirring occasionally, until the sugar is completely dissolved and the cream is hot, but not boiling. You’ll see small bubbles forming around the edges.
- Temper the Egg Yolks: While the cream is heating, lightly whisk the egg yolks in a separate medium bowl. Once the cream is hot, slowly pour about half of the hot cream mixture into the whisked egg yolks, whisking constantly. This is called tempering and prevents the yolks from scrambling. Then, pour the egg yolk mixture back into the saucepan with the remaining hot cream.
- Cook the Custard: Continue to cook the mixture over medium-low heat, stirring constantly with a whisk or a heatproof spatula, until the custard thickens enough to coat the back of a spoon (it should leave a clear trail when you run your finger across the spoon). This usually takes about 5-7 minutes. Do not let it boil.
- Add Gelatin and Flavor: Remove the custard from the heat. Stir in the bloomed gelatin until it is completely dissolved and no lumps remain. Then, stir in the pure peppermint extract. Start with ¾ teaspoon and taste; if you prefer a stronger mint flavor, add the remaining ¼ teaspoon. If desired, add a few drops of green food coloring at this stage, stirring until uniformly colored.
- Chill the Custard: Pour the mint custard mixture into a clean bowl and place it in the refrigerator to chill. Stir it every 10-15 minutes to prevent a skin from forming and to help it cool evenly. You want it to be cool to the touch, but not fully set – about the consistency of thick yogurt. This typically takes 45-60 minutes. This step is crucial; if the custard is too warm, it will melt the whipped cream in the next step.
- Whip the Remaining Cream: While the custard is chilling, pour the remaining 1 cup (240ml) of heavy cream into a large, cold bowl (chilling the bowl and beaters beforehand helps a lot!). Using an electric mixer on medium-high speed, whip the cream until soft to medium peaks form. You want it fluffy and light, but not stiff.
- Fold in the Cream and Chips: Once the mint custard is properly chilled and thickened, gently fold about a third of the whipped cream into the custard to lighten it. Then, carefully fold in the remaining whipped cream until no streaks remain. The goal is to keep as much air in the mousse as possible. Finally, gently fold in the mini semi-sweet chocolate chips.
Assembling the Mint Chocolate Chip Mousse Brownies:
Now for the exciting part – bringing it all together to create these stunning Mint Chocolate Chip Mousse Brownies!
- Layer the Mousse: Carefully spread the mint chocolate chip mousse evenly over the cooled brownie base. Use an offset spatula or the back of a spoon to create a smooth, level surface.
- Initial Chill: Place the pan in the refrigerator for at least 2-3 hours, or until the mousse is firmly set. This chilling time is absolutely necessary for the mousse to firm up and for the layers to meld beautifully. You want it to be firm enough that a light touch doesn’t leave an indent.
Preparing the Optional Chocolate Ganache Topping:
A glossy ganache adds an extra layer of chocolatey goodness and makes these brownies look incredibly professional.
- Heat Cream: In a small saucepan, heat the ½ cup heavy cream over medium heat until it just begins to simmer around the edges. Do not let it boil vigorously.
- Combine with Chocolate: Remove the cream from the heat and immediately pour it over the ½ cup semi-sweet chocolate chips in a heatproof bowl. Let it sit undisturbed for 5 minutes. This allows the hot cream to melt the chocolate.
- Whisk to Smooth: After 5 minutes, gently whisk the mixture starting from the center and working your way outwards until the ganache is completely smooth and glossy. If it’s too thick, you can add a tiny splash more cream; if it’s too thin, let it cool for a few minutes.
- Pour and Chill (Again!): Once the mousse layer is fully set, carefully pour the slightly cooled ganache over the mousse. Gently tilt the pan to spread the ganache evenly over the entire surface.
- Final Chill: Return the pan to the refrigerator for at least another 30-60 minutes, or until the ganache is set. This final chill ensures all layers are firm and easy to cut.
Serving Your Mint Chocolate Chip Mousse Brownies:
The moment of truth! Get ready for some deliciousness.
- Warm Knife for Clean Cuts: To get perfectly clean slices, fill a tall glass with hot water. Dip a sharp knife into the hot water, wipe it clean with a towel, and then make a cut. Repeat this process for each slice. This warms the blade, allowing it to glide through the chocolate and mousse without dragging.
- Garnish and Enjoy: Lift the entire slab of Mint Chocolate Chip Mousse Brownies out of the pan using the parchment paper sling. Transfer it to a cutting board. Cut into desired squares or rectangles. Garnish each piece with a sprinkle of additional mini chocolate chips and a fresh mint leaf for an elegant touch, if you wish.
- Storage: Store any leftover brownies in an airtight container in the refrigerator for up to 3-4 days. While they are best enjoyed chilled, letting them sit at room temperature for 10-15 minutes before serving can enhance the flavors and soften the texture slightly.
Conclusion:
Well, my friends, we’ve reached the delightful end of our journey into crafting one of the most irresistible desserts I’ve ever had the pleasure of sharing with you. I genuinely hope you’re feeling inspired and excited to dive into your kitchen to create these phenomenal Mint Chocolate Chip Mousse Brownies. This isn’t just another dessert recipe; it’s an experience, a symphony of textures and flavors that will undoubtedly earn you rave reviews from anyone lucky enough to take a bite. From the moment you taste that perfectly fudgy, rich chocolate brownie base, layered with a light, airy, and refreshingly cool mint chocolate chip mousse, you’ll understand why I’m so enthusiastic about it. It’s the kind of dessert that looks incredibly impressive, hinting at hours of meticulous work, but in reality, is surprisingly achievable, making it a fantastic showstopper for any occasion.
Why These Mint Chocolate Chip Mousse Brownies Are a True Game-Changer
What makes this particular recipe an absolute must-try? It’s the impeccable balance, truly. We start with a deeply chocolatey, moist, and dense brownie that provides the perfect grounding for the lighter elements. It’s chewy, satisfying, and full of that classic cocoa richness everyone adores. Then comes the star – the mint chocolate chip mousse. This isn’t just a simple topping; it’s a cloud-like, ethereal layer, infused with just the right amount of vibrant mint, creating a stunning contrast to the intense chocolate below. The tiny bursts of chocolate chips scattered throughout the mousse add a delightful textural surprise, ensuring every mouthful is a dynamic dance of soft, firm, and subtly crunchy. It’s cool and refreshing, yet deeply decadent all at once, offering a sophisticated twist on a beloved flavor combination. Imagine serving this after a hearty dinner – it’s light enough to cleanse the palate but rich enough to feel like a truly indulgent treat. It’s a dessert that transcends seasons, perfect for a refreshing summer get-together or a festive holiday celebration with its beautiful green hue. Trust me, the sheer delight on people’s faces when they taste the thoughtful combination of these elements is incredibly rewarding.
Elevate Your Dessert Experience: Serving Suggestions & Creative Variations
While these brownies are absolutely divine enjoyed simply chilled and straight from the pan, there are so many ways you can elevate the experience even further! For a classic touch, a light dusting of cocoa powder or powdered sugar over the top just before serving adds a professional flourish. For ultimate indulgence, consider a dollop of freshly whipped cream – perhaps even a mint-infused whipped cream for an extra burst of freshness – alongside a square. A few fresh mint leaves as garnish will really make the vibrant green mousse pop! If you’re feeling extra decadent, a scoop of premium vanilla bean ice cream or even a small scoop of more mint chocolate chip ice cream on the side creates an irresistible ensemble. For an adult pairing, consider serving this with a strong espresso, a rich dark roast coffee, or even a glass of a complementary after-dinner liqueur.
Don’t be afraid to get creative with variations too! For the brownie base, you could experiment with adding chopped walnuts or pecans for an extra nutty crunch, or swirl in a ribbon of salted caramel before baking for a sweet and savory surprise. If you prefer a darker chocolate profile, opt for a higher percentage cacao in your brownie mix. For the mousse, while the mint is iconic, you could adjust the intensity to your preference, or even try a subtle hint of almond extract alongside the mint for a unique twist. You could also swap out the semi-sweet chocolate chips in the mousse for mini white chocolate chips for a different visual and flavor dynamic, or even chop up some Andes Mints and fold those into the mousse for an extra punch of minty chocolate. For a fun party presentation, try making these in individual ramekins or small dessert glasses, layering the brownie crumbles with the mousse for a deconstructed, elegant look. The possibilities are truly endless once you master the core recipe!
Your Turn: Dive In and Share Your Sweet Success!
Now that you have all the tips, tricks, and inspiration you need, it’s your moment to shine! I promise you, making these brownies is a truly rewarding endeavor, and the smiles you’ll bring to faces (including your own!) will be well worth every moment spent in the kitchen. Don’t be intimidated by the layers; each step is straightforward, and the result is nothing short of spectacular. I truly cannot wait to hear about your experiences baking these sensational brownies. Please, please, please try this recipe and then come back and share your thoughts! Did you try any of the variations? What was your favorite part? Was there a specific moment where you felt like a dessert genius? I love hearing about your kitchen adventures and seeing your incredible creations. Join the conversation, share your photos, and let’s celebrate the joy of making and sharing truly delicious homemade treats together. Happy baking, my friends – may your kitchens be filled with the sweet aroma of success!
Mint Chocolate Chip Mousse Brownies: A Decadent Delight
Mint Chocolate Chip Mousse Brownies offer a delightful culinary journey, combining a rich, intensely fudgy brownie base with a light, airy, and refreshing mint white chocolate mousse. This layered masterpiece elevates beloved flavors into an irresistible form, perfect for grand celebrations or simply enhancing an ordinary evening.
Ingredients
-
1 cup (226g) unsalted butter
-
1 cup (170g) good quality semi-sweet chocolate chips or chopped baking chocolate
-
1 ½ cups (300g) granulated sugar
-
½ cup (100g) packed light brown sugar
-
4 large eggs, at room temperature
-
1 teaspoon vanilla extract
-
1 cup (125g) all-purpose flour
-
½ cup (45g) unsweetened cocoa powder (Dutch-processed)
-
½ teaspoon salt
-
2 teaspoons unflavored gelatin powder
-
¼ cup cold water
-
2 ¾ cups (660ml) heavy cream, divided (for mousse)
-
½ cup (100g) granulated sugar (for mousse)
-
2 large egg yolks
-
1 teaspoon pure peppermint extract (start with ¾ tsp and adjust to taste)
-
A few drops of green food coloring (optional, for mousse)
-
1 cup (170g) good quality white chocolate chips or chopped baking white chocolate (for mousse)
-
½ cup (120ml) heavy cream (for ganache)
-
½ cup (85g) semi-sweet chocolate chips or finely chopped chocolate (for ganache)
-
Additional mini chocolate chips (for garnish, optional)
-
Fresh mint leaves (for garnish, optional)
Instructions
-
Step 1
Preheat oven to 350°F (175°C). Line a 9×13-inch pan with parchment. Melt 1 cup (226g) unsalted butter and 1 cup (170g) semi-sweet chocolate chips in a large bowl. Cool slightly (5-10 min). -
Step 2
Whisk in 1 ½ cups (300g) granulated sugar and ½ cup (100g) light brown sugar (1-2 min). Whisk in 4 large eggs one at a time, then 1 tsp vanilla extract. -
Step 3
In a separate bowl, whisk 1 cup (125g) all-purpose flour, ½ cup (45g) cocoa powder, and ½ tsp salt. Fold dry ingredients into wet until just combined; do not overmix. -
Step 4
Pour batter into pan, spread evenly. Bake for 25-30 min, until a toothpick comes out with moist crumbs. Cool completely in pan on wire rack (1-2 hours) before adding mousse. -
Step 5
In a small bowl, sprinkle 2 tsp gelatin over ¼ cup cold water; let sit 5-10 min. In another heatproof bowl, melt 1 cup (170g) white chocolate chips with ¾ cup heavy cream over low heat until smooth. Let cool to room temp. -
Step 6
In a saucepan, heat 1 cup (240ml) heavy cream and ½ cup (100g) granulated sugar until hot and sugar dissolves. Lightly whisk 2 egg yolks. Slowly pour half hot cream into yolks, whisking, then return to saucepan. Cook over medium-low heat, stirring constantly, until thickened to coat a spoon (5-7 min); do not boil. -
Step 7
Remove custard from heat. Stir in bloomed gelatin until dissolved. Stir in 1 tsp peppermint extract (adjust to taste) and green food coloring (optional). Pour into a clean bowl and chill in fridge, stirring every 10-15 min, until cool and thickened (like thick yogurt, 45-60 min). -
Step 8
While custard chills, whip remaining 1 cup (240ml) heavy cream in a cold bowl until soft to medium peaks. Gently fold a third of whipped cream into chilled custard, then fold in remaining whipped cream. Finally, gently fold in the cooled melted white chocolate mixture. -
Step 9
Spread mint chocolate mousse evenly over the completely cooled brownie base. Chill in refrigerator for at least 2-3 hours, until mousse is firmly set. -
Step 10
Heat ½ cup (120ml) heavy cream until simmering. Pour over ½ cup (85g) semi-sweet chocolate chips; let sit 5 min. Whisk until smooth and glossy. Pour slightly cooled ganache over set mousse; gently tilt to spread evenly. -
Step 11
Return to refrigerator for another 30-60 min, until ganache is set. For perfectly clean slices, dip a sharp knife in hot water, wipe clean, then cut. Lift brownies from pan with parchment, cut into squares, and garnish with extra mini chocolate chips and fresh mint leaves, if desired. Store leftovers in an airtight container in the fridge for 3-4 days.
Important Information
Nutrition Facts (Per Serving)
It is important to consider this information as approximate and not to use it as definitive health advice.
Allergy Information
Please check ingredients for potential allergens and consult a health professional if in doubt.


Leave a Comment