
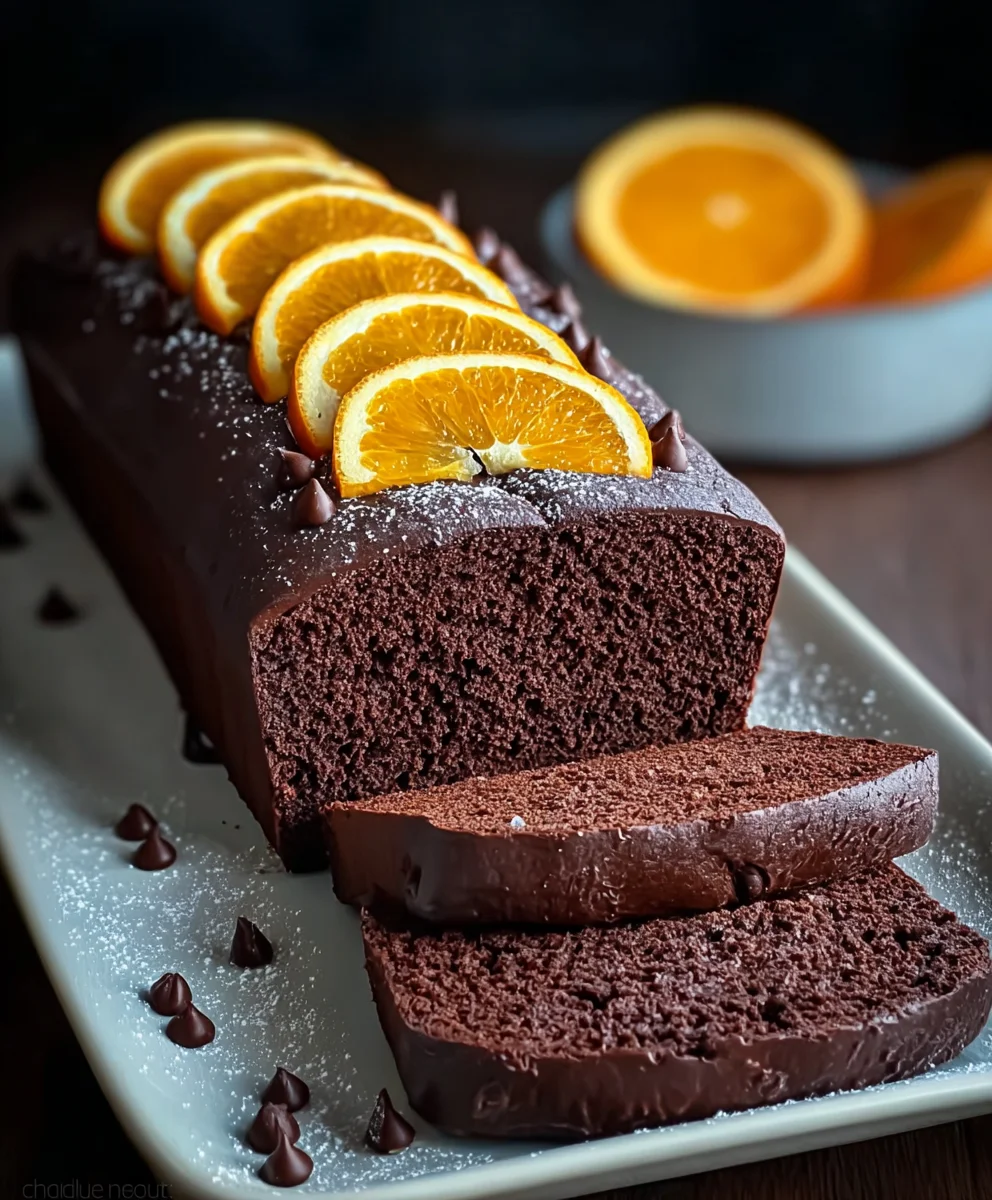
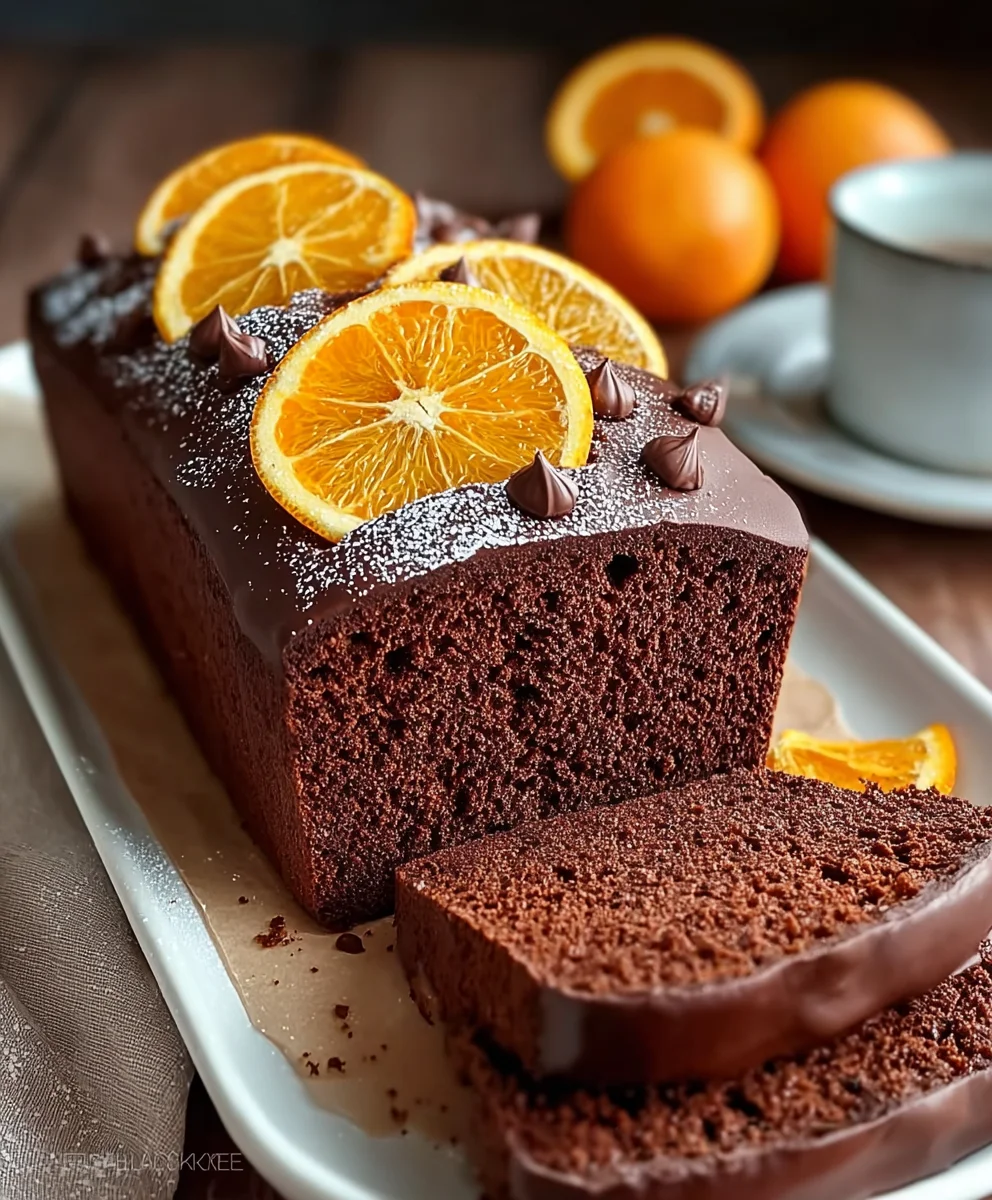
Chocolate Orange Loaf Cake – isn’t the very name enough to evoke images of warmth, comfort, and pure indulgence? I find this particular combination utterly captivating, a harmonious blend where the vibrant zest of sun-kissed oranges dances playfully with the deep, luxurious notes of rich cocoa. There’s an undeniable magic that happens when these two classic flavors unite, a pairing celebrated across cultures and through generations, especially cherished in desserts that promise both satisfaction and a touch of elegance.
This isn’t just any cake; it’s a delightful experience waiting to unfold. I believe its enduring popularity stems from its exquisite balance: the bright, citrusy lift perfectly cutting through the sweetness of the chocolate, creating a moist, tender crumb that melts in your mouth with every bite. Whether you’re seeking a sophisticated treat for an afternoon tea, a comforting dessert for a cozy evening, or a thoughtful gift for a loved one, this Chocolate Orange Loaf Cake effortlessly fits the bill. Its simple elegance and utterly irresistible flavor make it a beloved staple for any occasion, consistently earning rave reviews from everyone who tries it.
Ingredients:
- For the Chocolate Orange Loaf Cake:
- 200g (1 ¾ cups) All-Purpose Flour
- 1 teaspoon Baking Powder
- ½ teaspoon Baking Soda
- ¼ teaspoon Salt
- 170g (¾ cup) Unsalted Butter, softened to room temperature
- 200g (1 cup) Granulated Sugar
- 2 Large Eggs, at room temperature
- 1 teaspoon Vanilla Extract
- Zest of 2 Large Oranges (about 2 tablespoons)
- 120ml (½ cup) Freshly Squeezed Orange Juice (from 1-2 large oranges)
- 60ml (¼ cup) Whole Milk, at room temperature
- 100g (⅔ cup) Dark Chocolate Chips or chopped Dark Chocolate (50-70% cocoa)
- For the Zesty Chocolate Orange Glaze (Optional but Highly Recommended!):
- 100g (¾ cup) Powdered Sugar (Confectioners’ Sugar)
- 2 tablespoons Freshly Squeezed Orange Juice
- 1 tablespoon Melted Unsalted Butter
- ½ teaspoon Vanilla Extract
- 1-2 teaspoons Unsweetened Cocoa Powder (for a chocolate drizzle effect)
- A tiny pinch of Orange Zest (for garnish, optional)
- For Garnishing (Optional):
- Thin slices of fresh orange
- Additional orange zest
- A sprinkle of finely chopped dark chocolate or chocolate shavings
Preparation: Setting the Stage for Your Perfect Chocolate Orange Loaf Cake
1. Preheat Your Oven and Prepare Your Loaf Pan: Let’s get things started! I always begin by preheating my oven to 175°C (350°F). This ensures the oven is at a consistent temperature when the cake goes in, which is crucial for even baking. Next, take a standard 9×5-inch (23×13 cm) loaf pan. I like to lightly grease it with butter or cooking spray, then line it with parchment paper, leaving an overhang on the longer sides. This creates “slings” that make it incredibly easy to lift your beautiful Chocolate Orange Loaf Cake out of the pan once it’s baked and cooled. Trust me, it saves a lot of potential heartbreak!
2. Prepare Your Dry Ingredients: In a medium-sized bowl, we’re going to whisk together all our dry components. This includes the 200g (1 ¾ cups) all-purpose flour, 1 teaspoon baking powder, ½ teaspoon baking soda, and ¼ teaspoon salt. I always recommend sifting these together if you have the time; it truly helps to aerate the flour and ensures there are no lumps, leading to a much lighter and more even crumb in your finished Chocolate Orange Loaf Cake. A good whisk for about 30 seconds should do the trick otherwise, making sure everything is thoroughly combined. Set this aside for now.
3. Zest and Juice Your Oranges: Now for the star of the show – the oranges! Using a microplane or a fine grater, carefully zest two large oranges. You’re looking for about 2 tablespoons of fragrant zest. Be mindful to only get the bright orange part and avoid the bitter white pith underneath. Place this beautiful zest directly into your mixing bowl with the softened butter and sugar – the oils in the zest will infuse wonderfully during the creaming process. Then, halve your zested oranges and squeeze out 120ml (½ cup) of fresh orange juice. You might need one or two oranges depending on their size and juiciness. Strain the juice to remove any pulp or seeds and set it aside. This fresh juice is absolutely key to the vibrant orange flavor in our Chocolate Orange Loaf Cake!
Crafting the Exquisite Chocolate Orange Loaf Cake Batter
4. Cream Together Butter, Sugar, and Orange Zest: In a large mixing bowl, preferably using an electric mixer (stand mixer or hand mixer), combine the 170g (¾ cup) softened unsalted butter with the 200g (1 cup) granulated sugar and the orange zest you just prepared. Beat this mixture on medium-high speed for about 3-5 minutes. What you’re looking for is a transformation: the mixture should become light, fluffy, and significantly paler in color. This creaming process is vital as it incorporates air into the butter and sugar, which contributes immensely to the cake’s light and tender texture. It’s the foundation of a truly excellent Chocolate Orange Loaf Cake.
5. Add Eggs and Vanilla: Reduce the mixer speed to medium-low. Add the two large eggs, one at a time, beating well after each addition. Make sure each egg is fully incorporated before adding the next. This step helps to create a stable emulsion, preventing the batter from splitting. After the eggs are in, add 1 teaspoon of vanilla extract and beat for another 30 seconds until just combined. The batter should look smooth and creamy. Don’t forget to scrape down the sides and bottom of the bowl with a rubber spatula frequently to ensure everything is evenly mixed.
6. Alternate Adding Dry Ingredients and Liquids: This is a crucial step for the perfect texture of your Chocolate Orange Loaf Cake. We’re going to add the dry ingredient mixture and the liquid ingredients (orange juice and milk) alternately to the butter mixture, beginning and ending with the dry.
- First, add about one-third of the dry ingredients to the bowl. Mix on low speed until just barely combined – a few streaks of flour are perfectly fine at this stage.
- Next, pour in half of the combined orange juice and whole milk (so, about 90ml or ⅜ cup of the liquid mixture). Mix on low speed until just incorporated.
- Then, add another one-third of the dry ingredients, mixing until just combined.
- Follow this with the remaining half of the liquid mixture, mixing gently until just incorporated.
- Finally, add the last one-third of the dry ingredients. Mix on the lowest speed only until no dry streaks of flour remain. It’s incredibly important not to overmix the batter at this stage. Overmixing develops the gluten in the flour too much, which can lead to a tough and dense cake, and we want our Chocolate Orange Loaf Cake to be tender and moist. A light hand is key here!
7. Gently Fold in the Dark Chocolate Chips: Now for the delicious chocolate element! Take your 100g (⅔ cup) dark chocolate chips or chopped dark chocolate. Using your rubber spatula, gently fold them into the batter until they are evenly distributed. Again, be gentle and don’t overmix. We want those pockets of rich chocolate goodness in every slice of our Chocolate Orange Loaf Cake!
Baking Your Magnificent Chocolate Orange Loaf Cake
8. Pour into the Prepared Pan: Carefully spoon the beautifully fragrant batter into your prepared 9×5-inch loaf pan. Use your spatula to spread it evenly into the corners and smooth out the top. If you like, you can make a slight ridge down the center of the batter with your spatula – this often helps the loaf to bake with a lovely, even dome on top, preventing it from cracking wildly.
9. Bake to Golden Perfection: Place the loaf pan in your preheated 175°C (350°F) oven. The baking time for this Chocolate Orange Loaf Cake typically ranges from 50 to 65 minutes. However, oven temperatures can vary, so it’s always best to keep an eye on it.
- Around the 45-minute mark, you’ll notice your kitchen filling with the most incredible aroma of chocolate and orange – that’s your cue!
- To check for doneness, insert a wooden skewer or a toothpick into the center of the cake. When it comes out clean or with just a few moist crumbs attached (no wet batter!), your cake is ready. The top should be beautifully golden brown and spring back lightly when gently pressed.
- If the top starts to brown too quickly before the inside is fully cooked, you can loosely tent the loaf pan with aluminum foil for the remaining baking time.
10. Cooling Your Loaf Cake: Once baked, carefully remove the loaf pan from the oven. Let the Chocolate Orange Loaf Cake cool in the pan on a wire rack for about 10-15 minutes. This allows the cake to firm up slightly, making it easier to handle. After this initial cooling, use the parchment paper overhangs to gently lift the cake out of the pan and transfer it directly to the wire rack to cool completely. It’s really important for the cake to be completely cool before glazing, otherwise, the glaze will simply melt right off!
For the Zesty Chocolate Orange Glaze: The Grand Finale
11. Prepare the Glaze: While your Chocolate Orange Loaf Cake is cooling, let’s whip up this irresistible glaze! In a small bowl, combine the 100g (¾ cup) powdered sugar, 2 tablespoons fresh orange juice, 1 tablespoon melted unsalted butter, and ½ teaspoon vanilla extract. Whisk everything together thoroughly until you have a smooth, pourable consistency. If the glaze is too thick, add a tiny bit more orange juice (about ½ teaspoon at a time). If it’s too thin, whisk in a little more powdered sugar until you reach your desired consistency – you want it thick enough to coat a spoon but still able to drip slowly. For a lovely visual effect, I often divide the glaze and add 1-2 teaspoons of unsweetened cocoa powder to one half, making a gorgeous chocolate drizzle for contrast. This glaze truly elevates the “Chocolate Orange Loaf Cake” experience!
12. Glaze Your Cooled Cake: Once your Chocolate Orange Loaf Cake is completely cool to the touch (patience is a virtue here!), place the wire rack with the cake over a sheet of parchment paper or a baking tray. This will catch any drips and make cleanup a breeze. If you have both glazes, drizzle the plain orange glaze generously over the top of the cake, allowing some to drip down the sides. Then, take your chocolate glaze (if using) and drizzle it artfully over the orange glaze. For an extra touch of elegance and flavor, sprinkle a tiny pinch of fresh orange zest over the wet glaze.
Final Touches and Serving Suggestions for Your Chocolate Orange Loaf Cake
13. Allow the Glaze to Set: Let the glazed Chocolate Orange Loaf Cake sit for another 15-30 minutes, or until the glaze has set slightly. This will prevent smudging when you slice it.
14. Slice and Serve: Once the glaze is set, use a sharp, serrated knife to slice your beautiful Chocolate Orange Loaf Cake. I love to serve thick slices, perhaps with a few thin, fresh orange slices on the side or a tiny sprinkle of extra dark chocolate shavings for visual appeal and an additional burst of flavor. This cake is wonderfully moist and flavorful on its own, but it also pairs beautifully with a cup of hot tea or coffee.
15. Storage: Any leftover Chocolate Orange Loaf Cake can be stored at room temperature in an airtight container for up to 3-4 days. It tastes just as incredible the next day, sometimes even better as the flavors meld!
Conclusion:
And there you have it, my friends! We’ve journeyed through the simple yet profoundly satisfying process of creating something truly magical in your own kitchen. If you’ve been following along, you’ll know exactly why this particular recipe isn’t just another bakeshop treat; it’s a warm, comforting hug in edible form. I genuinely believe that everyone deserves to experience the sheer joy that comes from biting into a slice of this incredible cake. It’s more than just a dessert; it’s an experience, a moment of pure bliss that tantalizes your taste buds and warms your soul. The way the bright, zesty orange notes dance with the deep, rich chocolate is a flavor combination that’s truly timeless and utterly irresistible. Trust me when I say, once you smell this baking, you’ll be counting down the minutes until you can cut into it!
This Chocolate Orange Loaf Cake is an absolute must-try for so many reasons. Firstly, it’s surprisingly straightforward to make, meaning even novice bakers can achieve spectacular results. No complicated techniques or obscure ingredients here, just honest-to-goodness baking that delivers big on flavor. Secondly, the texture is simply divine: incredibly moist, tender, and with that perfect crumb that just melts in your mouth. And of course, the flavor profile is what truly sets it apart. The vibrant zing of fresh orange zest and juice cuts beautifully through the luxurious sweetness of the chocolate, creating a symphony of tastes that is both sophisticated and incredibly comforting. It’s the kind of cake that makes people ask for the recipe immediately, and you’ll be so proud to share it!
Serving Suggestions & Creative Variations:
While this loaf cake is utterly magnificent on its own, perhaps with a simple dusting of icing sugar, there are so many ways to elevate your experience. For a truly decadent dessert, try serving a warm slice with a scoop of vanilla bean ice cream or a dollop of freshly whipped cream. The contrast of the warm cake and cold cream is simply divine. It also pairs wonderfully with a rich custard or a light crème anglaise for a more elegant presentation. For those chilly afternoons, a slice alongside a steaming mug of Earl Grey tea or a robust coffee is pure perfection. And don’t forget, this cake makes an absolutely wonderful edible gift for friends, family, or neighbours – just wrap it beautifully and watch their faces light up!
Feeling adventurous? The beauty of a good loaf cake is its versatility! Here are a few ideas to get your creative juices flowing:
- Glaze Galore: Instead of a simple sugar glaze, consider a luscious chocolate ganache drizzled over the top, or a vibrant orange glaze made with icing sugar and fresh orange juice for an extra citrusy kick.
- Textural Delights: Fold in some chopped toasted nuts like almonds or walnuts for added crunch. White chocolate chips could also be a delightful addition, creating another layer of sweetness and visual appeal.
- Spice it Up: A pinch of cinnamon or cardamom could add an unexpected warmth and depth to the chocolate-orange combination. Start small and adjust to your taste!
- Citrus Swap: While orange is classic, you could experiment with other citrus fruits. Lemon and chocolate, or even lime and chocolate, offer equally exciting flavor profiles.
- Dairy-Free/Gluten-Free: With a few mindful substitutions (plant-based milk, oil instead of butter, or a good quality gluten-free flour blend), this recipe can often be adapted to suit various dietary needs without sacrificing flavor or texture. Always ensure your chocolate is dairy-free if going completely vegan!
I truly hope this recipe inspires you to get into your kitchen and create something wonderful. There’s a unique satisfaction that comes from baking from scratch, and even more so when the end result is as consistently delicious as this Chocolate Orange Loaf Cake. I encourage you to set aside some time, gather your ingredients, and immerse yourself in the delightful process. The aromas that will fill your home alone are worth the effort!
Once you’ve baked it, please don’t keep your experience a secret! I’d absolutely love to hear from you. Did you try any of the variations? What was your favorite part of the process? Did it disappear in minutes, or did you manage to savor a slice (or two!) over a few days? Share your photos, your triumphs, and even your funny kitchen mishaps in the comments below or tag me on social media. Your feedback and stories are what make this community so vibrant and exciting. Happy baking, and enjoy every single delightful crumb!
Frequently Asked Questions (FAQs):
How do I store Chocolate Orange Loaf Cake to keep it fresh?
To keep your loaf cake wonderfully fresh, store it at room temperature in an airtight container. If you have any glaze or frosting on it, make sure it’s fully set before covering. It will stay moist and delicious for 3-5 days. You can also place a slice of bread in the container with the cake; the bread will dry out, but the cake will absorb its moisture, helping it stay fresh longer.
Can I make this Chocolate Orange Loaf Cake ahead of time?
Absolutely! This loaf cake is a fantastic make-ahead treat. In fact, many people find that the flavors deepen and meld even better on the second day. Just store it properly as mentioned above. It’s perfect for preparing a day before an event or when you know you’ll have a busy week ahead.
Is it possible to freeze Chocolate Orange Loaf Cake?
Yes, this cake freezes beautifully! For best results, allow the cake to cool completely. You can freeze it whole, half, or in individual slices. Wrap it tightly in plastic wrap, then an additional layer of aluminum foil to prevent freezer burn. It will keep well in the freezer for up to 3 months. Thaw at room temperature for a few hours before serving.
What type of chocolate is best for this recipe?
For the best flavor, I recommend using good quality dark chocolate (around 50-70% cocoa solids) in either chip or chopped bar form. This percentage offers a lovely balance of bitterness and sweetness that pairs perfectly with the orange. Milk chocolate can be used if you prefer a sweeter cake, but avoid overly sweet or highly processed chocolate as it might not melt as nicely or provide the depth of flavor needed.
Can I use bottled orange juice instead of fresh?
While fresh orange juice and zest will always give you the most vibrant and authentic flavor, you can use good quality bottled orange juice in a pinch. However, do not substitute the fresh orange zest. The zest contains essential oils that carry the most intense orange flavor and aroma, which is crucial for the cake’s distinct taste. Without the fresh zest, the cake’s orange flavor will be significantly muted.
How do I know when my Chocolate Orange Loaf Cake is done baking?
The best way to check for doneness is the classic toothpick test. Insert a wooden skewer or toothpick into the center of the cake. If it comes out clean or with just a few moist crumbs attached, your cake is ready. If it comes out with wet batter, continue baking for a few more minutes and test again. Also, the cake should be golden brown on top and spring back lightly when gently pressed.
Moist Chocolate Orange Loaf Cake: Citrusy & Rich
A harmonious blend where the vibrant zest of sun-kissed oranges dances playfully with the deep, luxurious notes of rich cocoa. This moist, tender loaf cake offers an exquisite balance of bright citrus and chocolate, perfect for any occasion. Effortlessly fits the bill for sophisticated treats, comforting desserts, or thoughtful gifts.
Ingredients
-
200g All-Purpose Flour
-
1 tsp Baking Powder
-
½ tsp Baking Soda
-
¼ tsp Salt
-
170g Unsalted Butter
-
200g Granulated Sugar
-
2 Large Eggs
-
1 tsp Vanilla Extract
-
Orange Zest (2 tbsp, from 2 oranges)
-
120ml Orange Juice (½ cup) OR 1 tsp Orange Extract
-
60ml Whole Milk (¼ cup)
-
100g Dark Chocolate Chips (⅔ cup, 50-70% cocoa)
-
FOR THE GLAZE (OPTIONAL):
-
100g Powdered Sugar (¾ cup)
-
2 tbsp Orange Juice
-
1 tbsp Melted Unsalted Butter
-
½ tsp Vanilla Extract
-
1-2 tsp Unsweetened Cocoa Powder (for chocolate drizzle, optional)
-
Pinch Orange Zest (for garnish, optional)
-
FOR GARNISHING (OPTIONAL):
-
Thin Orange Slices
-
Orange Zest
-
Chopped Dark Chocolate / Shavings
Instructions
-
Step 1
Preheat oven to 175°C (350°F). Grease and line a 9×5-inch loaf pan with parchment paper, leaving an overhang. -
Step 2
In a medium bowl, whisk together flour, baking powder, baking soda, and salt. Set aside. -
Step 3
Zest 2 oranges (approx. 2 tbsp) and add zest to a large mixing bowl. Squeeze 120ml (½ cup) fresh orange juice, strain, and set aside. (Alternatively, use 1 tsp orange extract instead of fresh juice). -
Step 4
In the large mixing bowl (with orange zest), cream 170g unsalted butter and 200g granulated sugar on medium-high speed for 3-5 minutes until light, fluffy, and pale. -
Step 5
Reduce mixer speed to medium-low. Add 2 eggs, one at a time, beating well after each. Stir in 1 tsp vanilla extract until just combined. Scrape down the bowl. -
Step 6
Alternately add dry ingredients and combined orange juice/milk to the butter mixture, beginning and ending with dry. Mix on low speed until just combined, ensuring no dry streaks remain. Do not overmix. -
Step 7
Gently fold in 100g dark chocolate chips using a rubber spatula until evenly distributed. -
Step 8
Pour batter into the prepared loaf pan and smooth the top. Bake for 50-65 minutes at 175°C (350°F), or until a wooden skewer inserted into the center comes out clean. If the top browns too quickly, loosely tent with aluminum foil. -
Step 9
Remove from oven and let cool in the pan on a wire rack for 10-15 minutes. Use parchment overhangs to lift cake onto the wire rack to cool completely before glazing. -
Step 10
In a small bowl, whisk 100g powdered sugar, 2 tbsp orange juice, 1 tbsp melted unsalted butter, and ½ tsp vanilla extract until smooth. For a chocolate drizzle, optionally divide glaze and whisk 1-2 tsp cocoa powder into one half. -
Step 11
Once the cake is completely cool, place it on a wire rack over parchment paper. Drizzle generously with plain orange glaze, then with chocolate glaze (if using). Sprinkle with a pinch of fresh orange zest or other garnishes. -
Step 12
Allow the glaze to set for 15-30 minutes. Slice with a sharp, serrated knife and serve. Store any leftover cake in an airtight container at room temperature for 3-4 days.
Important Information
Nutrition Facts (Per Serving)
It is important to consider this information as approximate and not to use it as definitive health advice.
Allergy Information
Please check ingredients for potential allergens and consult a health professional if in doubt.


Leave a Comment