
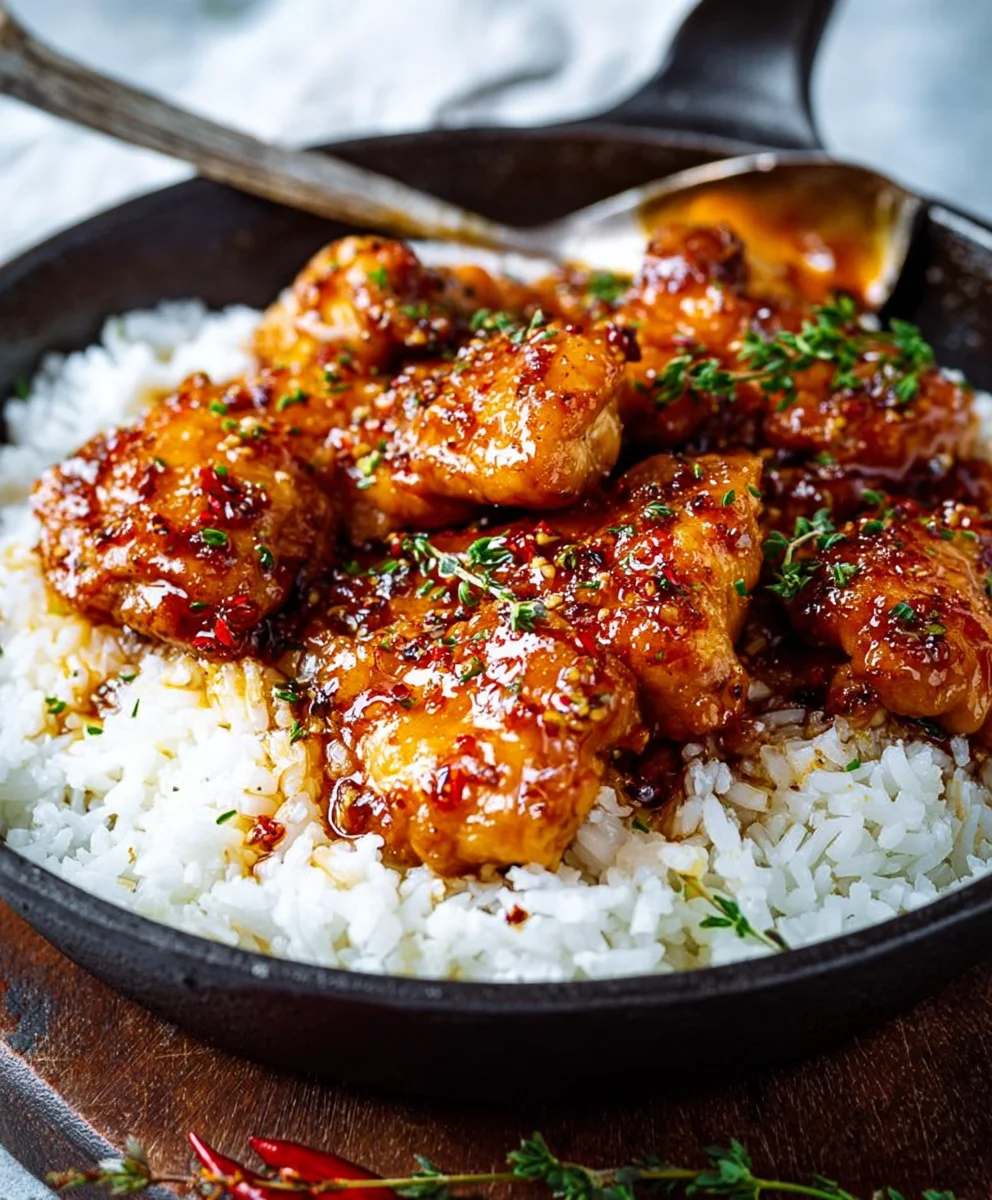
Honey Garlic Chicken. Just the name conjures images of glistening, tender chicken bathed in a perfectly balanced sweet and savory sauce, a culinary masterpiece that consistently delights dinner tables worldwide. It’s a dish that, despite its apparent simplicity, delivers an extraordinary depth of flavor that appeals to nearly every palate, making it a true staple in modern home cooking.
While this particular combination might not boast ancient origins, the universal appeal of this dish stems from its deceptively simple yet profoundly satisfying flavor profile. This delightful fusion of aromatic garlic and the golden sweetness of honey, often enhanced by a touch of savory soy, has transcended culinary boundaries, becoming a go-to for busy weeknights and a celebrated feature for more leisurely gatherings. It embodies the essence of comfort food with an elegant twist, proving that some of the best meals are born from simple, high-quality ingredients.
Why We Can’t Get Enough of Honey Garlic Chicken
What makes this dish an undeniable favorite for so many? Perhaps it’s the irresistible, glossy, and sticky glaze that clings to every piece of succulent chicken, creating a symphony of textures and tastes with each bite. Or maybe it’s the incredible convenience; a remarkably quick preparation often leads to an unexpectedly gourmet experience, proving that truly delicious meals don’t require hours in the kitchen. The harmonious blend of sweet honey, pungent garlic, and savory notes creates an umami explosion that is both comforting and exciting. Mastering the perfect Honey Garlic Chicken recipe is a truly rewarding experience, opening doors to endless meal possibilities that are both satisfying and easy to prepare.
Ingredients:
Gathering your ingredients is the first step to creating this absolutely delicious Honey Garlic Chicken. I find that having everything prepped and ready before you start cooking makes the whole process so much smoother and more enjoyable. Trust me, you’ll thank yourself later!
- For the Chicken:
- 2 lbs (approx. 900g) boneless, skinless chicken thighs or breasts: I personally prefer thighs for their juiciness and flavor, but breasts work beautifully too if you cut them into bite-sized pieces. Just ensure they are uniform for even cooking.
- 1/2 cup all-purpose flour: This will give our chicken a light, crispy coating that absorbs the sauce perfectly.
- 1 teaspoon salt: For seasoning the chicken.
- 1/2 teaspoon black pepper: Adds a little kick and depth of flavor.
- 1/2 teaspoon garlic powder: Enhances the garlic notes in the dish.
- 1/4 teaspoon paprika (optional): For a hint of color and mild flavor.
- 2-3 tablespoons vegetable oil or canola oil: For pan-frying our chicken to golden perfection.
- For the Irresistible Honey Garlic Sauce:
- 1/2 cup honey: The star of our sauce, providing that wonderful sweetness and glossy finish. Make sure it’s good quality!
- 1/4 cup soy sauce (low sodium preferred): Adds a savory, umami depth without being overly salty.
- 2 tablespoons rice vinegar: Balances the sweetness and richness with a subtle tang.
- 4-5 cloves garlic, minced: You can never have too much garlic in Honey Garlic Chicken! Freshly minced is key here for the best flavor.
- 1 tablespoon fresh ginger, grated (optional but highly recommended): Adds a fragrant, zesty warmth that complements the garlic beautifully.
- 1 tablespoon cornstarch: Our secret weapon for thickening the sauce to that luscious consistency.
- 2 tablespoons cold water: To create a slurry with the cornstarch, preventing lumps.
- 1/4 teaspoon red pepper flakes (optional, for a kick): If you like a little heat, these are fantastic.
- For Garnish (Optional):
- 2 tablespoons chopped fresh parsley or cilantro: Adds freshness and color.
- 1 tablespoon sesame seeds: Toasted sesame seeds offer a lovely nutty crunch and aesthetic appeal.
Preparing the Chicken
Let’s get our chicken ready! This foundational step is crucial for ensuring every piece of your Honey Garlic Chicken is perfectly seasoned and cooked. I always tell people that a little extra effort here pays off immensely in the final dish.
- Prepare the Chicken: First things first, take your chicken thighs or breasts and pat them really, really dry with paper towels. This is a super important step because it helps create a crispy crust when we fry them. If using chicken breasts, I recommend cutting them into 1-inch bite-sized cubes. For thighs, you can keep them larger or cut them down a bit, depending on your preference. Aim for pieces that are roughly uniform in size to ensure even cooking.
- Season the Chicken: In a medium bowl, combine the all-purpose flour, salt, black pepper, garlic powder, and paprika (if using). Give it a good whisk to ensure all the spices are evenly distributed throughout the flour. Now, add your prepared chicken pieces to this seasoned flour mixture. Toss them gently until each piece is lightly and evenly coated. I usually do this in batches if I have a lot of chicken to avoid overcrowding the bowl and to ensure everything gets a proper dusting. Shake off any excess flour; we want a thin coating, not a heavy batter. This light flour coating is what will give our Honey Garlic Chicken that wonderful texture and help the sauce cling to every morsel.
- Set Aside: Once coated, place the chicken pieces on a clean plate or a wire rack set over a baking sheet. This allows the coating to slightly adhere while you prepare the sauce, making for a better fry.
Crafting the Irresistible Honey Garlic Sauce
While our chicken is patiently waiting, let’s turn our attention to the star of the show: the incredibly flavorful Honey Garlic Sauce. This sauce is what truly defines our Honey Garlic Chicken, making it sticky, sweet, savory, and utterly addictive. Don’t skip the fresh aromatics; they make all the difference!
- Mince Aromatics: Peel and finely mince your garlic cloves. If you’re using fresh ginger, peel it and grate it using a microplane or a fine grater. The finer the better, as you want these flavors to infuse smoothly into the sauce without large chunks. Fresh garlic and ginger are key for the most vibrant flavor.
- Combine Liquid Ingredients: In a medium bowl or a liquid measuring cup, whisk together the honey, soy sauce, rice vinegar, minced garlic, grated ginger (if using), and red pepper flakes (if you enjoy a bit of heat). Give it a good stir until everything is well combined. Taste it, and if you feel it needs a tiny bit more tang or sweetness, now is the time to adjust.
- Prepare the Cornstarch Slurry: In a small separate bowl, combine the cornstarch and cold water. Whisk them together until you have a smooth, lump-free slurry. This slurry is what will thicken our sauce to that beautiful, glossy consistency we’re looking for. Set this aside, as we’ll add it to the sauce later.
Cooking the Chicken to Golden Perfection
Now comes the exciting part: cooking the chicken! This step is about achieving that perfect golden-brown exterior and tender, juicy interior that makes every bite of our Honey Garlic Chicken so satisfying. Remember, patience is a virtue here, especially with batch cooking.
- Heat the Oil: Place a large skillet or a non-stick frying pan over medium-high heat. Add 2-3 tablespoons of vegetable or canola oil. You want the oil to be hot enough to sizzle when a tiny bit of flour is dropped in, but not smoking. A good indication is when it shimmers slightly.
- Fry the Chicken in Batches: Carefully add the flour-coated chicken pieces to the hot oil in a single layer, ensuring not to overcrowd the pan. Overcrowding is a common mistake that leads to steaming rather than frying, resulting in less crispy chicken. Cook in batches if necessary.
- Cook Until Golden and Cooked Through: Let the chicken cook for about 4-6 minutes on each side, turning occasionally, until it’s beautifully golden brown and cooked through. The internal temperature should reach 165°F (74°C). The exact cooking time will depend on the size and thickness of your chicken pieces. I always keep an eye on the color, looking for that rich, appetizing golden hue.
- Drain Excess Oil: Once cooked, transfer the crispy chicken pieces to a plate lined with paper towels to drain any excess oil. This helps keep them from getting greasy.
- Repeat for Remaining Chicken: If you’re cooking in batches, add a little more oil to the pan if needed and repeat the frying process with the remaining chicken until all pieces are cooked to perfection.
Simmering the Sweet and Savory Honey Garlic Sauce
With our chicken cooked and ready, it’s time to bring that incredible Honey Garlic Sauce to life. This is where all those vibrant flavors meld together and the sauce transforms into its thick, glossy, and utterly delicious form. Get ready for your kitchen to smell amazing!
- Clear the Pan (or use a fresh one): If your skillet has a lot of browned bits or excess oil from frying the chicken, you might want to quickly wipe it clean or use a fresh pan. This prevents any burnt bits from affecting the sauce’s flavor. I usually just quickly wipe it out with a paper towel, leaving just enough residue for extra flavor.
- Pour in the Sauce Mixture: Reduce the heat to medium-low. Pour the combined honey, soy sauce, rice vinegar, garlic, ginger, and red pepper flakes mixture into the skillet. Bring the sauce to a gentle simmer, stirring constantly for about 1-2 minutes. You’ll start to smell the incredible aroma of the garlic and ginger blooming – it’s truly intoxicating!
- Thicken the Sauce: Give your cornstarch slurry a quick whisk again (as cornstarch can settle) and slowly pour it into the simmering sauce while whisking continuously. Continue to whisk for another 1-2 minutes, or until the sauce thickens to your desired consistency. It should be thick enough to coat the back of a spoon and have a lovely, glossy appearance. Don’t stop whisking when adding the slurry to prevent lumps! If it gets too thick, you can always add a tablespoon of water or chicken broth to thin it out slightly. If it’s not thick enough, you can mix another small slurry (1/2 tsp cornstarch with 1 tbsp water) and add it in.
Bringing It All Together: Your Ultimate Honey Garlic Chicken
The moment of truth! This is where our perfectly cooked chicken meets its destiny with the luscious Honey Garlic Sauce. This final step is quick but oh-so-satisfying, transforming individual components into a cohesive, flavorful masterpiece. Get ready to feast on the best Honey Garlic Chicken you’ve ever made!
- Add Chicken to Sauce: Once your sauce has reached that perfect thickness, gently add all the cooked chicken pieces back into the skillet.
- Toss to Coat: Using tongs or a large spoon, toss the chicken pieces until they are thoroughly coated in the glorious Honey Garlic Sauce. Make sure every single piece gets drenched in that sticky, sweet, and savory goodness. Continue to gently toss for about 1-2 minutes over low heat, allowing the chicken to absorb the flavors and warm through completely.
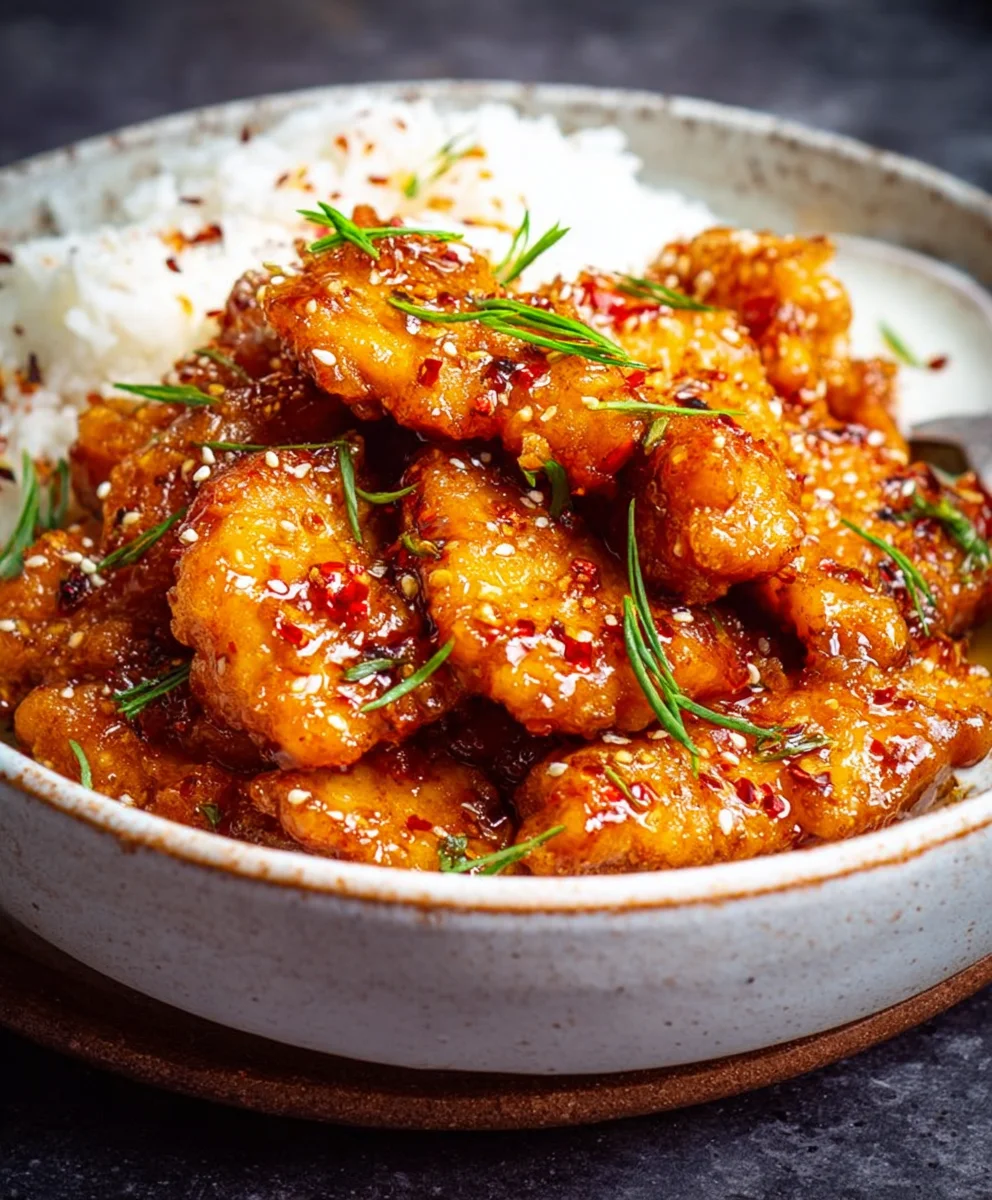
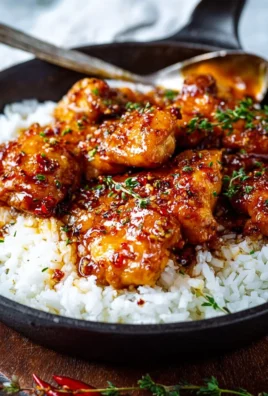
- Garnish and Serve: Transfer your magnificent Honey Garlic Chicken to a serving platter. Garnish with fresh chopped parsley or cilantro and a sprinkle of toasted sesame seeds, if desired. These garnishes add a wonderful fresh counterpoint and visual appeal.
Pro Tips for the Best Honey Garlic Chicken
Achieving truly outstanding Honey Garlic Chicken isn’t just about following the steps; it’s also about understanding the nuances. Here are some of my go-to tips to elevate your dish from great to absolutely unforgettable:
Tip 1: Pat Your Chicken Dry, Seriously!
I cannot emphasize this enough. A super dry chicken surface is the secret to a crispy exterior. Excess moisture creates steam, which prevents browning and crisping. So, grab those paper towels and give your chicken a thorough pat-down before seasoning and flouring.
Tip 2: Don’t Overcrowd the Pan
When frying the chicken, resisting the urge to cram all the pieces into the pan at once is critical. Overcrowding drops the oil temperature significantly, leading to chicken that steams instead of fries. This results in pale, soft chicken rather than beautifully golden and crispy pieces. Work in batches to maintain a consistent oil temperature and achieve that desirable crispiness. It might take a little longer, but the results are worth it.
Tip 3: The Power of Fresh Aromatics
While garlic powder and ginger powder have their place, for a dish like Honey Garlic Chicken, freshly minced garlic and grated ginger are non-negotiable for maximum flavor impact. Their vibrant, pungent notes will infuse your sauce with an unparalleled aroma and depth that dried versions simply can’t replicate.
Tip 4: Adjust Sauce Sweetness and Heat to Your Liking
This recipe provides a balanced flavor profile, but taste is personal. Feel free to adjust the amount of honey for more sweetness or less, and certainly play with the red pepper flakes. If you love a spicy kick, add a little extra; if you prefer it mild, omit them entirely. Don’t be afraid to taste the sauce before adding the cornstarch slurry and adjust seasonings.
Tip 5: Cornstarch Slurry Best Practices
Always mix your cornstarch with cold water before adding it to a hot liquid. This prevents lumps. Also, remember to whisk the slurry again right before adding it to the sauce, as cornstarch can settle at the bottom of the bowl. When adding it to the simmering sauce, pour it in slowly while continuously whisking to ensure smooth, even thickening. If your sauce becomes too thick, a tiny splash of water or chicken broth can rescue it.
Tip 6: Mind the Oil Temperature
Maintaining the right oil temperature (medium-high) is key for frying. Too low, and your chicken will soak up too much oil and become greasy. Too high, and the outside will burn before the inside is cooked through. If you have a kitchen thermometer, aim for around 350-375°F (175-190°C). Otherwise, watch for a shimmering oil and a gentle sizzle when a test piece of chicken or a sprinkle of flour is added.
Tip 7: Don’t Forget the Garnish!
A sprinkle of fresh chopped herbs like parsley or cilantro, along with some toasted sesame seeds, isn’t just for looks. The fresh herbs add a lovely brightness and contrast to the rich sauce, while sesame seeds provide a subtle nutty crunch that elevates the dish. These small touches make a big difference in presentation and overall enjoyment of your Honey Garlic Chicken.
Serving Suggestions and Delicious Variations
Your beautiful Honey Garlic Chicken is ready, but what to serve it with? And how can you switch it up next time? Here are some ideas to make your meal even more fantastic!
Classic Pairings for Honey Garlic Chicken:
The beauty of Honey Garlic Chicken is its versatility. It pairs wonderfully with a variety of sides that help balance its rich, savory-sweet flavor.
- Steamed White or Brown Rice: This is a classic for a reason! The rice soaks up all that incredible extra sauce, creating a truly comforting and satisfying meal. I love a good jasmine rice with this dish.
- Noodles: Think lo mein noodles, ramen, or even simple spaghetti. Toss the noodles with a little extra sauce or a dash of sesame oil before adding the chicken for a delightful Asian-inspired pasta dish.
- Steamed or Roasted Vegetables: Broccoli florets, green beans, asparagus, or bell peppers are excellent choices. Their freshness and slight crunch provide a perfect counterpoint to the richness of the chicken and sauce. I often steam some broccoli and then just toss it lightly with a bit of the excess sauce from the chicken for an easy side.
- Quick Salad: A simple, crisp green salad with a light vinaigrette can be a refreshing side, cutting through the richness of the main dish.
Exciting Variations to Try:
Once you’ve mastered the classic Honey Garlic Chicken, feel free to experiment with these delicious twists:
- Spicy Honey Garlic Chicken: For those who love a serious kick, increase the amount of red pepper flakes in the sauce. You could also add a dash of Sriracha or gochujang directly into the sauce mixture for a deeper, more complex heat. I sometimes add a thinly sliced fresh chili pepper or two if I’m feeling extra adventurous!
- Lemon Honey Garlic Chicken: A squeeze of fresh lemon juice or a teaspoon of lemon zest added to the sauce at the very end can brighten up the flavors beautifully, adding a lovely tangy note. This is particularly good if you’re using chicken breasts.
- Ginger Boost: If you’re a ginger lover like me, don’t be shy with the fresh grated ginger! You can increase the amount to 1.5 or even 2 tablespoons for a more pronounced warming, zesty flavor.
- Sesame Honey Garlic Chicken: While we use sesame seeds as a garnish, you can also add a teaspoon of toasted sesame oil to the sauce mixture along with the other liquids. This deepens the nutty, umami profile of the sauce considerably. Just remember, a little sesame oil goes a long way!
- Pineapple Honey Garlic Chicken: For a tropical twist, add some drained canned pineapple chunks or fresh pineapple pieces to the pan during the last few minutes of simmering the sauce, allowing them to warm through and soak up the flavors. This adds a lovely sweetness and juiciness.
- Baked or Air-Fried Chicken: If you prefer a less oily option, you can bake or air-fry your seasoned chicken pieces until golden and cooked through, then toss them in the prepared sauce. Adjust cooking times accordingly for your appliance. This works wonderfully for larger batches too.
Storage and Reheating Your Honey Garlic Chicken
One of the best things about Honey Garlic Chicken is that it often tastes even better the next day as the flavors meld and deepen. Here’s how to store and reheat your delicious leftovers to enjoy them again.
Storing Leftovers:
After your meal, allow any leftover Honey Garlic Chicken to cool down to room temperature within two hours of cooking. Once cooled, transfer the chicken and any remaining sauce into an airtight container. It can be safely stored in the refrigerator for up to 3-4 days. For longer storage, you can freeze Honey Garlic Chicken in a freezer-safe container or heavy-duty freezer bag for up to 2-3 months. Just make sure to label it with the date so you know when it was prepared!
Reheating for Best Results:
Reheating your Honey Garlic Chicken properly is key to maintaining its flavor and texture. My personal preference is often a quick stovetop reheat.
- Stovetop (Recommended): For the best results and to help restore some crispiness to the chicken, heat a non-stick skillet over medium-low heat. Add a tiny splash of water or chicken broth (about 1-2 tablespoons) to help loosen the sauce. Add the chicken and sauce to the pan, cover, and cook for 5-7 minutes, stirring occasionally, until the chicken is heated through. The sauce will re-thicken nicely as it warms.
- Microwave: While convenient, the microwave can sometimes make the chicken a little softer. Place the Honey Garlic Chicken in a microwave-safe dish, cover loosely, and heat on medium power in 1-minute intervals, stirring in between, until heated through. Be careful not to overheat, as this can dry out the chicken.
- Oven/Toaster Oven (for frozen chicken): If reheating from frozen, it’s best to thaw it in the refrigerator overnight first. For reheating in the oven, preheat your oven to 300°F (150°C). Place the chicken and sauce in an oven-safe dish, cover it loosely with foil, and bake for 15-20 minutes, or until heated through. This method also helps to prevent drying out and can keep the chicken tender.
No matter how you reheat it, your Honey Garlic Chicken will still be incredibly flavorful and a fantastic meal to look forward to!
Conclusion:
So, as we wrap up our journey through this incredible recipe, I truly hope you’re feeling as excited as I am about what you’re about to create in your own kitchen. I’ve shared countless meals with friends and family that started with a simple idea, and this one consistently earns rave reviews and requests for an encore. This isn’t just another dinner; it’s an experience, a moment of culinary joy that I believe everyone deserves to taste. From the very first sizzle in the pan to the final, glistening pieces on your plate, you’ll discover a dish that is deceptively simple yet profoundly satisfying, making it a perfect contender for busy weeknights or a show-stopping weekend feast.
Why This Recipe Shines: A Must-Try Culinary Delight
What makes this particular recipe an absolute must-try? Well, it all boils down to that irresistible combination of flavors and textures, perfectly balanced to create something truly magical. We’re talking about chicken that’s cooked to tender perfection, enveloped in a sticky, glossy sauce that hits all the right notes: sweet, savory, and with just the right kick of garlic. The caramelization achieved during the cooking process creates these incredible little pockets of flavor that burst in your mouth with every bite. It’s comforting, it’s exciting, and it’s undeniably delicious. I genuinely believe that once you taste this incredible Honey Garlic Chicken, it will quickly earn a permanent spot in your weekly rotation. It’s the kind of dish that makes you close your eyes and savor each mouthful, appreciating the harmonious blend of ingredients that come together so effortlessly. Plus, for anyone who loves a meal that feels gourmet but requires minimal fuss, this recipe is a godsend. It proves that you don’t need complex techniques or obscure ingredients to create something truly spectacular.
Your Culinary Canvas: Serving Suggestions and Delicious Variations
Now, let’s talk about how to make this magnificent dish even more adaptable to your preferences and pantry. While the chicken itself is the star, pairing it with the right accompaniments can elevate your meal to new heights. For a classic and universally loved pairing, I highly recommend serving this with a steaming bed of fluffy white rice – it’s perfect for soaking up every last drop of that incredible sauce. If you’re looking for something a bit heartier, a side of creamy mashed potatoes or even some roasted sweet potatoes would be an excellent choice, adding a wonderful textural contrast. For those who prefer to keep things lighter, a simple steamed green vegetable like broccoli, asparagus, or green beans tossed with a pinch of salt and pepper offers a refreshing counterpoint to the richness of the chicken. Don’t shy away from adding a sprinkle of sesame seeds and some chopped green onions just before serving; they add both visual appeal and an extra layer of flavor and freshness that truly completes the dish.
But the fun doesn’t stop there! This recipe is incredibly versatile and open to your creative whims. Want to add a touch of heat? A pinch of red pepper flakes or a dash of sriracha mixed into the sauce will give it a fiery kick. For a brighter, tangier note, a squeeze of fresh lime juice over the finished chicken can work wonders. You could even experiment with different cuts of chicken – boneless, skinless thighs work beautifully and stay incredibly juicy. And why limit yourself to chicken? This same glorious sauce can be used to glaze shrimp, pork, or even firm tofu for a delicious vegetarian option. Imagine this sauce over crispy baked cauliflower florets – absolutely divine! The possibilities are truly endless, allowing you to tailor this foundation recipe to suit your mood, your diet, or whatever ingredients you have on hand.
Take the Plunge and Share Your Culinary Journey!
So, what are you waiting for? I wholeheartedly encourage you to roll up your sleeves, gather your ingredients, and give this fantastic recipe a try. Trust me, the joy of creating something so flavorful and satisfying with your own hands is truly unparalleled. I can’t wait for you to experience that moment when you take your first bite and realize just how simple yet utterly delicious homemade cooking can be. Once you’ve whipped up your batch of this delightful chicken, please don’t keep it a secret! I absolutely love hearing about your cooking adventures and seeing your incredible creations. Snap a picture of your masterpiece, share your serving ideas, or tell me about any exciting variations you came up with. Your feedback and experiences inspire me and the entire cooking community. Let’s make some amazing food together!
Sticky Honey Garlic Chicken: Quick & Irresistible Dinner!
Glistening, tender chicken bathed in a perfectly balanced sweet and savory honey garlic sauce. This quick and easy dish delivers an extraordinary depth of flavor, appealing to nearly every palate for a truly satisfying meal.
Ingredients
-
8 skinless, boneless chicken thighs
-
2 tbsp cornflour (cornstarch)
-
½ tsp salt
-
½ tsp pepper
-
2 tbsp vegetable oil
-
1 tbsp unsalted butter
-
4 cloves minced garlic
-
110g (1/3 cup) honey
-
80ml (1/3 cup) chicken stock
-
1 tbsp rice vinegar
-
1 tbsp light soy sauce
-
1 tbsp finely chopped fresh parsley (for garnish)
-
½ tsp chilli flakes (optional)
-
Boiled rice (for serving)
Instructions
-
Step 1
Pat chicken thighs dry with paper towels. Season evenly with ½ tsp salt and ½ tsp pepper. -
Step 2
Heat 2 tbsp vegetable oil in a large skillet over medium-high heat. Fry chicken in batches for 4-6 minutes per side until golden brown and cooked through (internal temperature 165°F/74°C). Transfer cooked chicken to a plate. -
Step 3
In the same skillet (wiped clean if necessary), melt 1 tbsp unsalted butter over medium-low heat. Add 4 cloves minced garlic, 110g (1/3 cup) honey, 80ml (1/3 cup) chicken stock, 1 tbsp rice vinegar, 1 tbsp light soy sauce, and ½ tsp chilli flakes (if using). Bring to a gentle simmer, stirring for 1-2 minutes. -
Step 4
In a small separate bowl, whisk 2 tbsp cornflour (cornstarch) with 2 tbsp cold water until smooth. Slowly pour this slurry into the simmering sauce while continuously whisking for 1-2 minutes, until the sauce thickens to a glossy consistency. -
Step 5
Return the cooked chicken pieces to the skillet with the thickened sauce. Toss gently for 1-2 minutes over low heat, ensuring all chicken is thoroughly coated and warmed through. Garnish with 1 tbsp finely chopped fresh parsley and serve immediately with boiled rice.
Important Information
Nutrition Facts (Per Serving)
It is important to consider this information as approximate and not to use it as definitive health advice.
Allergy Information
Please check ingredients for potential allergens and consult a health professional if in doubt.
Leave a Comment