
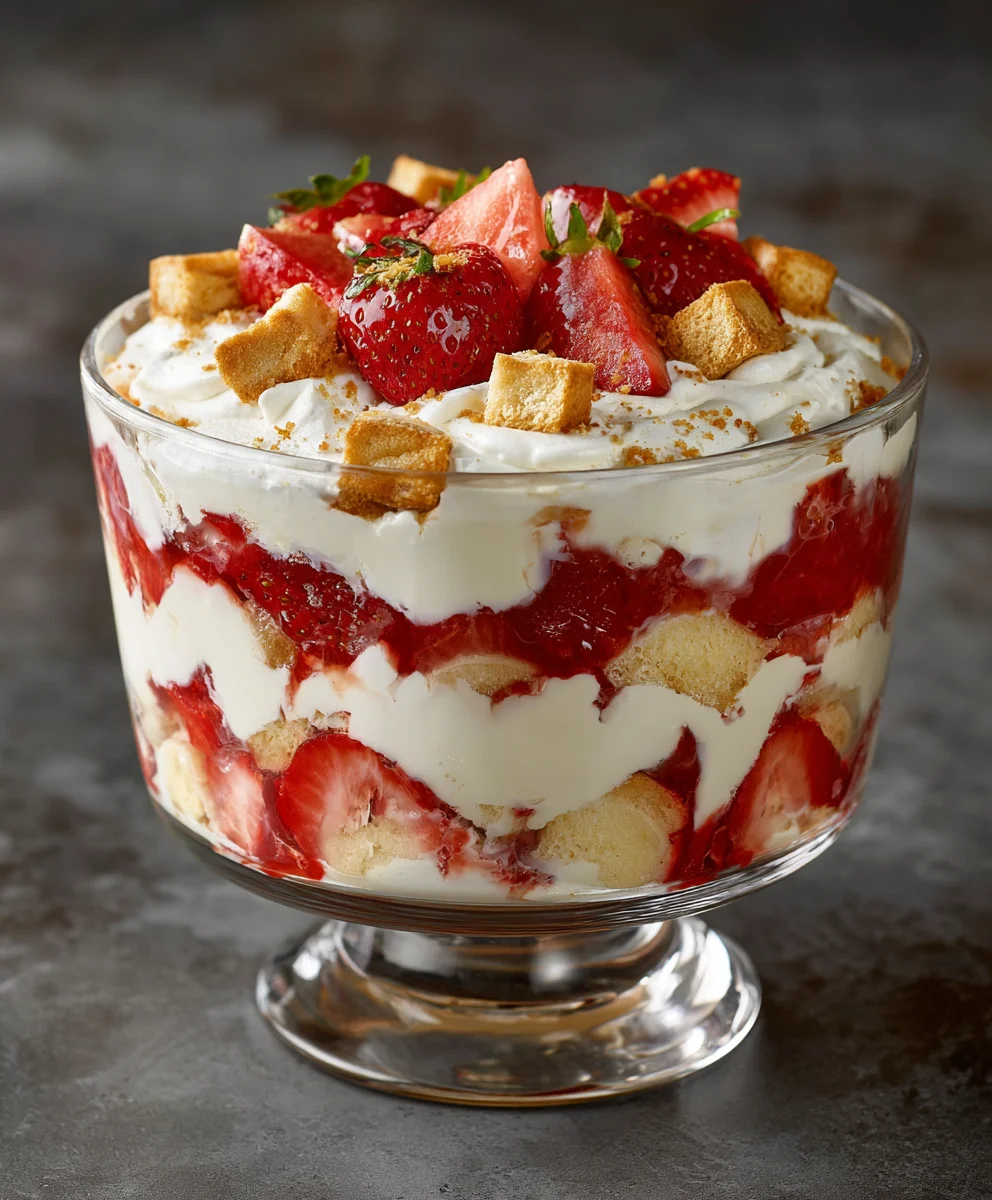
Strawberry Cheesecake Banana Pudding – just reading those words, we believe, conjures images of a dessert that is truly beyond compare.
Are you ready to elevate your dessert game to an entirely new level? We’re so excited to introduce you to a fusion masterpiece that combines the best of three beloved treats into one sensational dish. Forget everything you thought you knew about classic banana pudding, because this is the ultimate no-bake indulgence, perfect for any occasion, from casual family dinners to elegant gatherings.
While traditional banana pudding holds a cherished place in Southern culinary heritage, and cheesecake boasts a rich history dating back to ancient Greece, this particular rendition represents a delightful modern evolution. It’s a testament to how classic flavors can be reimagined, creating something utterly fresh and exciting. The addition of bright, juicy strawberries not only enhances the visual appeal but also introduces a wonderful tang that perfectly cuts through the richness, balancing every spoonful.
We believe people adore this particular Strawberry Cheesecake Banana Pudding for its incredible layers of flavor and texture: the creamy, dreamy cheesecake filling, the sweet slices of ripe banana, the vibrant burst of strawberries, and the tender vanilla wafers all melding together in harmonious bliss. It’s comforting, yet sophisticated; familiar, yet innovative. The fact that it’s also wonderfully convenient, requiring no oven time, makes it an absolute winner in any busy kitchen. Prepare yourself for a dessert experience that we know will have everyone asking for the recipe!
Ingredients:
- For the Creamy Cheesecake Layer:
- 8 ounces cream cheese, full-fat, softened to room temperature (that’s one block!)
- 1/2 cup granulated sugar
- 1 teaspoon vanilla extract, pure
- 1/4 teaspoon almond extract (optional, but lovely!)
- 1 cup heavy whipping cream, cold
- For the Luscious Strawberry Glaze:
- 2 cups fresh strawberries, hulled and diced (about 1 pound)
- 1/4 cup granulated sugar (adjust to your strawberries’ sweetness)
- 1 tablespoon lemon juice, fresh squeezed
- 1 tablespoon cornstarch
- 2 tablespoons cold water
- For the Classic Banana Pudding Base:
- 2 (3.4 ounce) packages instant vanilla pudding mix (the Jell-O brand works wonderfully)
- 3 cups cold whole milk (or 2% if you prefer, but whole milk makes it extra creamy)
- 1 teaspoon vanilla extract, pure
- 1 (8 ounce) container frozen whipped topping, thawed (like Cool Whip) OR 1 cup homemade whipped cream
- For the Assembly:
- 4-5 ripe but firm bananas, sliced into 1/4-inch rounds (about 4 cups)
- 1 (11 ounce) box vanilla wafers (Nilla Wafers are the classic choice!)
- Optional garnishes: Fresh strawberry slices, extra vanilla wafers, a dollop of whipped cream
Preparing the Creamy Cheesecake Layer for Your Strawberry Cheesecake Banana Pudding
Let’s kick things off with one of the most exciting components of our delightful Strawberry Cheesecake Banana Pudding – the rich and creamy cheesecake layer. This part adds an incredible tang and luxurious texture that truly elevates the entire dessert.
- First things first, make sure your 8 ounces of full-fat cream cheese are truly softened to room temperature. This is paramount! If it’s too cold, you’ll end up with lumps, and nobody wants lumpy cheesecake. I usually take it out of the fridge at least an hour or two before I plan to start.
- In a large mixing bowl, combine the softened cream cheese with 1/2 cup of granulated sugar. Using an electric mixer (either a hand mixer or stand mixer fitted with the paddle attachment), beat these two ingredients together on medium speed until the mixture is incredibly smooth and creamy. You want to see no grainy sugar or lumps of cream cheese. This usually takes about 2-3 minutes. Scrape down the sides of the bowl frequently to ensure everything is incorporated evenly.
- Next, add your 1 teaspoon of pure vanilla extract and, if you’re using it, the 1/4 teaspoon of almond extract. The almond extract, while optional, really adds a subtle depth of flavor that complements both the cream cheese and the strawberries beautifully. Mix again on low speed just until combined, about 30 seconds. Don’t overmix at this stage.
- Now for the magic! Pour in your 1 cup of cold heavy whipping cream. It’s crucial that the cream is cold; this helps it whip up properly. Increase the mixer speed to medium-high and beat the mixture until it becomes thick, fluffy, and holds soft peaks. This process usually takes about 3-5 minutes, depending on your mixer and the temperature of your cream. Be careful not to overbeat, or you might end up with a grainy texture. You’re looking for a consistency similar to a very thick, stabilized whipped cream or a light mousse. The volume will increase noticeably, and the mixture will lighten in color.
- Once whipped, give it a final gentle stir with a spatula to ensure everything is perfectly blended. Cover the bowl with plastic wrap and place it in the refrigerator to chill while you prepare the other components. This chilling step allows the cheesecake layer to firm up a bit, making it easier to spread and ensuring it holds its structure beautifully in our Strawberry Cheesecake Banana Pudding.
Crafting the Luscious Strawberry Glaze for Your Strawberry Cheesecake Banana Pudding
This vibrant strawberry glaze is what truly brings the “strawberry” in Strawberry Cheesecake Banana Pudding to life! It’s fresh, sweet, and provides a wonderful contrast to the creamy layers. It’s also incredibly simple to make.
- Begin by preparing your fresh strawberries. You’ll need about 2 cups of hulled and diced strawberries. I like to dice them into relatively small pieces, around 1/4 to 1/2 inch, so they distribute well throughout the pudding and are easy to scoop. If your strawberries are particularly large, you might want to quarter them first before dicing.
- In a medium saucepan, combine the diced strawberries, 1/4 cup of granulated sugar, and 1 tablespoon of fresh lemon juice. The lemon juice isn’t just for flavor; it also brightens the strawberries and helps maintain their vibrant color.
- Place the saucepan over medium heat. Stir occasionally as the strawberries begin to release their juices and the sugar dissolves. Bring the mixture to a gentle simmer. Once simmering, reduce the heat to low and let it cook for about 5-7 minutes. During this time, the strawberries will soften, and the liquid will become more syrupy. You can gently mash some of the strawberries with the back of a spoon if you prefer a smoother glaze, but I personally love having small chunks of fruit throughout.
- While the strawberries are simmering, prepare your cornstarch slurry. In a small bowl, whisk together 1 tablespoon of cornstarch with 2 tablespoons of cold water until it forms a smooth paste. It’s crucial to use cold water for this; hot water will cause the cornstarch to clump immediately.
- Once your strawberries have cooked down slightly and are tender, slowly pour the cornstarch slurry into the simmering strawberry mixture, whisking constantly to prevent lumps. Continue to whisk and cook for another 1-2 minutes, or until the glaze thickens to your desired consistency. It should be thick enough to coat the back of a spoon, but still pourable.
- Remove the saucepan from the heat and transfer the strawberry glaze to a separate bowl. Allow it to cool completely to room temperature before using. You can even pop it in the refrigerator for about 30 minutes to speed up the cooling process, as you want it cool enough not to melt our other creamy layers. As it cools, it will thicken even more. This gorgeous glaze is a key component to our incredible Strawberry Cheesecake Banana Pudding!
Assembling the Classic Banana Pudding Base
Now, let’s get to the heart of the “banana pudding” in our Strawberry Cheesecake Banana Pudding: the creamy, dreamy vanilla pudding base. This part comes together super quickly, which is perfect when you’re eager to get to the final assembly!
- In a very large mixing bowl, combine your two packages of instant vanilla pudding mix. Make sure it’s instant, not cook-and-serve, for ease and speed.
- Pour in the 3 cups of cold whole milk. I highly recommend using whole milk for the best, most luxurious texture, but 2% will also work if that’s what you have on hand.
- Using an electric mixer or a sturdy whisk, beat the pudding mix and milk together on medium speed for about 2-3 minutes, or until the mixture begins to thicken considerably. You’ll notice it goes from a thin liquid to a noticeable pudding consistency quite quickly. Make sure to scrape down the sides of the bowl to ensure all the pudding powder is fully dissolved and incorporated.
- Once the pudding has thickened, stir in 1 teaspoon of pure vanilla extract. This extra boost of vanilla really enhances the flavor of the base pudding.
- Now, gently fold in your 8-ounce container of thawed whipped topping (like Cool Whip) or 1 cup of freshly made whipped cream. If you’re using homemade whipped cream, ensure it’s softly whipped – not too stiff. The key here is to fold it in gently with a spatula, using an upward motion, until no streaks of white remain. You want to incorporate air and keep the pudding light and airy, not deflate it. This step makes the pudding incredibly smooth, light, and almost mousse-like, which is absolutely perfect for our Strawberry Cheesecake Banana Pudding.
- Cover the pudding bowl and refrigerate it for at least 15-20 minutes. This allows the pudding to set even further and become perfectly scoopable and ready for layering.
Preparing the Bananas and Vanilla Wafers for the Ultimate Strawberry Cheesecake Banana Pudding
These two components are essential for the classic banana pudding experience, providing texture, freshness, and that unmistakable flavor profile in our Strawberry Cheesecake Banana Pudding. A little preparation goes a long way here.
- First, let’s address the bananas. You’ll need 4-5 ripe but firm bananas. The “ripe but firm” part is important – you don’t want them green and starchy, nor do you want them overly brown and mushy. They should have a few speckles, indicating sweetness, but still hold their shape well when sliced.
- Peel your bananas and slice them into uniform 1/4-inch rounds. I like to do this just before I’m ready to layer to minimize browning. If you need to slice them a bit in advance, you can toss them gently with a tiny bit of lemon juice (about a teaspoon per banana) to prevent oxidation, but be very sparing so as not to impart too much lemon flavor. For this recipe, I find quick slicing right before layering is usually sufficient. You should end up with about 4 cups of sliced bananas.
- Next, for the vanilla wafers. While some recipes call for crushing them, for this specific Strawberry Cheesecake Banana Pudding, I prefer to keep them whole. They soften beautifully in the pudding and provide a lovely textural contrast without being too crumbly. Simply open your 11-ounce box of vanilla wafers and have them ready for layering. If you want a little extra crunch on top, you might reserve a few to crush and sprinkle just before serving, but for the layers themselves, whole wafers are best.
Layering the Magnificent Strawberry Cheesecake Banana Pudding
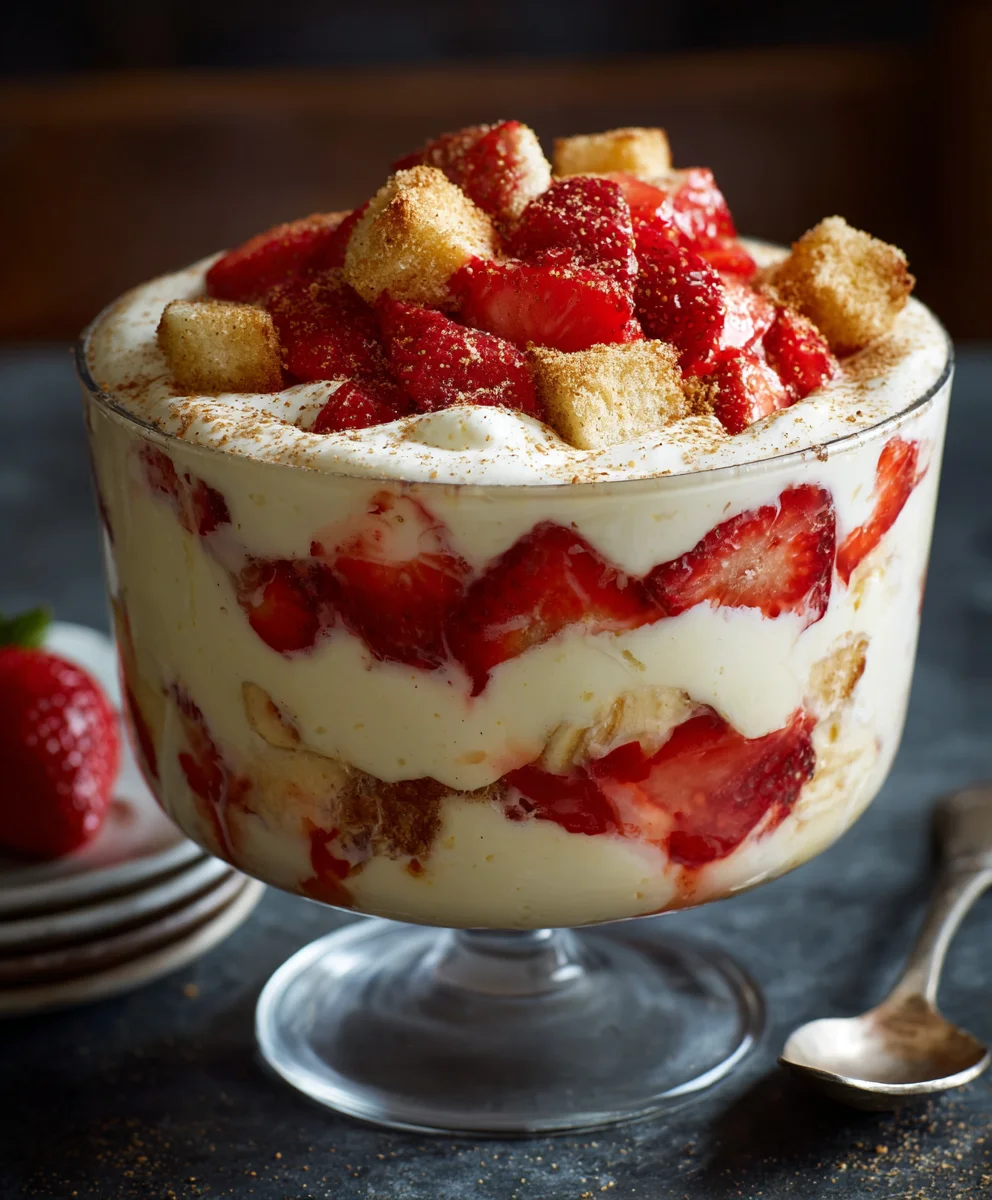
This is where all our hard work comes together! Layering is a fun and somewhat artful process that creates the beautiful strata of our Strawberry Cheesecake Banana Pudding. You’ll need a large, clear serving dish – a 9×13-inch baking dish or a large trifle bowl works perfectly to show off those gorgeous layers.
- First Layer: Vanilla Wafers. Begin by placing a single layer of vanilla wafers across the bottom of your chosen serving dish. Arrange them snugly, breaking a few to fit into any gaps, creating a solid base. This layer will absorb moisture and become wonderfully soft.
- Second Layer: Sliced Bananas. Arrange about half of your sliced bananas evenly over the vanilla wafers. Try to cover as much of the wafer layer as possible.
- Third Layer: Classic Banana Pudding Base. Spoon about half of the chilled banana pudding base over the bananas. Gently spread it out with an offset spatula or the back of a spoon, making sure to cover the bananas completely and create an even layer. This is the main body of our delicious Strawberry Cheesecake Banana Pudding.
- Fourth Layer: Cheesecake Cream. Now, carefully spread about half of your chilled creamy cheesecake layer over the banana pudding. Be gentle here, as the pudding might be a bit soft. An offset spatula works wonders for an even spread. Take your time to make it smooth.
- Fifth Layer: Strawberry Glaze. Drizzle about half of your cooled strawberry glaze over the cheesecake layer. You can spread it gently or leave it artfully swirled. The vibrant red of the strawberries against the creamy white is truly appealing!
- Repeat the Layers:
- Place another single layer of vanilla wafers over the strawberry glaze.
- Follow with the remaining sliced bananas.
- Then, spread the remaining classic banana pudding base.
- Carefully spread the remaining creamy cheesecake layer.
- Finally, spoon and spread the remaining luscious strawberry glaze over the top. This top layer of strawberries will be the crowning glory of your Strawberry Cheesecake Banana Pudding.
Chilling and Serving Your Divine Strawberry Cheesecake Banana Pudding
The waiting game begins! This step is crucial for allowing all the flavors to meld and the wafers to soften, transforming our layered creation into the truly unified and irresistible Strawberry Cheesecake Banana Pudding you’ve been dreaming of.
- Once all the layers are assembled in your serving dish, gently cover the dish tightly with plastic wrap. Ensure the plastic wrap doesn’t directly touch the strawberry glaze too much if you want to preserve its perfect top appearance, but it’s more important to seal it to prevent odors and drying out.
- Refrigerate the Strawberry Cheesecake Banana Pudding for a minimum of 4 hours. I honestly recommend chilling it for at least 6-8 hours, or even better, overnight. This extended chilling time is vital for several reasons:
- It allows the vanilla wafers to absorb moisture from the pudding and banana layers, softening them to that iconic, melt-in-your-mouth texture.
- It gives all the flavors – the sweet banana, the tangy cheesecake, and the bright strawberry – time to marry and develop into a harmonious symphony.
- It ensures the pudding, cheesecake, and glaze layers firm up completely, making for clean, beautiful scoops.
Patience truly is a virtue here; do not rush the chilling process!
- Before serving, you can add optional garnishes. I love to scatter a few fresh strawberry slices on top, maybe a couple of whole vanilla wafers for visual appeal, or even a small dollop of fresh whipped cream in the center. These small touches enhance the presentation of your magnificent Strawberry Cheesecake Banana Pudding.
- When you’re ready to serve, use a large spoon or serving spatula to scoop generous portions into individual bowls. Each spoonful will reveal the beautiful layers and deliver a delightful combination of textures and flavors. Prepare for rave reviews! This dessert is best enjoyed chilled and will keep well in the refrigerator, covered, for up to 3 days, though I doubt it will last that long!
Enjoy every delightful bite of your homemade Strawberry Cheesecake Banana Pudding!
Conclusion:
Well, my friends, we’ve reached the sweet end of our culinary journey for today, and I truly hope you’re as excited as I am about the incredible dessert we’ve just explored. If you’ve followed along, you now have all the tools and inspiration you need to create something truly magical in your own kitchen. This isn’t just any dessert; it’s a revelation, a masterpiece of textures and flavors that will undoubtedly earn you rave reviews from anyone lucky enough to try it. I genuinely believe that this particular creation, our beloved Strawberry Cheesecake Banana Pudding, is an absolute must-try for so many compelling reasons, and I’m just bursting to tell you why it holds such a special place in my heart.
First and foremost, it’s the symphony of flavors. Imagine the luscious sweetness of perfectly ripe bananas, softened just enough to melt in your mouth, perfectly complementing the bright, slightly tart burst of fresh strawberries. Then, layer that with the rich, tangy creaminess of cheesecake, all brought together by a comforting, vanilla-kissed pudding and the delightful crunch of vanilla wafers. It’s a combination that dances on your palate, offering a different sensation with every single spoonful. It’s comforting yet sophisticated, familiar yet excitingly new. I often find that desserts can sometimes lean too heavily on one flavor profile, but this recipe achieves a beautiful, harmonious balance that keeps you coming back for more. This dessert truly stands out from the crowd, promising a memorable experience with every bite.
Beyond the taste, there’s the sheer joy of creating something so spectacular with relative ease. While it might look incredibly impressive, trust me when I say the process is straightforward and incredibly rewarding. You don’t need to be a seasoned pastry chef to whip this up; just a love for delicious food and a willingness to follow a few simple steps. The layering creates a visual appeal that is truly stunning, making it a showstopper at any gathering without demanding hours of intricate work from you. It’s the kind of dessert that makes people gasp in delight before they even take their first bite, and that’s a feeling I absolutely adore sharing. The minimal effort for such a grand result is truly one of its most appealing attributes, making it perfect for both novice and experienced home cooks alike.
I find it incredibly versatile too. Whether you’re planning a casual backyard barbecue, a formal dinner party, or simply craving a delightful treat for yourself and your loved ones on a quiet evening, this pudding fits the bill perfectly. It’s a dessert that evokes happy memories and creates new ones, embodying everything wonderful about homemade treats. Its refreshing coolness makes it ideal for warmer months, but its comforting creaminess also makes it a delightful indulgence year-round. Seriously, this recipe isn’t just a dessert; it’s an experience, a delightful journey for your taste buds that I promise you won’t regret embarking on. It’s truly a dessert that adapts to your needs, whether you’re seeking a light, fruity finish or a rich, decadent treat.
Elevate Your Dessert: Serving Suggestions and Creative Variations
Now that you’re convinced this is a must-try, let’s talk about how to make it truly yours. One of the best things about this Strawberry Cheesecake Banana Pudding is its adaptability. For serving, I absolutely love individual clear glasses or mason jars. They perfectly showcase the beautiful layers, making each portion a little work of art. Imagine guests picking up their own jar, seeing the vibrant red of the strawberries, the creamy white of the pudding, and the golden hues of the bananas and wafers – it’s an invitation to pure bliss! Of course, a large trifle bowl is equally stunning for a family-style presentation, allowing everyone to scoop out generous portions. The visual impact alone is enough to impress, and the individual servings also make portion control and serving much easier.
But why stop there? Let’s get creative with toppings and variations to truly personalize your dessert. A dollop of freshly whipped cream, perhaps infused with a hint of vanilla bean or a drop of almond extract, can take this already divine pudding to new heights of decadence. For an extra touch of texture and flavor, consider sprinkling some finely grated white chocolate or dark chocolate shavings on top just before serving. A few extra fresh strawberry slices or even a whole, perfectly placed strawberry can act as a beautiful garnish. If you’re feeling adventurous, a crumble of toasted coconut flakes or even a sprinkle of chopped pecans could introduce an exciting new dimension. I’ve even experimented with a light dusting of freeze-dried strawberry powder, which intensifies the berry flavor and adds a beautiful pop of color! These small additions can transform a wonderful dessert into an unforgettable masterpiece tailored to your personal taste.
And don’t be afraid to play with the recipe itself! While the original is fantastic, you could experiment with different berries – a mix of raspberries and blueberries would be delightful, or even a layer of thinly sliced peaches for a summer twist. For those who enjoy a little extra zing, a tiny bit of lemon or orange zest folded into the cream cheese mixture can brighten everything up beautifully. If you’re making this for an adults-only occasion, a splash of strawberry liqueur or a hint of Grand Marnier in the pudding mixture could add a sophisticated depth. For dietary considerations, feel free to swap traditional vanilla wafers for gluten-free alternatives, or use a sugar substitute in the pudding if you’re mindful of sugar intake. The core components are so forgiving, allowing for endless possibilities to tailor it to your preferences or dietary needs. It’s truly a recipe that encourages your culinary creativity!
Your Turn: Embrace the Sweetness and Share Your Creations!
So, what are you waiting for? I truly, wholeheartedly encourage you to roll up your sleeves and give this incredible recipe a try. Don’t let the thought of making a “fancy” dessert intimidate you; this is all about enjoying the process and, most importantly, savoring the utterly delicious results. There’s something incredibly satisfying about creating a dessert from scratch that brings so much joy to those who taste it, and I promise you, this Strawberry Cheesecake Banana Pudding delivers on that promise every single time.
Once you’ve whipped up your own batch, I would absolutely love to hear about your experience! Did you stick to the classic recipe, or did you venture into some of the variations I suggested? Perhaps you came up with a brilliant twist of your own? I thrive on hearing about your kitchen adventures, so please don’t hesitate to share your thoughts, your successes, and even any questions you might have. Your feedback and creative ideas inspire not just me, but also our entire community of fellow food enthusiasts. There’s so much to learn and celebrate when we share our culinary journeys.
Take pictures of your beautiful layered creation! There’s nothing quite like seeing the vibrant colors and delightful textures of this pudding come to life through your lens. Sharing your results is a fantastic way to spread the joy and perhaps even inspire others to try their hand at this wonderful dessert. Let’s create a vibrant gallery of homemade goodness together! After all, food is meant to be shared, both in its making and its enjoyment. Happy baking, my friends, and I can’t wait to see and hear about your delicious Strawberry Cheesecake Banana Pudding masterpieces! Don’t hold back; let your inner dessert artist shine!
Strawberry Cheesecake Banana Pudding
An easy no-bake treat, this Strawberry Cheesecake Banana Pudding is a fusion masterpiece combining creamy cheesecake, sweet bananas, vibrant strawberries, and tender vanilla wafers into one sensational, layered dessert. Perfect for any occasion.
Ingredients
-
8 oz cream cheese, full-fat, softened
-
1/2 cup granulated sugar (for cheesecake)
-
1 tsp pure vanilla extract (for cheesecake)
-
1/4 tsp almond extract (optional)
-
1 cup cold heavy whipping cream
-
2 cups fresh strawberries, hulled and diced
-
1/4 cup granulated sugar (for glaze)
-
1 tbsp fresh lemon juice
-
1 tbsp cornstarch
-
2 tbsp cold water
-
2 (3.4 oz) packages instant vanilla pudding mix
-
3 cups cold whole milk
-
1 tsp pure vanilla extract (for pudding)
-
1 (8 oz) container thawed whipped topping OR 1 cup homemade whipped cream
-
4-5 ripe but firm bananas, sliced (about 4 cups)
-
1 (11 oz) box vanilla wafers
-
Optional garnishes: Fresh strawberry slices, extra vanilla wafers, whipped cream
Instructions
-
Step 1
In a large bowl, beat 8 oz softened cream cheese with 1/2 cup granulated sugar until smooth. Mix in 1 tsp vanilla and 1/4 tsp almond extract (optional). Gradually whip in 1 cup cold heavy cream until thick and fluffy. Refrigerate. -
Step 2
In a medium saucepan, combine 2 cups diced strawberries, 1/4 cup granulated sugar, and 1 tbsp lemon juice. Simmer over medium heat for 5-7 minutes. In a small bowl, whisk 1 tbsp cornstarch with 2 tbsp cold water to form a slurry. Stir slurry into simmering strawberries; cook 1-2 minutes until thickened. Remove from heat and cool completely. -
Step 3
In a very large bowl, whisk 2 (3.4 oz) instant vanilla pudding mixes with 3 cups cold whole milk for 2-3 minutes until thickened. Stir in 1 tsp pure vanilla extract. Gently fold in 1 (8 oz) thawed whipped topping or 1 cup homemade whipped cream until no streaks remain. Refrigerate for 15-20 minutes. -
Step 4
Slice 4-5 ripe but firm bananas into 1/4-inch rounds (about 4 cups). Have 1 (11 oz) box vanilla wafers ready for layering. -
Step 5
In a large 9×13-inch serving dish or trifle bowl, create the layers: First, a single layer of vanilla wafers. Then, arrange half of the sliced bananas evenly over the wafers. Spoon about half of the chilled banana pudding base over the bananas. Carefully spread half of the chilled creamy cheesecake layer over the pudding. Drizzle about half of the cooled strawberry glaze over the cheesecake. Repeat all layers: vanilla wafers, remaining bananas, remaining banana pudding, remaining cheesecake cream, and finally, the remaining luscious strawberry glaze on top. -
Step 6
Gently cover the dish tightly with plastic wrap. Refrigerate for a minimum of 4 hours, preferably 6-8 hours or even overnight, to allow flavors to meld and wafers to soften. Before serving, garnish with fresh strawberry slices, extra vanilla wafers, or a dollop of whipped cream if desired. Scoop generous portions and enjoy chilled. Store covered in the refrigerator for up to 3 days.
Important Information
Nutrition Facts (Per Serving)
It is important to consider this information as approximate and not to use it as definitive health advice.
Allergy Information
Please check ingredients for potential allergens and consult a health professional if in doubt.

Leave a Comment