
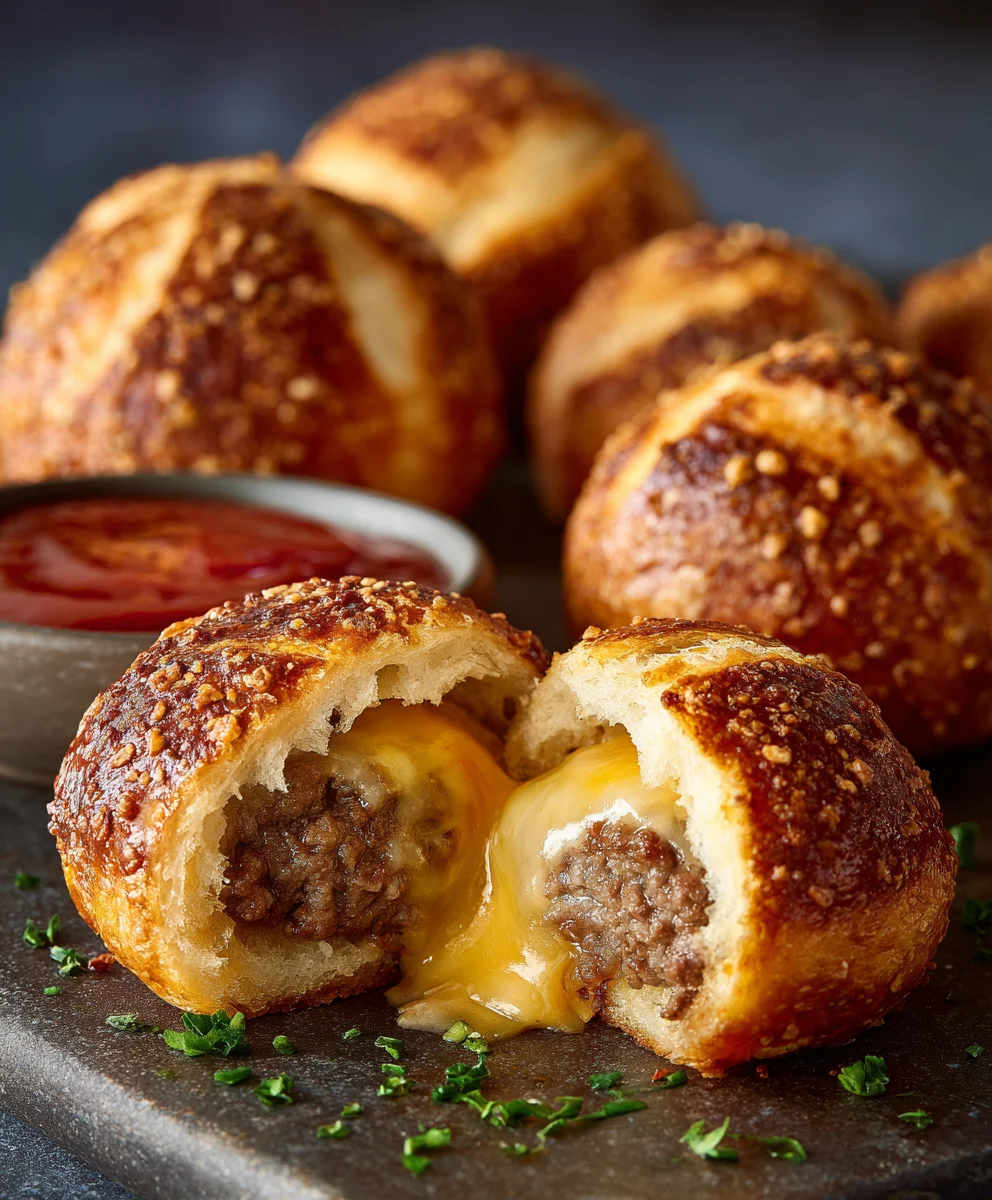
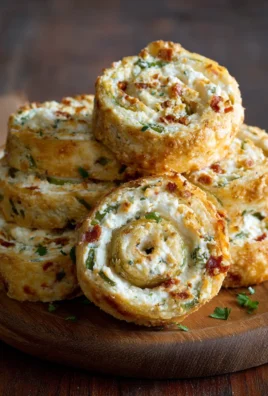
Cheeseburger Pretzel Bombs are more than just a snack; they are a culinary revelation that brings together two of America’s most beloved comfort foods in an utterly irresistible package. Imagine the juicy, savory goodness of a classic cheeseburger, complete with melted cheese and perfectly seasoned beef, all encased within the warm, soft, and slightly salty embrace of a perfectly baked pretzel. It’s a flavor and texture explosion that promises to delight with every bite.
While the traditional cheeseburger holds a cherished place in American culinary history as an icon of casual dining and backyard barbecues, and the pretzel boasts a rich heritage tracing back to European monasteries, this innovative fusion represents a delightful modern twist on both. This dish isn’t just a novelty; it’s a testament to how incredible comfort food can evolve, offering the familiar, hearty satisfaction of a burger combined with the unique, chewy appeal of a pretzel.
People absolutely adore this creation for its incredible taste profile and versatile nature. Each bomb offers that coveted gooey cheese pull, the robust flavor of beef, and the distinct, satisfying chew of a pretzel crust, creating an experience that is both comforting and exciting. They are the ultimate crowd-pleaser, ideal for game nights, parties, or simply as a fun, satisfying treat that’s easy to prepare and even easier to devour. Get ready to impress your friends and family with these truly exceptional Cheeseburger Pretzel Bombs, a guaranteed hit that will have everyone reaching for more.
Ingredients:
-
For the Irresistible Cheeseburger Filling:
- 1 pound Lean Ground Beef (85/15 or 90/10 recommended): Using lean ground beef is really key here because we want a flavorful filling, but we don’t want it to be greasy, which could make our pretzel bombs soggy. The leaner cuts provide that robust beefy taste without excessive fat that would need to be drained, although we’ll still keep an eye on it.
- 1 small Yellow Onion, finely diced: A finely diced onion melts into the beef as it cooks, adding a subtle sweetness and aromatic depth without any chunky bits. It’s a foundational flavor for any good cheeseburger.
- 2 cloves Garlic, minced: Garlic is simply essential! Its pungent, savory notes elevate the beef mixture beautifully. Don’t skip this, or if you’re a garlic lover like me, feel free to add an extra clove.
- 1/4 cup Ketchup: This provides that classic tangy, slightly sweet tomato base that defines a cheeseburger. It’s a core flavor component, balancing the richness of the beef.
- 2 tablespoons Yellow Mustard (or Dijon for a sophisticated twist): Yellow mustard lends that characteristic zing and sharpness that cuts through the richness of the beef and cheese. If you prefer a more gourmet flavor, Dijon mustard offers a slightly spicier, more complex tang.
- 1 tablespoon Worcestershire Sauce: This magical ingredient adds an incredible depth of umami. It really enhances the savory notes of the beef, making the filling taste more complex and satisfying.
- 1/2 teaspoon Salt: Essential for seasoning and bringing out all the flavors. We’ll adjust this to taste later, but this is a good starting point.
- 1/4 teaspoon Black Pepper, freshly ground: Freshly ground pepper always offers a brighter, more potent flavor than pre-ground. It adds a lovely, subtle heat.
- 1 cup Shredded Sharp Cheddar Cheese (or a blend of cheddar and Monterey Jack): We need cheese that melts beautifully and delivers a punch of flavor. Sharp cheddar is perfect, but a blend with Monterey Jack will give you an even creamier, stretchier melt. Make sure it’s shredded so it incorporates easily into the warm filling.
- 1/4 cup Dill Pickle, finely diced (optional, but highly recommended for that true cheeseburger experience): If you love pickles on your burger, you’ll love them in these bombs! The acidity and crunch of finely diced dill pickles really brighten the whole mixture and provide that unmistakable cheeseburger tang.
- 4 strips Bacon, cooked crispy and crumbled (optional, for extra indulgence): Oh, bacon! If you want to take your Cheeseburger Pretzel Bombs to the next level of deliciousness, a bit of crispy, smoky bacon is the answer. It adds an amazing textural and flavor dimension.
-
For the Pretzel Bomb Shell:
- 2 cans (16.3 ounces each) Refrigerated Large Flaky Biscuits (8 biscuits per can): These are our shortcut heroes! Using store-bought biscuit dough makes the process so much easier and quicker. The large, flaky variety works best as they are easy to flatten and wrap around the filling, creating a lovely soft interior. Make sure to get the “flaky” kind if possible, as it yields a more tender final texture.
-
For the Authentic Pretzel Finish:
- 10 cups Water: This will be the base for our alkaline bath, crucial for achieving that characteristic deep brown color and chewy pretzel crust.
- 1 cup Baking Soda: This is the secret ingredient for transforming ordinary biscuit dough into a glorious pretzel. When dissolved in hot water, baking soda creates an alkaline solution that reacts with the starches in the dough during baking, giving us that distinctive dark, shiny crust and unique pretzel flavor.
- 1 large Egg, beaten: An egg wash provides a beautiful sheen and helps the pretzel salt adhere perfectly. It gives our bombs that professional, appetizing finish.
- 2 tablespoons Pretzel Salt or Coarse Sea Salt: That signature chunky salt on top isn’t just for looks; it adds bursts of savory flavor and a delightful textural contrast. Pretzel salt has larger, irregular crystals, perfect for this application. If you can’t find it, coarse sea salt is a great alternative.
Preparing the Savory Cheeseburger Filling
-
Brown the Beef and Aromatics: First things first, we need to get our delicious cheeseburger filling going. Grab a large skillet or a Dutch oven and place it over medium-high heat. Add your 1 pound of lean ground beef to the hot pan. Using a wooden spoon or spatula, break up the beef as it cooks. We want it to brown evenly, losing all that pink color. Once it’s mostly browned, toss in your finely diced small yellow onion and the minced garlic.
<h4>Why this step is important:</h4>
Cooking the beef until it’s nicely browned develops a deeper, richer flavor through the Maillard reaction. Adding the onions and garlic at this stage allows them to soften and release their aromatic compounds, infusing the beef with wonderful savory notes. Cook them until the onion becomes translucent and the garlic is fragrant, usually about 3-5 minutes. Be careful not to burn the garlic! -
Drain Excess Fat: Even with lean ground beef, there might be a little rendered fat in the pan. Carefully tilt the skillet and use a spoon to scoop out any excess fat. You can also use a paper towel to blot it, being very careful not to burn yourself.
<h4>The key to a non-soggy bomb:</h4>
This is a crucial step for our Cheeseburger Pretzel Bombs! If we leave too much fat in the filling, it can make the pretzel dough greasy and soggy, which is definitely not what we’re aiming for. We want that perfect, tender dough encasing a flavorful, but not oily, filling. -
Stir in the Sauces and Seasonings: Now for the magic! Reduce the heat to low. Add the 1/4 cup ketchup, 2 tablespoons yellow mustard (or Dijon, if you chose that route!), and the 1 tablespoon Worcestershire sauce to the beef mixture. Sprinkle in the 1/2 teaspoon salt and 1/4 teaspoon freshly ground black pepper. Stir everything together really well, making sure all the beef crumbles are coated in that tangy, savory sauce. Let it simmer gently for about 5 minutes, allowing the flavors to meld and deepen.
<h4>Building the classic cheeseburger profile:</h4>
These ingredients are what truly give our filling that unmistakable cheeseburger taste. The simmering allows the flavors to concentrate and permeate the beef, creating a really cohesive and delicious base. -
Incorporate Cheese and Optional Add-ins: Remove the skillet from the heat. Now, stir in your 1 cup shredded sharp cheddar cheese. The residual heat from the beef mixture will start to melt the cheese beautifully, making it gooey and incorporated. This is also the time to add your optional, but highly recommended, 1/4 cup finely diced dill pickle and the 4 strips of crispy, crumbled bacon. Give it another good stir until everything is evenly distributed and the cheese is mostly melted and wonderfully stringy.
<h4>Customizing your bombs:</h4>
Adding the cheese off the heat prevents it from seizing up and keeps it nice and creamy. The pickles and bacon are game-changers here, adding texture, tang, and that irresistible smoky flavor. Feel free to adjust these optional ingredients based on your personal preferences! -
Cool the Filling Completely: Transfer the cheeseburger filling to a bowl and let it cool completely. You can even pop it into the refrigerator for 30 minutes to an hour to speed up the process.
<h4>Why cooling is essential:</h4>
This step is absolutely critical! If you try to stuff hot or even warm filling into the biscuit dough, it will make the dough sticky, difficult to work with, and prone to tearing. A cool, firm filling is much easier to manage and helps prevent blowouts during baking. Trust me on this one; patience here pays off!
Assembling Your Cheeseburger Pretzel Bombs
-
Prepare Your Workstation: Preheat your oven to 400°F (200°C). Line two large baking sheets with parchment paper or silicone baking mats. This will prevent sticking and make cleanup a breeze. While the oven preheats, you can prepare your pretzel bath, but it’s sometimes easier to do this right before dipping.
<h4>Efficiency and ease:</h4>
Having everything prepped and ready before you start assembling makes the whole process smoother and more enjoyable. -
Prepare the Biscuit Dough: Open your cans of refrigerated large flaky biscuits. Separate each biscuit. On a lightly floured surface, or even just on your clean countertop, take one biscuit and gently flatten it into a circle, about 4-5 inches in diameter. You can use a rolling pin if you have one, or just the palms of your hands. Don’t make it too thin, or it might tear, but make it wide enough to comfortably hold a spoonful of filling. Repeat this for all biscuits.
<h4>Working with the dough:</h4>
The flakiness of these biscuits makes them really forgiving and easy to work with. Aim for an even thickness to ensure uniform baking. If the dough starts to feel sticky, a tiny bit more flour on your hands or the surface will help. -
Portion and Stuff the Filling: Take a spoonful (about 1.5 to 2 tablespoons, depending on the size of your flattened biscuit) of the cooled cheeseburger filling and place it in the center of a flattened biscuit. Don’t overfill, or it will be difficult to seal.
<h4>The art of stuffing:</h4>
The amount of filling is a balance. Too little, and you miss out on flavor; too much, and sealing becomes a nightmare. Aim for a generous but manageable dollop. -
Seal Your Cheeseburger Pretzel Bombs: Carefully gather the edges of the biscuit dough up and over the filling. Pinch the dough seams together firmly at the top to completely enclose the filling. Make sure there are no gaps or holes, as we don’t want any delicious filling leaking out during baking. Once sealed, gently roll the dough in your hands to form a smooth, round ball. Place the sealed bomb seam-side down on your prepared baking sheet. Repeat this process with the remaining biscuits and filling. You should end up with 16 perfectly formed bombs.
<h4>Ensuring a perfect seal:</h4>
This step requires a little bit of care. Think of it like making a dumpling or a small purse. Pinching tightly is key. A good seal ensures all that cheesy, beefy goodness stays right where it belongs inside our golden pretzel shell.
The Authentic Pretzel Treatment
-
Prepare the Alkaline Bath: In a large, wide pot or Dutch oven, bring 10 cups of water to a rolling boil over high heat. Once boiling, very carefully and slowly whisk in the 1 cup of baking soda. Be prepared for it to foam up quite a bit – this is normal! Reduce the heat to low, so the water is just simmering gently.
<h4>The Science Behind the Pretzel Crust:</h4>
This baking soda bath is the secret to that authentic pretzel flavor and deep brown, chewy crust. The alkaline solution chemically alters the surface of the dough, promoting browning and a unique texture that plain baked dough simply can’t achieve. Always add the baking soda slowly to boiling water, as it will react and foam up. Do this cautiously to avoid any spills or burns. -
Dip the Pretzel Bombs: Working in batches of 2-3 bombs at a time (don’t overcrowd the pot!), carefully lower each sealed biscuit ball into the simmering baking soda bath using a slotted spoon. Let them simmer for about 20-30 seconds per side. You’ll notice them puff up slightly and take on a slightly darker hue.
<h4>Precision is key for texture and color:</h4>
The dipping time is important. Too short, and you won’t get the full pretzel effect. Too long, and the dough can start to break down. Aim for that 20-30 second sweet spot on each side for optimal results. -
Transfer and Prepare for Baking: Using your slotted spoon, carefully remove the pretzel bombs from the bath, letting any excess water drain off. Place them back on the parchment-lined baking sheets, leaving about 2 inches of space between each bomb. The dough will be a bit delicate after the bath, so handle them gently.
<h4>Gentle handling:</h4>
They might look a bit wrinkly or soft at this stage, but don’t worry, they’ll puff up beautifully in the oven. -
Apply Egg Wash and Pretzel Salt: In a small bowl, lightly beat the 1 large egg. Using a pastry brush, gently brush the tops and sides of each dipped pretzel bomb with the beaten egg wash. This egg wash will give them a gorgeous golden shine and help our salt adhere. Immediately sprinkle a generous amount of pretzel salt (or coarse sea salt) over the tops of each bomb.
<h4>The finishing touches:</h4>
The egg wash not only provides a beautiful glossy finish but also acts as “glue” for the pretzel salt, ensuring those delightful bursts of salty crunch are present in every bite. Don’t be shy with the salt; it’s part of the authentic pretzel experience!
Baking Your Golden-Brown Delights
-
Bake to Golden Perfection: Place your baking sheets into the preheated 400°F (200°C) oven. Bake for 18-22 minutes, or until the Cheeseburger Pretzel Bombs are deeply golden brown and puffed up. The exact baking time can vary depending on your oven, so keep an eye on them after about 18 minutes. We’re looking for that rich, dark pretzel color.
<h4>Visual cues for doneness:</h4>
A beautifully baked pretzel bomb will be a uniform deep golden to light brown, indicating that the dough is cooked through and the pretzel crust has fully developed. They should sound hollow if you tap them gently. -
Cool and Serve: Once baked, remove the pretzel bombs from the oven and transfer them to a wire rack to cool for 5-10 minutes. This cooling time is important. While they might be tempting to bite into immediately, giving them a few minutes allows the filling to set slightly and prevents you from burning your mouth on that molten cheese!
<h4>Best enjoyed warm:</h4>
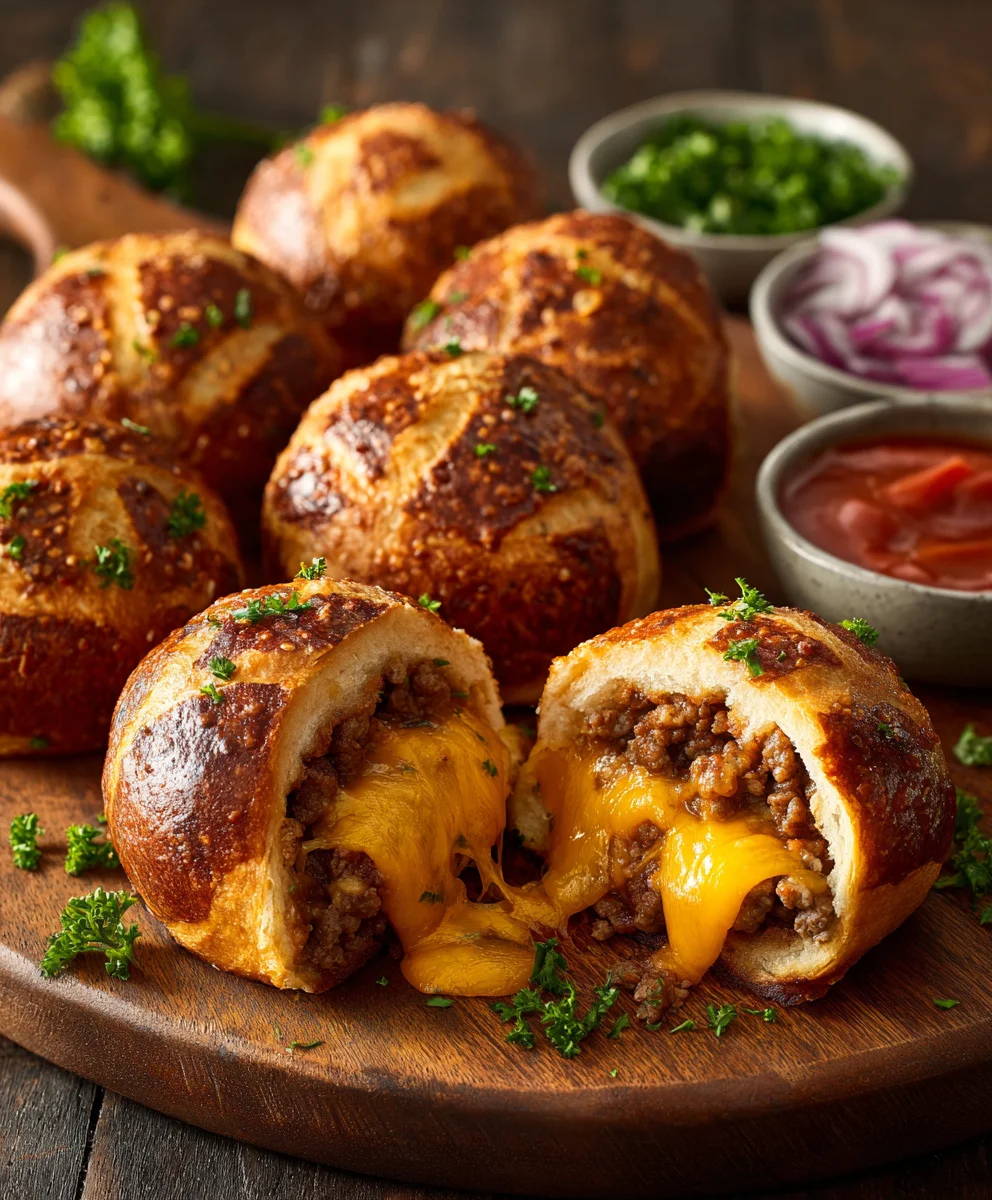
These Cheeseburger Pretzel Bombs are absolutely best served warm, fresh out of the oven, when the dough is soft and chewy, and the cheeseburger filling is hot and gooey.
They are fantastic on their own, but if you want to really elevate the experience, consider serving them with extra ketchup, mustard, or even a homemade “secret sauce” for dipping. Imagine a creamy sriracha aioli or a tangy barbecue ranch! The possibilities for dipping are endless, and they truly make these already amazing “Cheeseburger Pretzel Bombs” an unforgettable treat for any occasion. They are perfect for game day, parties, or just a fun family dinner. Each bite is a delightful explosion of savory cheeseburger flavor wrapped in a perfectly chewy, salty pretzel crust. Enjoy!
Conclusion:
And there you have it, my friends! After delving into all the delicious details, I genuinely hope you’re as excited as I am about these incredible culinary creations. I truly believe that this recipe isn’t just another dish; it’s an experience, a delightful journey for your taste buds that you absolutely have to embark on. What makes these particular treats so utterly irresistible, you ask? Well, it’s the ingenious fusion of two beloved comfort foods into one handheld, incredibly satisfying package. Imagine the savory, juicy goodness of a classic cheeseburger, perfectly seasoned and nestled within a warm, chewy, golden-brown pretzel crust. It’s a combination that sounds almost too good to be true, but I promise you, it delivers on every single promise of flavor and texture. From the moment you take that first bite, you’ll understand why I’m so passionate about these amazing bites. The delightful surprise of the melted cheese, gooey and rich, mingling with the hearty ground beef, all encased in that distinctive, slightly salty, chewy pretzel dough, is simply unparalleled. It’s comfort food elevated, party food perfected, and a surefire way to bring smiles to anyone who tries them.
Why These Cheeseburger Pretzel Bombs Are a Game-Changer
These aren’t just snacks; they are a celebration of flavor and ingenuity. I’ve found that they consistently steal the show at every gathering, whether it’s a casual get-together, a lively game day party, or even a fun family dinner when you want to shake things up. The fact that they are individual portions makes them incredibly easy to serve and enjoy, eliminating the need for plates and forks, which is a huge bonus in my book! They’re the ultimate grab-and-go gourmet bite, bursting with that familiar, beloved cheeseburger flavor but with an exciting, unexpected twist. I particularly love the way the pretzel crust adds a unique depth and a wonderfully satisfying chew that a traditional burger bun simply can’t replicate. It’s truly a texture sensation that sets these apart, making them not just delicious, but also memorable. They are, without a doubt, a must-try for anyone who appreciates creative cooking and sensational flavors.
Making Them Your Own: Serving Suggestions and Delicious Variations
Now, let’s talk about taking your Cheeseburger Pretzel Bombs to the next level! While they are absolutely divine on their own, a little accompaniment can make them even more special. For dipping, I highly recommend a classic trio of ketchup, yellow mustard, and a creamy ranch dressing. If you’re feeling adventurous, a homemade “secret sauce” combining mayonnaise, ketchup, relish, and a dash of hot sauce can elevate the experience to that of your favorite burger joint. For those who love a bit of heat, a spicy Sriracha mayo or a jalapeño cheddar dip would be phenomenal. Don’t forget the pickles! A side of crisp pickle spears or even some tangy bread and butter pickles can cut through the richness beautifully, adding that essential burger complement. Crispy onion rings or a simple side salad could also make for a more complete meal.
But the fun doesn’t stop at dipping! The beauty of this recipe lies in its incredible versatility. You can easily customize these bombs to suit your personal preferences or what you have on hand. For the meat, feel free to experiment with ground turkey or even plant-based ground “meat” for a delicious vegetarian option. Change up the cheese – pepper jack will add a lovely kick, sharp cheddar offers a more robust flavor, or even a smoked gouda could introduce an interesting dimension. Think about incorporating mix-ins directly into your beef mixture: finely diced cooked bacon for a bacon cheeseburger bomb, caramelized onions for a sweeter note, or a sprinkle of finely chopped pickled jalapeños for a spicy surprise. Some people love to add a teaspoon of Worcestershire sauce or a touch of liquid smoke to the meat for an extra layer of savory depth. After baking, a sprinkle of toasted sesame seeds on top can give them that classic burger bun look, adding to the visual appeal. The possibilities are truly endless, and I encourage you to get creative in your kitchen!
Your Turn: Try, Share, and Inspire!
Now that I’ve shared all my enthusiasm and tips, it’s your turn to roll up your sleeves and bring these incredible creations to life! I genuinely can’t wait for you to experience the joy of making and tasting these fantastic Cheeseburger Pretzel Bombs for yourself. This recipe is not just about following steps; it’s about creating something truly special, something that will undoubtedly impress your friends and family and become a staple in your recipe repertoire. Don’t be afraid to experiment, to put your own unique spin on them, and to truly make them your own. Cooking should always be an adventure, and this recipe offers plenty of room for creative exploration. Once you’ve whipped up a batch, I would absolutely love to hear about your experience! Please share your thoughts in the comments below, tell me about any variations you tried, and, if you’re comfortable, even post a picture of your delicious creations. Your feedback not only brightens my day but also helps other home cooks feel inspired and confident to try the recipe themselves. So go ahead, get baking, and prepare to be amazed by the deliciousness you’ve created!
Happy cooking, everyone!
Ultimate Cheeseburger Pretzel Bombs: Savory Bite-Sized Fun!
Cheeseburger Pretzel Bombs are more than just a snack; they are a culinary revelation that brings together two of America’s most beloved comfort foods in an utterly irresistible package. Imagine the juicy, savory goodness of a classic cheeseburger, complete with melted cheese and perfectly seasoned beef, all encased within the warm, soft, and slightly salty embrace of a perfectly baked pretzel. It’s a flavor and texture explosion that promises to delight with every bite.
Ingredients
-
1 lb Lean Ground Beef (85/15 or 90/10)
-
1 small Yellow Onion, finely diced
-
2 cloves Garlic, minced
-
1/4 cup Ketchup
-
2 tbsp Yellow Mustard (or Dijon)
-
1 tbsp Worcestershire Sauce
-
1/2 tsp Salt
-
1/4 tsp Freshly Ground Black Pepper
-
1 cup Shredded Sharp Cheddar Cheese (or cheddar/Monterey Jack blend)
-
1/4 cup Finely Diced Dill Pickle (optional)
-
4 strips Beef Bacon, cooked crispy & crumbled (optional)
-
2 cans (16.3 oz each) Refrigerated Large Flaky Biscuits (8 biscuits per can)
-
10 cups Water
-
1 cup Baking Soda
-
1 large Egg, beaten
-
2 tbsp Pretzel Salt or Coarse Sea Salt
Instructions
-
Step 1
In a large skillet over medium-high heat, brown 1 lb lean ground beef. Add 1 small finely diced yellow onion and 2 minced garlic cloves; cook until softened (3-5 min). Drain excess fat. -
Step 2
Reduce heat to low. Stir in 1/4 cup ketchup, 2 tbsp yellow mustard, 1 tbsp Worcestershire sauce, 1/2 tsp salt, and 1/4 tsp freshly ground black pepper. Simmer 5 minutes. Remove from heat, then stir in 1 cup shredded sharp cheddar cheese, optional 1/4 cup finely diced dill pickle, and optional 4 strips crispy, crumbled beef bacon. -
Step 3
Transfer cheeseburger filling to a bowl and cool completely (refrigerate for 30-60 minutes to speed up). -
Step 4
Preheat oven to 400°F (200°C). Line two large baking sheets with parchment paper. Open 2 cans of refrigerated large flaky biscuits and flatten each biscuit into a 4-5 inch circle. -
Step 5
Place 1.5-2 tablespoons of the cooled cheeseburger filling in the center of each flattened biscuit. Gather dough edges over the filling and pinch firmly to completely seal, forming a smooth, round ball. Place sealed bombs seam-side down on prepared baking sheets. -
Step 6
In a large, wide pot, bring 10 cups of water to a rolling boil. Carefully and slowly whisk in 1 cup of baking soda (it will foam up). Reduce heat to low simmer. -
Step 7
Working in batches (2-3 bombs), carefully lower each sealed biscuit ball into the simmering baking soda bath using a slotted spoon. Simmer for 20-30 seconds per side. Remove, letting excess water drain, and return to the parchment-lined baking sheets. -
Step 8
Brush the tops and sides of each dipped pretzel bomb with 1 beaten large egg. Immediately sprinkle a generous amount of 2 tbsp pretzel salt or coarse sea salt over the tops. -
Step 9
Bake in the preheated 400°F (200°C) oven for 18-22 minutes, or until deeply golden brown and puffed up. -
Step 10
Remove from oven and transfer to a wire rack to cool for 5-10 minutes. Serve warm, optionally with extra ketchup, mustard, or a dipping sauce.
Important Information
Nutrition Facts (Per Serving)
It is important to consider this information as approximate and not to use it as definitive health advice.
Allergy Information
Please check ingredients for potential allergens and consult a health professional if in doubt.
Leave a Comment