
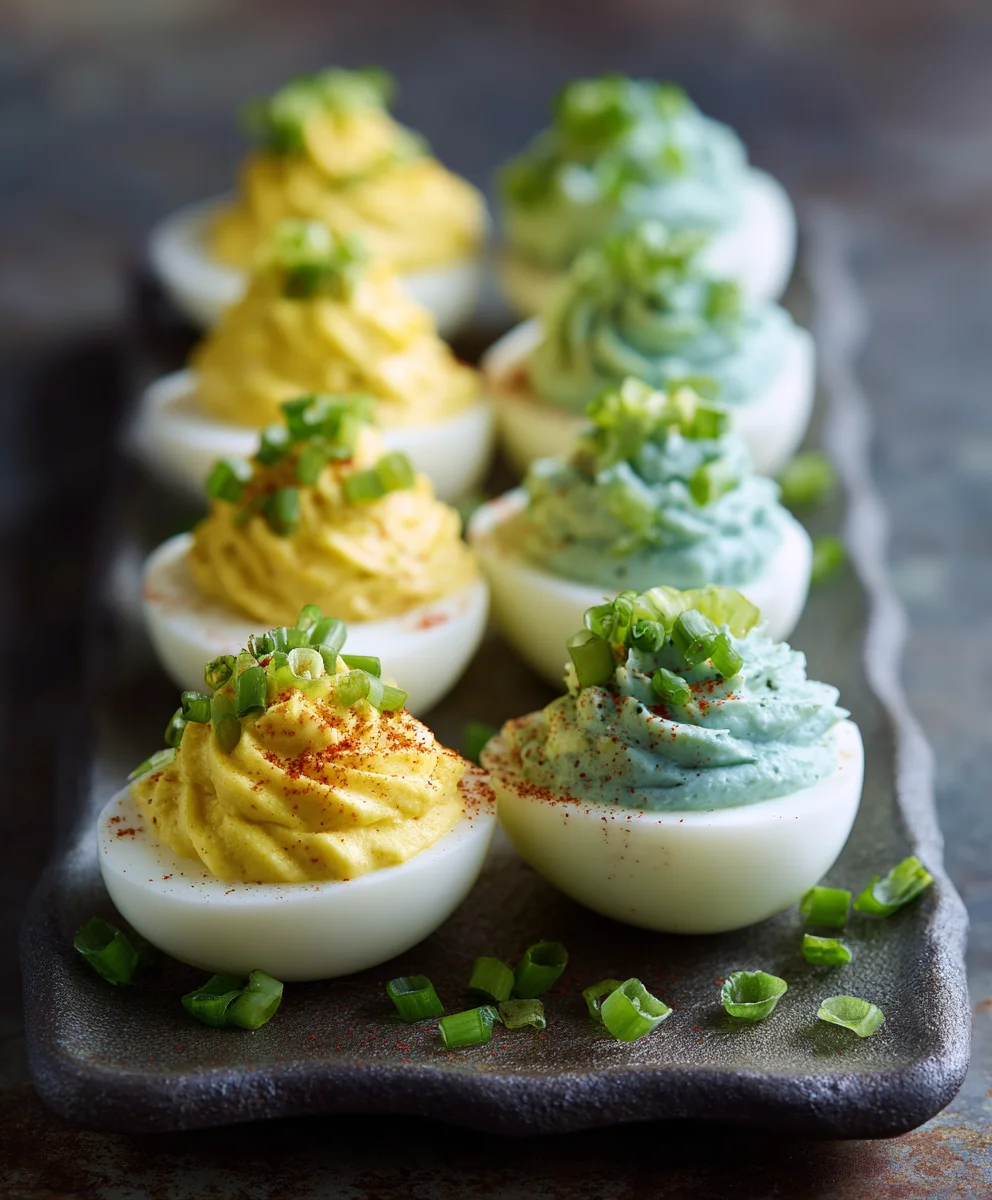
Colored Deviled Eggs are not just a simple appetizer; they are a delightful culinary surprise that, I believe, consistently brightens any gathering. Imagine the gasp of delight from your guests as they encounter a platter of these vibrant, jewel-toned beauties, each one promising a creamy, savory bite. It’s a playful, modern twist on a timeless classic, transforming the humble deviled egg into an eye-catching centerpiece that I always find immensely satisfying to present.
The concept of deviled eggs dates back to ancient Rome, evolving through centuries to become the beloved American picnic and party staple we know today. While the traditional recipe remains a firm favorite, introducing vibrant hues to the egg whites elevates the experience entirely. This simple yet ingenious modification makes Colored Deviled Eggs perfect for festive occasions like Easter brunches, baby showers, or even just a fun weekend get-together. We love this dish not only for its irresistible creamy texture and perfectly balanced flavors – a delightful mix of savory and tangy – but also for its sheer convenience. They are easy to prepare in advance, transport effortlessly, and are guaranteed crowd-pleasers. For me, preparing them is a joy, and watching them disappear from the plate is even more satisfying!
Ingredients:
- 12 large eggs: Fresh eggs are best for flavor, but sometimes older eggs can be easier to peel. We’re aiming for perfect hard-boiled eggs!
- 1/2 cup mayonnaise: I prefer full-fat mayonnaise for the creamiest texture and richest flavor, but feel free to use your favorite brand or even a light version if you prefer.
- 2 tablespoons Dijon mustard: Dijon adds a lovely tang and a bit of sophisticated flavor. If you prefer a classic, slightly sharper taste, yellow mustard can be used instead.
- 1 tablespoon white vinegar or apple cider vinegar: This brightens up the filling and cuts through the richness of the egg yolks and mayonnaise. A little acidity is key to a balanced flavor.
- 1/2 teaspoon salt: Fine sea salt is my go-to for even seasoning.
- 1/4 teaspoon black pepper: Freshly ground pepper makes a huge difference in aroma and taste.
- Pinch of smoked paprika or regular paprika for garnish: This adds a beautiful pop of color and a hint of smoky flavor if you use the smoked variety.
- Gel food coloring (various colors): Gel colors are concentrated and won’t dilute your coloring baths as much as liquid food coloring. I love using vibrant colors like blue, green, pink, purple, and yellow to create a rainbow of Colored Deviled Eggs.
- Optional garnishes: Fresh chives, dill, a sprinkle of cayenne pepper for a kick, or even a tiny piece of crispy bacon or capers.
Preparing the Perfect Hard-Boiled Eggs:
Achieving perfectly cooked and easily peelable hard-boiled eggs is the foundational step for our beautiful Colored Deviled Eggs. Trust me, a bad peel can ruin the aesthetic!
- Gentle Placement: Carefully place your 12 large eggs in a single layer at the bottom of a large saucepan. You want them to have enough room so they don’t crack against each other during boiling.
- Cover with Water: Pour cold water over the eggs until they are covered by at least one inch of water. This ensures even cooking.
- Bring to a Rolling Boil: Place the saucepan over high heat and bring the water to a rapid, rolling boil.
- Remove from Heat and Cover: As soon as the water reaches a full boil, immediately remove the saucepan from the heat. Cover the pot with a lid and let the eggs sit in the hot water for exactly 10-12 minutes. For a slightly softer, creamier yolk, aim for 10 minutes. For a firmer, more traditional deviled egg yolk, go for 12 minutes. Consistency is key here!
- Prepare an Ice Bath: While the eggs are sitting, prepare a large bowl filled with ice water. This ice bath is crucial for two reasons: it stops the cooking process immediately, preventing that unappealing green ring around the yolk, and it helps the egg whites contract, making them significantly easier to peel.
- Transfer to Ice Bath: Using a slotted spoon, carefully transfer the hot eggs from the saucepan directly into the ice bath. Let them cool in the ice water for at least 10-15 minutes, or until they are completely cool to the touch. This step cannot be rushed.
- Gentle Peeling: Once fully cooled, gently tap each egg on a hard surface to crack the shell all around. Roll the egg between your hands to further loosen the shell. Then, starting from the larger end of the egg (where the air pocket usually forms), carefully peel the shell under cool running water. The water helps to wash away small shell fragments and can make the peeling process smoother. If you encounter any stubborn spots, try peeling from a different area. We’re aiming for smooth, intact egg whites.
- Rinse and Pat Dry: After peeling, quickly rinse the whites under cold water to ensure no tiny shell fragments remain. Then, very gently pat each egg white dry with a paper towel. This will prevent any excess water from diluting our colorful dyeing solutions.
Separating Yolks and Whites, and Coloring the Egg Whites:
Now comes the fun, vibrant part of making your impressive Colored Deviled Eggs!
- Halve the Eggs: Using a sharp knife, carefully slice each peeled hard-boiled egg in half lengthwise. Try to make clean, straight cuts for a neat presentation.
- Scoop out Yolks: Gently scoop out the bright yellow yolks into a medium-sized mixing bowl. Be very careful not to tear or damage the egg white halves, as these will be our colorful vessels for the filling. Place the empty egg white halves onto a plate or a clean cutting board, ready for their colorful transformation.
- Prepare Coloring Baths: Now for the magic! For each color you wish to use, prepare a separate small bowl or deep ramekin.
- Fill each bowl with approximately 1/2 to 1 cup of cold water.
- Add a few drops (start with 3-5 drops) of your chosen gel food coloring to each bowl. The amount of coloring will depend on the intensity you desire. Remember, gel colors are highly concentrated, so a little goes a long way. Stir well to dissolve the color evenly in the water.
- For an extra boost to the color absorption and to help set the color, I like to add 1 teaspoon of white vinegar to each coloring bath. This helps the color penetrate the egg whites more effectively.
- Submerge Egg Whites: Carefully place the hollowed-out egg white halves into the prepared coloring baths, ensuring they are fully submerged. You can place several halves of the same color into one bowl, as long as they aren’t overcrowded and are completely covered by the colored water.
- Soak for Color: Let the egg whites soak in the coloring baths.
- For pastel or lighter shades, soak for about 10-15 minutes.
- For more vibrant, deeper colors, soak for 30 minutes to an hour. You can even leave them longer, up to several hours in the refrigerator, for extremely intense hues. I often check them every 15 minutes or so to gauge the color development.
- If you want a two-tone effect, you can soak one half in one color and then carefully transfer it to another color, or partially submerge it. The creative possibilities are endless for your Colored Deviled Eggs!
- Remove and Dry: Once your egg whites have reached your desired color intensity, carefully remove them from the coloring baths using a slotted spoon. Gently place them cut-side down on a wire rack set over a baking sheet, or on a plate lined with paper towels. Allow them to air dry for at least 15-20 minutes. This step is important to ensure the colors are set and to prevent any moisture from making your filling watery. You can also lightly blot them with a clean paper towel if you’re in a hurry, but be gentle not to rub off the color.
Preparing the Creamy Deviled Egg Filling:
While your beautifully colored egg whites are drying, it’s the perfect time to prepare the delicious, creamy heart of your Colored Deviled Eggs.
- Mash the Yolks: In the bowl containing the reserved egg yolks, use a fork or a potato masher to thoroughly mash the yolks until they are completely smooth and free of any large lumps. You want a very fine, consistent texture for a silky filling.
- Add Wet Ingredients: Add the mayonnaise, Dijon mustard, and white vinegar to the mashed yolks.
- Season: Sprinkle in the salt and black pepper. This is your initial seasoning, but we’ll adjust later.
- Mix Until Smooth and Creamy: Using the back of your fork, a whisk, or even a rubber spatula, vigorously mix all the ingredients together until the filling is perfectly smooth, creamy, and well combined. There should be no streaks of unmixed ingredients. If the mixture seems a bit too thick, you can add another tiny splash of vinegar or a teaspoon more mayonnaise until it reaches your desired consistency – smooth and pipeable, but not runny.
- Taste and Adjust: This is a crucial step! Taste a small spoonful of the filling. Does it need more salt? A little more pepper? Perhaps a touch more mustard for tang, or vinegar for brightness? Adjust the seasonings to your personal preference. Remember, the flavor of the filling is just as important as the visual appeal of your Colored Deviled Eggs. Don’t be shy about making it perfect for your palate.
Assembling and Garnishing Your Colored Deviled Eggs:
The moment of truth! Bringing together the vibrant whites and the savory filling to create a stunning presentation.
- Prepare for Piping: For the neatest and most professional-looking Colored Deviled Eggs, I highly recommend using a piping bag fitted with a star tip (like an Ateco 826 or Wilton 1M) or a round tip. If you don’t have a piping bag, a sturdy Ziploc bag with one corner snipped off will work just as well, though the presentation will be simpler. Spoon all the creamy yolk filling into your prepared piping bag.
- Fill the Egg Whites: Hold a colored egg white half in one hand or arrange them neatly on your serving platter. Using your piping bag, pipe the filling into the center of each hollowed-out egg white. Aim for a generous mound that fills the cavity and creates an attractive dome or swirl. The contrasting colors of the filling and the egg white are what make these so striking!
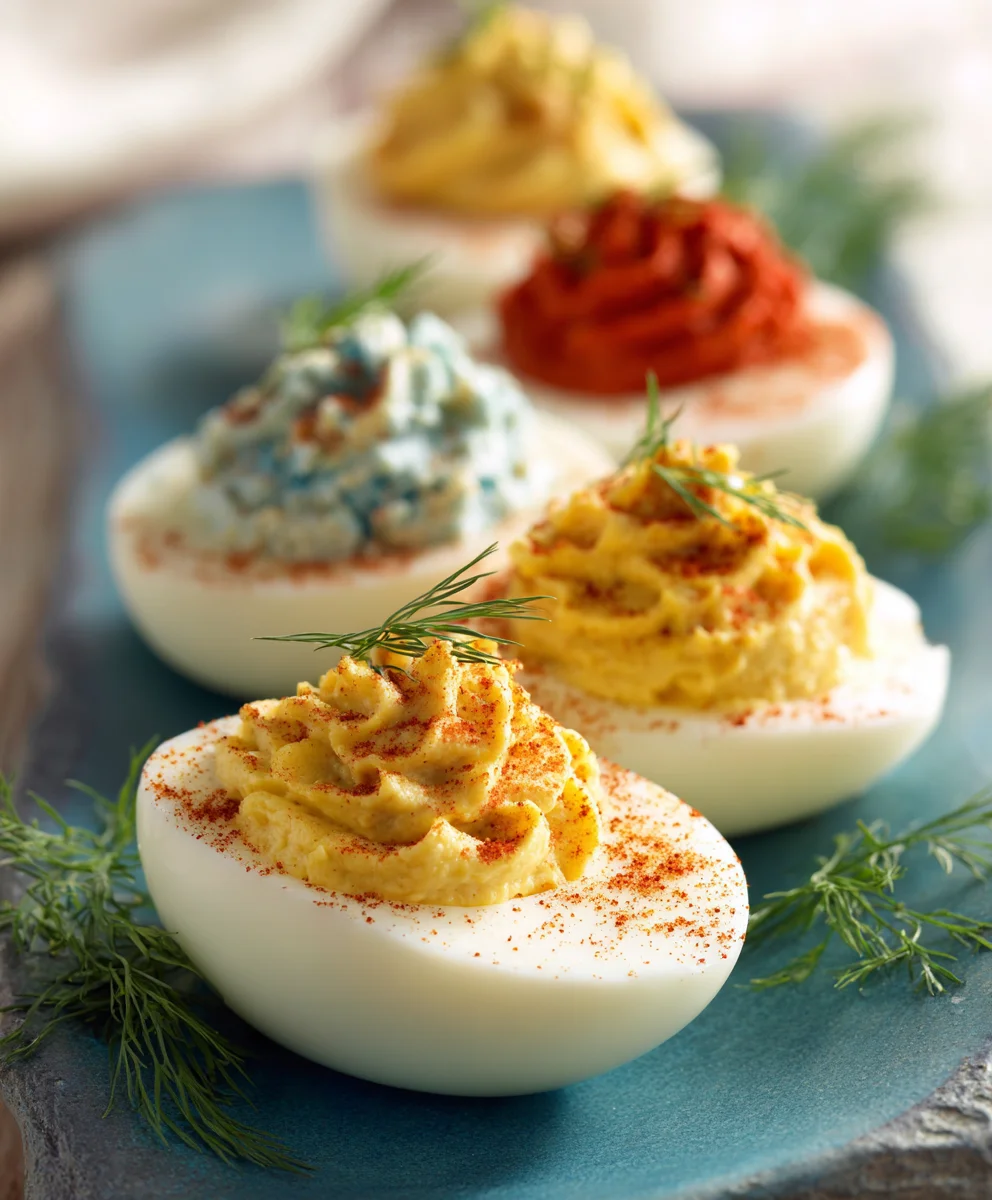
- Garnish Beautifully: Once all your Colored Deviled Eggs are filled, it’s time for the finishing touch. Lightly sprinkle each deviled egg with a pinch of paprika. For an extra flourish, you can also add a tiny sprig of fresh dill, finely chopped chives, or even a delicate slice of radishes if you want to be extra fancy. The garnish not only adds visual appeal but can also contribute a subtle fresh flavor.
- Chill Before Serving: While these are tempting to eat immediately, Colored Deviled Eggs taste best when they’ve had a chance to chill. Arrange them on your serving platter, cover loosely with plastic wrap, and refrigerate for at least 30 minutes to allow the flavors to meld and the filling to firm up slightly. They can be stored in the refrigerator for up to 2 days, making them a fantastic make-ahead appetizer for parties and gatherings.
Tips for Success and Creative Variations:
To truly master the art of making Colored Deviled Eggs and impress your guests, consider these additional tips and variations:
- Color Intensity Control: Experiment with soaking times. For ombre effects, you can partially submerge eggs, or remove them at different intervals. Remember that the color will look more vivid when wet and slightly less intense once dried.
- Natural Dyes: For a more natural approach, consider using ingredients like beet juice (for pink/red), turmeric (for yellow), red cabbage water with a bit of vinegar (for blue/purple), or spinach water (for green). These typically require longer soaking times and may yield more subdued colors, but are a great alternative.
- Flavor Enhancements:
- Spicy Kick: Add a dash of hot sauce (like Tabasco or Sriracha) to the filling.
- Herbal Freshness: Finely chop fresh herbs like chives, parsley, dill, or tarragon and mix them directly into the filling.
- Smoky Flavor: A pinch of smoked paprika or even a little liquid smoke can elevate the flavor.
- Umami Boost: A tiny bit of anchovy paste (seriously, it’s a secret ingredient!), Worcestershire sauce, or even some finely grated Parmesan cheese can add depth.
- Crispy Texture: Mix in finely crumbled cooked bacon bits, or a small amount of finely chopped celery or bell pepper for a bit of crunch.
- Curried Deviled Eggs: Add 1/2 to 1 teaspoon of curry powder to the yolk mixture for an exotic twist.
- Storage: Always store deviled eggs in a single layer on a platter, covered loosely with plastic wrap or in an airtight container in the refrigerator. Consume within 2-3 days for optimal freshness and safety.
- Transportation: If you’re taking your Colored Deviled Eggs to a potluck, invest in a deviled egg carrier. These specialized containers keep the eggs from sliding around and protect their delicate appearance. Alternatively, transport the filling and egg whites separately and assemble them at your destination.
- Making Ahead: You can boil and peel the eggs up to 3 days in advance, keeping them in the refrigerator. You can also make the filling a day ahead and store it in an airtight container or piping bag in the fridge. Assemble just before serving for the freshest look.
These beautiful Colored Deviled Eggs are not just a treat for the taste buds, but a feast for the eyes, perfect for any holiday, party, or brunch. Enjoy the process of creating these colorful culinary delights!
Conclusion:
If there’s one recipe I urge you to try this season, it’s these incredible Colored Deviled Eggs. They are more than just a dish; they’re a statement, a burst of joy on any platter, and an absolute treat for the taste buds. We’ve journeyed through the simple steps of transforming ordinary hard-boiled eggs into vibrant, edible jewels, and I promise you, the effort is minimal but the reward is immense. Imagine the gasps of delight when your guests first lay eyes on a platter adorned with these rainbow-hued beauties! It’s not just about the striking visual appeal, though that certainly plays a huge part; it’s about the perfect balance of creamy, savory, and slightly tangy flavor that makes deviled eggs a timeless classic. My recipe ensures that classic deliciousness is perfectly preserved, simply elevated with a fun and festive twist that makes them truly unforgettable.
I genuinely believe these aren’t just for special occasions. While they undoubtedly shine at holiday gatherings, birthday parties, or baby showers, why not make a batch just because? A casual backyard barbecue, a picnic in the park, or even a simple Sunday brunch can be instantly brightened by their presence. They are the ultimate crowd-pleaser, appealing to both children and adults alike, and consistently disappear faster than any other appetizer on the table. The magic truly happens when you present them, because everyone expects the traditional, but then they see the vibrant hues, and curiosity turns into pure enjoyment. They are a fantastic conversation starter, and trust me, you’ll be sharing this recipe often!
Serving Suggestions and Creative Variations:
Once you’ve mastered the basic technique for these stunning deviled eggs, the world of customization opens up beautifully. For serving, I always recommend arranging them artfully on a large white platter to really let their colors pop. A sprinkle of fresh chopped chives or dill adds a lovely green contrast and a hint of freshness. For a touch of classic elegance, a light dusting of smoked paprika not only enhances the color but adds a subtle smoky depth. Crispy bacon bits or finely crumbled prosciutto can elevate them to a decadent level, adding a wonderful textural crunch that complements the creamy filling perfectly. Don’t be afraid to get creative with your garnishes!
But why stop there? The beauty of deviled eggs lies in their versatility. Think of the creamy yolk filling as a blank canvas. For a spicy kick, a dash of Sriracha or finely minced jalapeños can be mixed into the filling. For a more sophisticated flavor profile, a pinch of curry powder, a hint of truffle oil, or even some finely chopped capers can introduce exciting new dimensions. You could even create themed platters: imagine a batch of green eggs for St. Patrick’s Day with a hint of pesto in the filling, or vibrant red and green ones for Christmas, perhaps with a touch of roasted red pepper purée in the red ones. Consider using natural dyes for a healthier alternative, too! Beet juice creates a stunning fuchsia, turmeric offers a sunny yellow, and a tiny amount of spirulina can produce a soft blue or green. The possibilities are truly endless, making each batch of Colored Deviled Eggs a unique culinary adventure.
Your Turn to Shine!
Now that you’re armed with all the tips and tricks, it’s your turn to bring these show-stopping deviled eggs to life. I promise you, the process is far simpler than the impressive results suggest. Gather your ingredients, get ready to have some fun with food coloring, and prepare to delight everyone who tastes them. Don’t be shy about experimenting with the colors or the filling; make them truly your own! I absolutely adore seeing your creations, so please, if you make these, share your photos and experiences online. Tag me on social media, leave a comment below, or send me an email. I’m always thrilled to see how you interpret my recipes and to hear about the joy they bring to your table. Happy cooking, and get ready to impress with the most vibrant deviled eggs you’ve ever made!
FAQs (People Also Ask):
How do you dye deviled eggs?
Dyeing deviled eggs is surprisingly simple and requires minimal effort for maximum impact! After you’ve hard-boiled and peeled your eggs, you’ll slice them in half lengthwise and carefully scoop out the yolks. Then, you’ll prepare several small bowls of water (or white vinegar, which helps set the color) with a few drops of food coloring in each. Place the hollowed-out egg white halves into these colored liquid baths, typically for 5-15 minutes, depending on the desired intensity. The longer they soak, the more vibrant the color will be. Once dyed, remove them, pat them dry with a paper towel, and proceed with filling them with your delicious yolk mixture.
What food coloring is best for deviled eggs?
For the most vibrant and consistent results, I highly recommend using gel food coloring. Gel colors are concentrated, so a little goes a long way, and they produce much richer hues than liquid food colorings without diluting your dye bath too much. Brands like Wilton or AmeriColor are excellent choices. While liquid food coloring can also work, you might need to use more drops to achieve the desired intensity, and the colors might appear slightly less saturated. For a natural approach, you can also use natural dyes like beet juice for red/pink, turmeric for yellow, or spinach juice for green.
How long do colored deviled eggs last?
Just like their traditional counterparts, Colored Deviled Eggs should be stored in an airtight container in the refrigerator and are best enjoyed within 2-3 days. The vibrant colors will typically hold well during this time. For optimal freshness and safety, avoid leaving them out at room temperature for more than 2 hours, especially if they contain mayonnaise or other perishable ingredients. If you’re preparing them for a party, I suggest making them no more than 24 hours in advance to ensure they are at their peak flavor and presentation.
Can you make deviled eggs the day before?
Absolutely, making deviled eggs the day before is a fantastic time-saver for entertaining! To keep them fresh and prevent the egg whites from drying out, I recommend storing the dyed egg whites and the prepared yolk filling separately. Keep the egg whites covered tightly in the refrigerator, and store the yolk filling in an airtight container or a piping bag (without the tip attached yet). On the day of serving, simply pipe the filling into the egg whites, garnish, and arrange them on your platter. This method helps maintain the best texture and prevents the whites from absorbing too much moisture from the filling.
Why do my deviled eggs get watery?
Watery deviled eggs can be a bit disappointing, but it’s a common issue with a few potential culprits. The main reason is often residual moisture. Ensure your hard-boiled eggs are thoroughly cooled and completely dry before you start processing them. When mixing the yolk filling, be mindful of the amount of mayonnaise or other wet ingredients you add; too much can make the filling loose. Using fresh, high-quality ingredients also helps. If your filling still seems a bit too loose, a small amount of cream cheese or a little extra dry seasoning (like garlic powder) can help thicken it without compromising flavor. Also, make sure your utensils and mixing bowls are completely dry to avoid introducing additional moisture.
Vibrant Colored Deviled Eggs: Easy Party Appetizer
Colored Deviled Eggs are a delightful culinary surprise that consistently brightens any gathering. This playful, modern twist transforms the humble deviled egg into an eye-catching centerpiece, perfect for festive occasions like Easter brunches, baby showers, or any fun get-together. Easy to prepare in advance and guaranteed to be a crowd-pleaser.
Ingredients
-
12 large eggs
-
1/2 cup mayonnaise
-
2 tablespoons Dijon mustard
-
1 tablespoon white vinegar or apple cider vinegar
-
1/2 teaspoon salt
-
1/4 teaspoon black pepper
-
Pinch of paprika (smoked or regular), for garnish
-
Gel food coloring (various colors)
-
Optional garnishes: fresh chives, dill, cayenne pepper, crispy beef bacon, capers
Instructions
-
Step 1
Place eggs in a large saucepan and cover with at least one inch of cold water. Bring to a rapid boil, then immediately remove from heat, cover, and let sit for 10-12 minutes. Prepare an ice bath. Transfer hot eggs to the ice bath and cool for 10-15 minutes. Gently peel eggs under cool running water, then rinse and pat dry. -
Step 2
Carefully slice each peeled hard-boiled egg in half lengthwise. Scoop out the yolks into a medium mixing bowl, taking care not to damage the egg white halves. Place the empty egg white halves aside. -
Step 3
For each desired color, prepare a separate small bowl with 1/2 to 1 cup of cold water. Add 3-5 drops of your chosen gel food coloring and 1 teaspoon of white vinegar to each bowl; stir well. Submerge egg white halves in the coloring baths, ensuring they are fully covered. Soak for 10-15 minutes for pastel colors or 30-60 minutes (or longer in the refrigerator) for vibrant, deeper hues. Remove egg whites with a slotted spoon and place cut-side down on a wire rack to air dry for 15-20 minutes. -
Step 4
Mash the reserved egg yolks thoroughly until completely smooth. Add the mayonnaise, Dijon mustard, white vinegar, salt, and black pepper. Mix vigorously until the filling is perfectly smooth, creamy, and well combined. Taste and adjust seasonings to your personal preference. -
Step 5
Spoon the creamy yolk filling into a piping bag fitted with a star or round tip (or use a Ziploc bag with a snipped corner). Pipe a generous mound of filling into the center of each hollowed-out, colored egg white half. Lightly sprinkle each deviled egg with paprika for garnish. For an extra touch, add optional garnishes like fresh dill, finely chopped chives, or crispy beef bacon, if desired. -
Step 6
Arrange the filled Colored Deviled Eggs on a serving platter. Cover loosely with plastic wrap and refrigerate for at least 30 minutes to allow the flavors to meld and the filling to firm up slightly. Serve chilled. These can be stored in the refrigerator for up to 2 days.
Important Information
Nutrition Facts (Per Serving)
It is important to consider this information as approximate and not to use it as definitive health advice.
Allergy Information
Please check ingredients for potential allergens and consult a health professional if in doubt.
Leave a Comment