
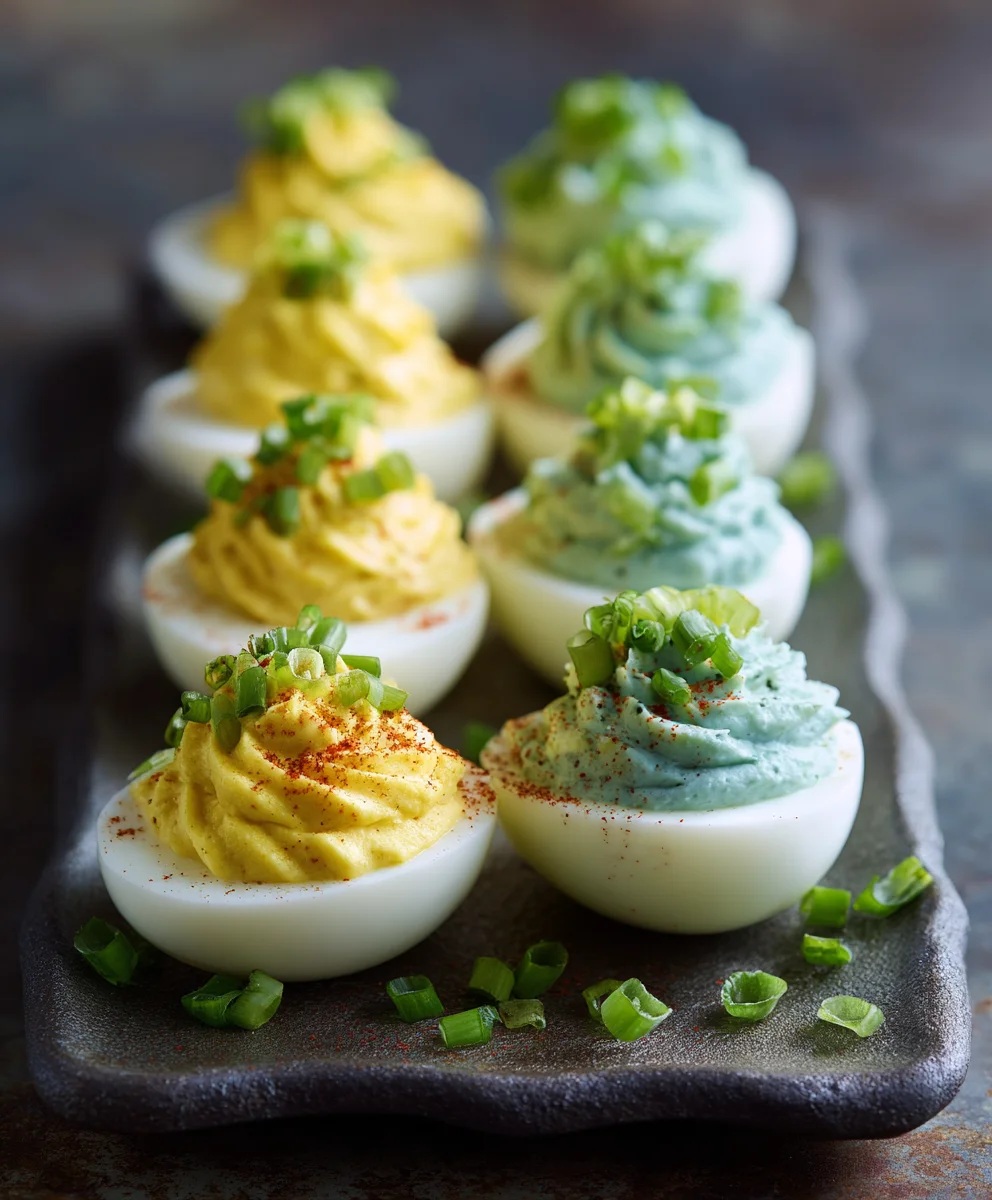
Colored Deviled Eggs are more than just a delightful appetizer; they are a joyful surprise waiting to adorn your next gathering! Imagine the gasps of delight when your guests discover a vibrant spectrum of creamy, savory bites, a refreshing departure from the traditional pale yellow. This dazzling twist transforms a timeless classic into an unforgettable visual and culinary experience, instantly elevating your spread from ordinary to extraordinary.
While the humble deviled egg boasts a rich history, gracing tables since ancient Roman times and becoming a staple at American potlucks and holiday celebrations, our modern interpretation injects a playful splash of color. I personally find immense joy in crafting these eye-catching treats, knowing they will bring smiles and curiosity. People absolutely adore this dish not only for its perfectly balanced flavor—the creamy, tangy yolk filling nestled in a firm, tender egg white—but also for its incredible convenience. They are a fantastic make-ahead option, ensuring you can enjoy your event without last-minute fuss. But with these Colored Deviled Eggs, the primary draw is undoubtedly their stunning presentation. They offer all the beloved qualities of the original, enhanced with a burst of captivating hues, making them a perfect conversation starter and a feast for both the eyes and the palate.
Ingredients:
- 12 large eggs, preferably a week or two old (fresher eggs are harder to peel)
- ½ cup mayonnaise (full-fat recommended for creaminess)
- 1 tablespoon Dijon mustard
- 1 teaspoon white vinegar or pickle juice (adds a tangy kick)
- ¼ teaspoon salt, or to taste
- ⅛ teaspoon black pepper, freshly ground, or to taste
- Pinch of paprika, for garnish (sweet or smoked, your preference)
- Fresh chives or dill, finely chopped, for garnish (optional)
- Assorted gel food colorings (red, blue, green, yellow, purple – or any colors you desire)
- Small bowls or ramekins (one for each color you plan to use)
- White vinegar (about 1 tablespoon per bowl for the coloring solution)
Preparing the Hard-Boiled Eggs: The Foundation of Perfect Colored Deviled Eggs
The journey to creating truly show-stopping Colored Deviled Eggs begins with perfectly cooked and easily peelable hard-boiled eggs. This step is crucial, as poorly cooked or difficult-to-peel eggs can lead to an uneven canvas for our vibrant colors.
-
Boiling the Eggs (Stovetop Method):
Gently place your eggs in a single layer at the bottom of a large saucepan. I prefer using a saucepan that’s just large enough to hold them without too much extra space, which helps prevent them from rolling around too much and cracking. Cover the eggs with cold water by about one inch. Add a pinch of salt to the water; some people believe this helps prevent cracking and makes peeling easier, though its effectiveness is debated. Bring the water to a rolling boil over high heat. As soon as the water reaches a full, vigorous boil, immediately remove the pan from the heat and cover it tightly with a lid. Let the eggs sit in the hot water for exactly 10-12 minutes for large eggs. For extra-large eggs, you might need an additional minute. For medium eggs, 9-10 minutes is usually perfect. The precise timing is key to getting a firm, fully cooked yolk without any greenish-gray ring around it, which is an indicator of overcooking.
-
Boiling the Eggs (Instant Pot Method – My Personal Favorite for Easy Peeling):
If you own an Instant Pot, this method is a game-changer for consistently easy-to-peel eggs. Place a trivet in the bottom of your Instant Pot and add 1 cup of cold water. Carefully place your eggs on the trivet in a single layer. Secure the lid and make sure the venting knob is sealed. Cook on High Pressure for 5 minutes. Once the cooking time is complete, allow a natural pressure release for 5 minutes, then carefully switch the vent to “Venting” to quick release any remaining pressure. This 5-5-5 method (5 min cook, 5 min natural release, 5 min ice bath) yields consistently perfect, easy-to-peel eggs every single time, making your preparation for Colored Deviled Eggs much smoother.
-
The Essential Ice Bath:
Immediately after the cooking time (whether stovetop or Instant Pot), carefully transfer the hot eggs to a large bowl filled with ice water. This ice bath serves two critical purposes: it immediately stops the cooking process, preventing that undesirable greenish ring around the yolk, and it causes the egg whites to contract, making them much easier to peel. Allow the eggs to cool in the ice bath for at least 10-15 minutes, or until they are completely cool to the touch. This step is non-negotiable for beautiful results.
-
Peeling with Precision: Tips for Flawless Whites:
Once cooled, it’s time for the sometimes-dreaded peeling. But with properly cooked and cooled eggs, it should be a breeze! I like to crack each egg all over its surface by gently tapping it against a hard surface – your counter or a cutting board works well – then roll it gently between your palms. This helps to loosen the shell. Start peeling from the larger end of the egg, where the air pocket usually is. If you’re having trouble, try peeling them under cold running water; the water can help separate the shell from the egg white. Take your time and be gentle to avoid tearing the beautiful white, as these pristine whites will be the canvas for our vibrant colors. Any nicks or tears will show up more prominently once dyed. Repeat with all 12 eggs. I always aim for smooth, unblemished whites because they absorb the dye more evenly and look so much more appealing when transformed into Colored Deviled Eggs.
-
Halving and Yolk Removal:
Once all your eggs are perfectly peeled, carefully slice each egg in half lengthwise using a sharp, thin-bladed knife. Wipe your knife blade between each cut to ensure a clean, smooth cut. Gently scoop out the bright yellow yolks into a medium-sized mixing bowl. I find a small spoon works best for this. Place the hollowed-out egg white halves on a wire rack set over a baking sheet, or directly onto paper towels. This will allow any excess moisture to drain, which is important for even dye absorption and prevents watery deviled eggs. You want the whites to be as dry as possible before the next step.
Creating the Vibrant Colors: The Magic Behind Your Colored Deviled Eggs
This is where the fun truly begins! Transforming plain egg whites into a rainbow of colors is what makes these Colored Deviled Eggs so unique and exciting. Don’t be afraid to experiment with different shades and combinations.
-
Preparing the Dye Solutions:
Gather your small bowls or ramekins. For each color you wish to create, pour about ½ cup of cold water into a bowl. Add 1 tablespoon of white vinegar to each bowl of water. The vinegar is crucial here as it acts as a mordant, helping the food coloring adhere to the egg white and creating a more intense, long-lasting color. Now, add several drops of your chosen gel food coloring to each bowl. Gel food colorings are preferred over liquid ones as they are much more concentrated and produce richer, more vibrant hues. Start with 5-10 drops, stir well, and assess the color intensity. Remember, the color of the solution will be slightly darker than the final color of your egg whites. If you want super vibrant, almost neon colors, don’t be shy with the coloring! I usually aim for a fairly dark solution to ensure a good saturation.
Expert Tip for Custom Colors:
Don’t limit yourself to single colors! You can mix food colorings to create unique shades. For example, a few drops of blue with a tiny bit of red can yield a lovely lavender, or yellow and blue for a brilliant green. This opens up endless possibilities for your Colored Deviled Eggs.
-
Immersing the Egg Whites:
Carefully place the hollowed egg white halves, cut-side up or down (it doesn’t make much difference, but some prefer cut-side down to protect the interior from absorbing too much dye if you want a slight ombré effect), into the prepared dye solutions. Make sure they are fully submerged. You might need to gently press them down with the back of a spoon to ensure they stay underwater. Distribute your egg whites amongst the different color bowls, ensuring each color has an equal number if you want a balanced display. For instance, if you have 12 egg halves (from 6 eggs), you could do 3 colors with 4 halves each, or 4 colors with 3 halves each. The goal is to get even coverage on all sides of the egg white.
-
Achieving Different Color Intensities:
The amount of time the egg whites spend in the dye solution will determine the intensity of their color. For pastel shades, you might only need 10-15 minutes. For bright, vivid colors, I recommend letting them soak for at least 30 minutes to an hour. For truly deep, rich colors, especially for darker shades like deep blue or purple, you can even let them sit for several hours, or even overnight in the refrigerator. I often do a quick check after 15-20 minutes by carefully lifting one out with a spoon to see if the color is developing to my liking. Remember that the color will appear slightly lighter once the egg white is removed from the liquid and dries. This step is the artistic heart of making Colored Deviled Eggs, so have fun with it!
-
Rinsing and Drying:
Once your egg whites have reached your desired color intensity, carefully remove them from the dye solutions using a slotted spoon. Gently rinse each colored egg white under cold running water for a few seconds to remove any excess food coloring from the surface. This prevents the color from transferring to other egg whites or to your hands during assembly. Immediately after rinsing, place the colored egg whites, hollow-side up, back on the wire rack set over a baking sheet lined with paper towels, or directly on several layers of paper towels. Allow them to air dry completely, which usually takes about 15-30 minutes. You want them to be as dry as possible, both inside and out, before adding the filling. This ensures the filling doesn’t become watery and the vibrant colors remain pristine.
Crafting the Creamy Filling: The Heart of Delicious Deviled Eggs
While the vibrant colors of our Colored Deviled Eggs are what first catch the eye, the filling is what keeps people coming back for more. A perfectly creamy, well-seasoned filling is paramount.
-
Mashing the Yolks to Perfection:
Return to your bowl of cooked egg yolks. Using a fork, thoroughly mash the yolks until they are completely smooth and free of any large lumps. I like to press them against the side of the bowl to break them down finely. The smoother the yolks are at this stage, the creamier your final filling will be. This attention to detail ensures a luxurious texture that contrasts beautifully with the firm egg white.
-
Adding the Mayonnaise and Mustard:
Now, add the mayonnaise and Dijon mustard to the mashed yolks. I always recommend using a good quality, full-fat mayonnaise for the best flavor and creamiest texture. The Dijon mustard adds a wonderful tang and a subtle, sophisticated kick without being overpowering. These two ingredients are the backbone of a classic deviled egg filling, binding everything together into a luscious mixture. Don’t be tempted to skimp on them; they are essential for that signature creaminess.
-
Incorporating Other Seasonings and Flavor Boosters:
Next, pour in the white vinegar or pickle juice. I personally love pickle juice for the extra layer of briny, dilly flavor it imparts, but plain white vinegar works just as well to provide that necessary acidic brightness that cuts through the richness of the yolks and mayo. Add the salt and freshly ground black pepper. Remember, seasonings are to taste, so start with the recommended amounts and adjust later if needed. Some people like a dash of hot sauce for a little heat, or a tiny pinch of garlic powder for a savory depth. Feel free to customize this part to your personal preference; it’s your chance to make these Colored Deviled Eggs uniquely yours.
-
Achieving the Perfect Consistency:
Using your fork, or a spatula, thoroughly mix all the ingredients together until everything is well combined and the filling is completely smooth and creamy. You’re aiming for a consistency that is easy to pipe but firm enough to hold its shape. If the mixture seems a little too thick, add a tiny bit more mayonnaise or a teaspoon of milk or cream, a quarter teaspoon at a time, until you reach your desired consistency. If it’s too thin, which is less common, you can sometimes thicken it by adding a small amount of finely grated hard cheese like Parmesan, though it will alter the flavor slightly. The goal is a uniform, spreadable (or pipeable!) texture that will elegantly fill our vibrant egg white shells.
-
Taste Testing and Adjusting:
This is arguably the most important step for any recipe. Take a small spoonful of the filling and taste it. Does it need more salt? A little more pepper? Perhaps another dash of vinegar for brightness? Or maybe a touch more mustard for zing? Adjust the seasonings as needed until the filling tastes absolutely perfect to you. Remember that flavors can mellow slightly once chilled, so it’s okay for it to taste quite robust at this stage. A well-seasoned filling is what truly elevates these already beautiful Colored Deviled Eggs from good to unforgettable.
Assembling and Garnishing Your Eye-Catching Colored Deviled Eggs
Now for the grand finale! Assembling and garnishing your Colored Deviled Eggs is where their full visual appeal comes to life, turning a simple appetizer into a dazzling centerpiece.
-
Filling the Egg Whites:
Transfer the creamy yolk filling into a piping bag fitted with a star tip (or any decorative tip you prefer). If you don’t have a piping bag, a large resealable plastic bag with one corner snipped off will work just fine, though the presentation won’t be as fancy. Hold the piping bag perpendicular to the egg white and pipe the filling into each colored egg white half, creating a beautiful swirl or mound. Start from the outside edge and work your way inward, or create a simple, elegant swirl. I find that a star tip makes them look incredibly professional and adds a lovely texture. Fill each egg white until it has a generous, attractive mound of filling. Be careful not to overfill, as you want them to be easy to pick up and eat.
-
Piping Techniques for a Professional Touch:
For uniform and attractive mounds, apply steady, even pressure to the piping bag. If using a star tip, start in the center of the egg white and pipe a small mound, then spiral outwards, or start at the edge and spiral inwards. Practice on a plate first if you’re new to piping. The contrast between the perfectly piped, creamy yellow filling and the vibrant, colored egg white is what makes these Colored Deviled Eggs so visually stunning. If you’re not using a piping bag, simply use two small spoons to scoop and artfully arrange the filling into each egg half. While not as decorative, it’s still perfectly delicious!
-
Garnish Options for Added Flair:
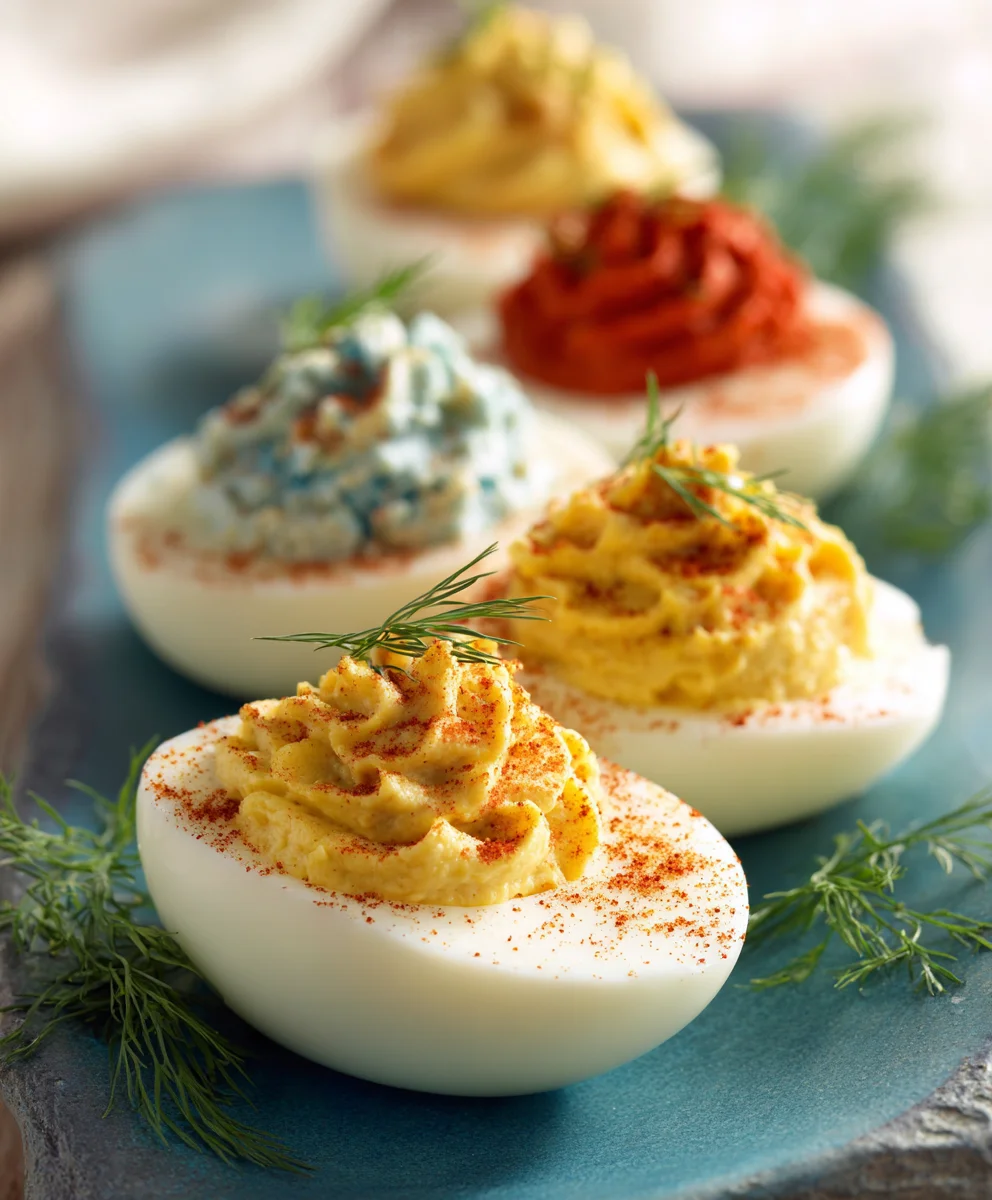
Once all your colored egg whites are filled, it’s time for the finishing touches. Sprinkle a small pinch of paprika over each deviled egg for a classic touch. Sweet paprika adds a mild flavor and a pop of red, while smoked paprika offers a deeper, more savory, smoky note. For a fresh, herbaceous element, sprinkle finely chopped chives or dill over the top. Other creative garnishes include a tiny sprig of fresh parsley, a small caper, a sliver of pickled jalapeño for a kick, or even a few tiny pieces of crispy bacon or prosciutto for a savory crunch. The garnish not only adds flavor but also enhances the visual appeal, making your Colored Deviled Eggs even more inviting.
-
Chilling and Serving:
Arrange your finished Colored Deviled Eggs on a serving platter. For the best flavor and texture, cover the platter loosely with plastic wrap and refrigerate the deviled eggs for at least 30 minutes, or up to 2-3 hours, before serving. This allows the flavors to meld and the filling to firm up slightly. They are best served chilled. These vibrant, delicious deviled eggs are always a huge hit at parties, potlucks, and family gatherings, not just for their stunning appearance but also for their perfectly balanced taste. They are a delightful twist on a beloved classic!
Conclusion:
Well, friends, we’ve journeyed through the simple yet utterly delightful process of creating something truly spectacular. If you’ve followed along, you’re now armed with the know-how to transform a humble appetizer into a show-stopping masterpiece. This isn’t just about making deviled eggs; it’s about infusing joy, creativity, and a burst of color into your culinary repertoire. I promise you, once you try this recipe, you’ll understand why it quickly becomes a beloved staple for every gathering.
Why is this recipe an absolute must-try? Beyond the incredibly creamy, tangy, and utterly addictive filling, the magic truly lies in the visual impact. The vibrant hues of our Colored Deviled Eggs elevate them from a simple snack to an edible work of art. Imagine the delighted gasps when your guests first lay eyes on a platter adorned with eggs in shades of ruby red, sunny yellow, emerald green, and deep purple. It’s an instant conversation starter, a testament to your creativity, and frankly, just plain fun! They’re perfect for themed parties, holiday celebrations, or even just a vibrant addition to your family brunch. This recipe ensures every bite is not only a flavor explosion but also a feast for the eyes, proving that sometimes, you absolutely can play with your food – and the results are utterly delicious and beautiful.
The beauty of this recipe also lies in its deceptive simplicity. While they look incredibly impressive, the actual steps are straightforward and forgiving, making them accessible to even novice cooks. You don’t need fancy equipment or advanced techniques to achieve these stunning results. Just a few natural food colorings, a bit of patience, and a desire to make something extraordinary out of ordinary ingredients. I truly believe that food should be an experience, and these deviled eggs deliver on that promise every single time. They bridge the gap between gourmet presentation and home-style comfort, making everyone feel special.
Now, let’s talk about how to serve these beauties! While they’re undeniably fantastic on their own as a standalone appetizer, don’t limit your imagination. For a festive brunch, arrange them on a large platter alongside fresh fruit, mini quiches, and a vibrant salad. Hosting a summer BBQ? They’re the perfect cool, refreshing bite that perfectly complements grilled meats and fresh veggies. Think about pairing the colors – a platter of red and green deviled eggs for Christmas, or pastel shades for Easter and baby showers. They also make an unexpected, yet incredibly welcome, addition to a charcuterie board, offering a creamy, tangy contrast to cured meats and cheeses. Don’t forget about potlucks! These eggs are always the first to disappear, and everyone will be asking for your secret.
Consider garnishing them creatively too! A sprinkle of smoked paprika adds a warm, earthy note and a pop of contrasting color. Fresh dill or chives offer a bright, herbaceous finish. For a touch of elegance, a tiny sprig of parsley or a few capers can truly elevate their appearance. You could even get adventurous with a sprinkle of everything bagel seasoning for a savory crunch. The possibilities are truly endless, allowing you to tailor them to any occasion or personal preference.
Feeling inspired to experiment? That’s the spirit! This recipe is a fantastic canvas for your culinary creativity. While our base filling is classic and delicious, you can easily introduce new flavor profiles. Imagine a spicy version with a dash of sriracha or a pinch of cayenne pepper in the filling. Or perhaps a smoky twist with a bit of chipotle powder. For a gourmet touch, fold in some finely chopped cooked bacon or crispy prosciutto. A touch of dijon mustard can amp up the tang, while a whisper of curry powder can transport your taste buds to a different continent. If you’re a fan of herbs, finely chop some fresh tarragon, chives, or parsley and mix them into the yolk mixture for a refreshing burst of flavor. You could even play with different vinegars for coloring – pickling eggs in beet juice gives a natural red, for instance, adding an extra layer of flavor complexity. Don’t be afraid to make these truly your own; that’s where the real fun of cooking lies!
So, what are you waiting for? I wholeheartedly encourage you to dive into your kitchen, gather your ingredients, and whip up a batch of these extraordinary deviled eggs. Trust me, the joy of seeing your creation come to life, and the even greater joy of watching friends and family devour them, is incredibly rewarding. Once you’ve made them, I would absolutely love to hear about your experience! Did you stick to the classic colors, or did you venture into new vibrant territory? What variations did you try? Please, share your photos and tell me all about your colorful deviled egg adventures in the comments below. Your feedback and creative twists inspire me and the entire community. Let’s make every gathering a little brighter, one beautifully colored deviled egg at a time!
People Also Ask:
How do I prevent my egg whites from tearing when cutting them?
To minimize tearing, ensure your hard-boiled eggs are completely cooled before peeling. Use a very sharp, thin knife and slice them gently in half lengthwise. You can also dip your knife in water between each cut to help prevent the yolk from sticking.
Can I make colored deviled eggs ahead of time?
Absolutely! You can prepare the colored egg whites and the yolk filling separately up to 2 days in advance. Store the egg white halves in an airtight container in the refrigerator, and the yolk filling in a piping bag (without a tip) or an airtight container. Assemble them no more than 2-4 hours before serving to maintain freshness and prevent the whites from drying out or the filling from getting soggy.
What are some natural ways to color deviled eggs without artificial food dyes?
There are many wonderful natural options! For pink/red, use beet juice (fresh or from canned beets). For yellow, turmeric or saffron steeped in water. For green, spinach juice or a blend of parsley/cilantro juice (though this can affect flavor slightly). For blue/purple, red cabbage water (boiled and strained, then a tiny bit of baking soda added for blue, or just the liquid for purple). For orange, carrot juice or paprika infused water can work. Just immerse your peeled egg whites in the colored liquid for a few hours or overnight in the fridge until they reach your desired shade.
How long do deviled eggs last in the refrigerator?
For optimal freshness and safety, deviled eggs should be consumed within 2-3 days when stored properly in an airtight container in the refrigerator. However, they are always best enjoyed within 24 hours of preparation.
What makes deviled eggs so flavorful and creamy?
The key to flavorful and creamy deviled eggs lies in a balanced filling! Mayonnaise provides the creamy base, while mustard (Dijon or yellow) adds a tangy kick. Vinegar or lemon juice brightens the flavor, and a pinch of salt and pepper brings everything together. For extra creaminess, some recipes add a touch of softened cream cheese or sour cream. Don’t be shy about tasting and adjusting the seasoning to your preference!
Vibrant Colored Deviled Eggs
Colored Deviled Eggs are a joyful surprise to adorn your next gathering! This dazzling twist transforms a timeless classic into an unforgettable visual and culinary experience, instantly elevating your spread from ordinary to extraordinary with vibrant, creamy, savory bites. Perfect as a make-ahead party appetizer.
Ingredients
-
12 large eggs
-
½ cup full-fat mayonnaise
-
1 tbsp Dijon mustard
-
1 tsp white vinegar or pickle juice
-
¼ tsp salt
-
⅛ tsp black pepper
-
Pinch of paprika, for garnish
-
Fresh chives or dill, chopped, for garnish (optional)
-
Assorted gel food colorings
-
White vinegar (1 tbsp per dye bowl, for coloring solution)
Instructions
-
Step 1
Place eggs in a saucepan, cover with 1 inch cold water. Bring to a rolling boil, immediately remove from heat, cover, and let sit for 10-12 minutes. Alternatively (Instant Pot): Place eggs on a trivet with 1 cup water. Cook on High Pressure for 5 minutes, then allow 5 minutes natural pressure release. -
Step 2
Immediately transfer cooked eggs to a large bowl filled with ice water for 10-15 minutes. Once cooled, gently crack and peel eggs under cold running water for flawless whites. -
Step 3
Carefully slice each peeled egg in half lengthwise. Scoop out the yolks into a medium mixing bowl. Place the hollowed egg white halves on a wire rack or paper towels to dry completely. -
Step 4
For each desired color, combine ½ cup cold water and 1 tablespoon white vinegar in a small bowl. Add several drops of gel food coloring and stir well. Use more drops for more vibrant colors. -
Step 5
Carefully place the dried egg white halves into the prepared dye solutions, ensuring they are fully submerged. Soak for 10-15 minutes for pastel shades, 30-60 minutes for bright colors, or several hours (refrigerated) for deep, rich hues. -
Step 6
Once desired color is achieved, remove egg whites from dye solutions using a slotted spoon. Gently rinse each colored white under cold running water for a few seconds. Place them hollow-side up on a wire rack or paper towels to air dry completely (15-30 minutes). -
Step 7
Mash the cooked egg yolks until completely smooth. Add ½ cup full-fat mayonnaise and 1 tablespoon Dijon mustard to the mashed yolks. Mix well. -
Step 8
Stir in 1 teaspoon white vinegar or pickle juice, ¼ teaspoon salt, and ⅛ teaspoon freshly ground black pepper. Mix thoroughly until the filling is smooth and creamy. Taste and adjust seasonings as desired. -
Step 9
Transfer the creamy yolk filling into a piping bag fitted with a star tip (or a resealable plastic bag with a corner snipped off). Pipe the filling into each colored egg white half, creating an attractive swirl or mound. -
Step 10
Garnish each deviled egg with a small pinch of paprika and/or finely chopped fresh chives or dill. Arrange on a serving platter, cover loosely, and refrigerate for at least 30 minutes (or up to 2-3 hours) before serving to allow flavors to meld.
Important Information
Nutrition Facts (Per Serving)
It is important to consider this information as approximate and not to use it as definitive health advice.
Allergy Information
Please check ingredients for potential allergens and consult a health professional if in doubt.

Leave a Comment